Do you love the thought of crafting matching tees for the whole family to wear on Christmas Eve? Or do you want to give a special gift to an older relative who would appreciate a hand-printed tea towel or set of matching napkins? Either way, you probably wonder how to print on fabric at home.
The easiest way to print on fabric at home is to use freezer paper to transfer a design from a printer to the fabric. Other popular at-home techniques include using a Cricut, wood blocks carved by hand, and image transfer fluid. Common methods used for professional fabric printing include screen printing, sublimation printing, and DTG printing.
In this article, you will learn eight ways to print on fabric. You will find out what kind of printer and supplies you need. Finally, you will find tips to help you pick the best technique for you.
Can You Print on Fabric?
You can print on fabric using many different techniques, including printing directly onto the cloth, printing onto a transfer to apply to cloth, and using methods that don’t require ink, like heat transfer vinyl.
Printing directly onto fabric is difficult at home because most office printers need a bigger opening to slide fabric or a whole garment through. They fit a piece of paper, and that’s about it! That said, you can sometimes stiffen and iron small pieces of cloth and put them through a printer.
One common practice for home printers is to iron a paper-sized piece of fabric onto a sheet of freezer paper. This makes the cloth stiff and allows you to slot it through the printer. The limitation here is that you can only use a paper-shaped piece of fabric, not a shirt, hoodie, or tea towel.
The best printer for this is an inkjet printer. The toner will create a stiffened section on the fabric that does not feel very nice in a garment, though. The other option is to use a laser printer, but this option does not work well on cloth overall because the toner will scrape right back off the material instead of soaking into it.
Professional printers print directly onto shirts or entire bolts of fabric, but they use costly commercial printers called DTG or direct-to-garment printers for this method.
Most home crafters or small business owners get around this dilemma by using alternative methods of printing that do not apply ink directly to fabric. These include using heat transfer sheets, carving wood blocks, cutting out shapes with a Cricut, or using image transfer fluid.
How to Print on Fabric: 8 Methods
You can print on fabric using methods that do not require expensive tools or take up a lot of space, like using heat transfer sheets or freezer paper. You can also invest more and learn how to print on fabric using more professional techniques like screen printing, sublimation printing, or DTG printing.
How to Print on Fabric at Home
The easiest ways to print on fabric at home do not make a mess, cost a lot of money, or take up a lot of space. These methods include using freezer paper, an inkjet printer and transfer sheets, wood blocks, and transfer fluid.
1. Freezer Paper
 Printing designs onto cloth attached to freezer paper gives you a cheap and simple way to print images using a regular home printer. Freezer paper has a matte side and a smooth side and is not the same as wax paper. You can often find it in the same section of a grocery store as items like foil and plastic wrap.
This method works best on stiff cotton, like a lightweight canvas. You can only print on a piece of cloth as large as the largest size sheet of paper your printer can hold, usually 81/2 X 11 inches.
For this reason, the freezer paper method works best for fabric prints you want to frame and use as decoration or include in a decorative quilt. It does not work well for adding a design to a t-shirt.
- Iron the fabric or garment to make sure it lies completely smooth. If you have a wrinkle in the cloth, you will have a blank spot in your final design!
- Next, spread a piece of freezer paper shiny-side down on the fabric. Iron across it to seal the plastic-coated side to the cloth.
- Now put a piece of regular printer paper on top and trace around it, and then cut out the freezer paper and fabric sandwich along your traced lines to form a shape that can fit through the printer.
- Slot the rectangle of cloth and paper into your printer with the fabric facing up.
- Select full color and photo settings in your design program before hitting print.
- Print out your design directly onto the fabric.
2. Inkjet Printer
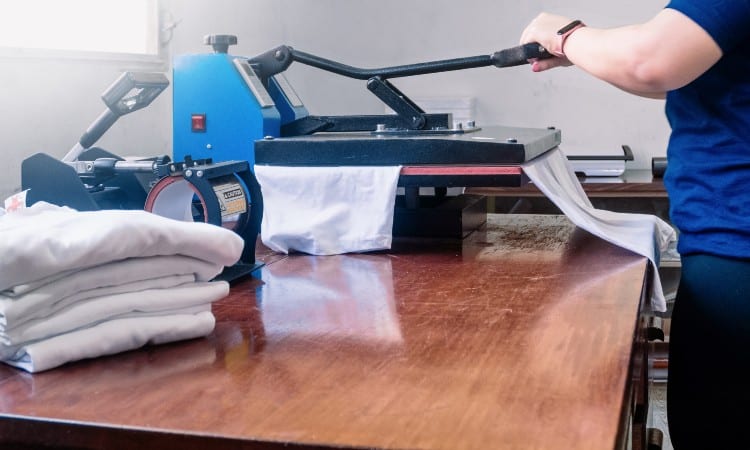
 One of the most popular methods of printing on fabric at home is to use an inkjet printer and transfer sheets. This allows you to print full-color designs onto a special transfer, which you can apply to any fabric garment, bag, or item using heat.
- First, edit or create your design using whatever graphic design program you like. You can also simply download free images online or use a full-color photo.
- Next, use the tool in your program to mirror the image. This means it will print out looking reversed, but this is important as you will attach the transfer face-down onto your fabric later.
- The transfer sheet should have markings telling you which side should face up as it goes into the printer. You want to print onto the matte, blank surface of the sheet.
- Print out the design.
- Use sharp scissors to cut around the outline of the shape.
- If you have a heat press, use that to smooth and flatten your fabric or garment. If you do not have one, use an iron.
- Carefully align the cut-out design where you want it to go on your garment.
- Use a heat press or iron on the transfer for as long as the transfer sheet package instructs. This can vary from one brand of transfer sheets to another, but the timing usually takes less than one minute.
- Let the material cool slightly, and then gently peel away the backing from the transfer. The thin mesh of the actual transfer and ink will remain attached to the fabric.
3. By Hand
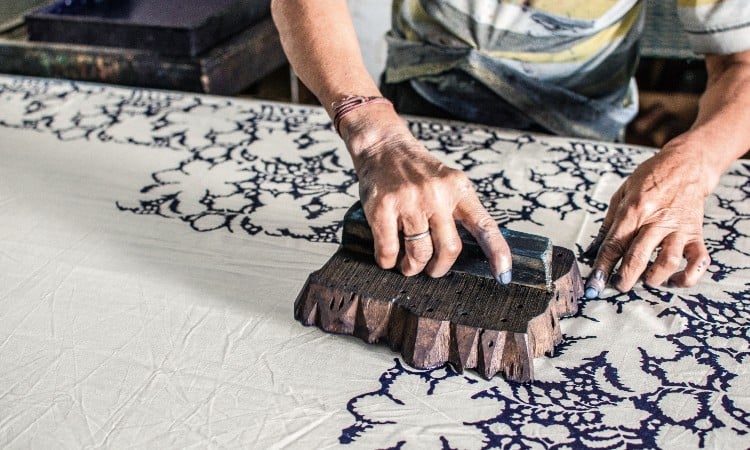
If you want to get old-school, you can print onto fabric using carved wood blocks you make by hand. This lets you use simple tools and affordable inks purchased from a craft store rather than more expensive printers and ink cartridges. The catch with this method is that you need a few carving tools: you can use a carving knife, but you will find that a Dremel works much more quickly and evenly.
- Find some squares of scrap wood. You can often get several handfuls cheaply at a home repair store from a scrap bin. The type of wood does not matter.
- Either freehand draw a design onto the surface of the wood or trace a pattern from a coloring book, wrapping paper, or anything you like.
- Use a Dremel to carefully carve out the design by digging its tip through each line or dot you drew onto the wood. For example, if you want to print a smiley face, Dremel around the outline of the circle, then lift the bit and Dremel two dots for the eyes and a curve for the smile.
- Lightly sand the surface of the wood block so that no splinters will snag on the fabric.
- Set up your garment or cloth on a flat surface, and place a sheet of soft craft foam beneath the fabric. This provides a soft surface for the cared block to press into as you work.
- Use a foam brush to paint the carved block with either fabric dyes or acrylic paint. Acrylic paint works great for decorative items, but for wearables, you may want to use the dye of your choice.
- Press the carved surface onto the fabric for several seconds, then lift it straight to avoid smearing the design.
- Let the paint dry completely before you move the fabric.
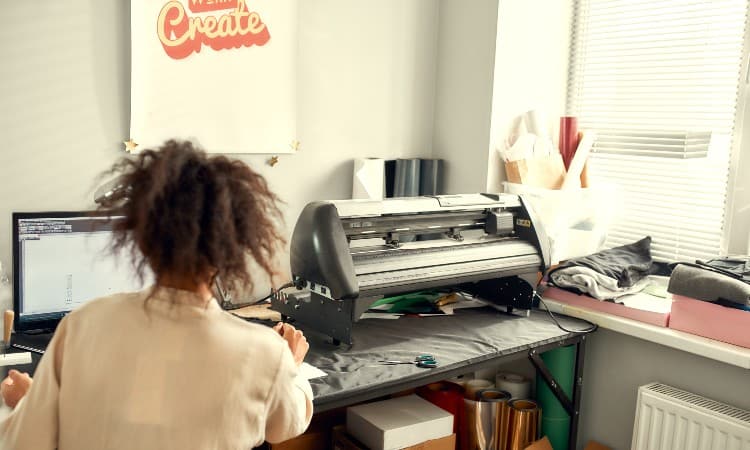
4. With Cricut
 Though not technically printing, another super popular way to “print” on fabric at home is to use a Cricut to cut out heat-transfer vinyl images. A Cricut or another electronic cutting machine can form complex, detailed shapes out of a thin sheet of vinyl. You then use heat to permanently adhere the HTV to the fabric of your choice.
This method works well for wearables like t-shirts because you can safely wash the HTV without ruining it. That said, it does work best with one or two-color designs.
- Your Cricut or another electronic cutting machine will typically come with access to a free design space online where you can either create, download, or edit the design you want to cut out. Prep your image here, and then click the “mirror” button to reverse the image.
- Place the sheet of HTV onto a light grip cutting mat. Make sure you place it with the shiner plastic-backing side facing down.
- Insert the HTV and the mat into the Cricut with the vinyl facing up and the paper backing facing down.
- Follow the instructions on the computer screen to tell the Cricut to begin printing. If you have a wireless or Bluetooth-enabled Circut, you can do everything from your phone!
- Once the machine finishes cutting out the design, you will need to use a knife or spatula tool to remove all the excess vinyl from around the design. Think of it as taking out the negative space of the image or lettering, leaving only the part you want to place onto the fabric.
- Iron or heat-press the surface of your fabric to make it smooth and unwrinkled.
- Transfer the HTV shapes to the fabric, placing the shiny side face up this time.
- Use your heat press or iron again to apply heat to the HTV shapes. The HTV packaging should tell you how much heat you need and how long to apply it. This will vary from one kind of HTV to another.
- Check the HTV instructions to find out if you should peel away the plastic backing while warm or let it cool entirely first. This can also vary from one type of HTV to another.
- Finally, once the fabric cools down, make sure you cannot peel away the HTV from the fabric! It should have a permanent hold. If it does peel up, you need to apply more heat.
5. Image Transfer Fluid
You can use special photo mediums to transfer a printed design from a piece of paper onto fabric following these simple steps.
You will need a photo transfer medium like the popular Mod Podge brand variety for this method.
- Print out your image onto regular printer paper, but make sure you mirror the image first.
- Cut out the design from the paper and set it aside.
- Set up your workplace with either a large plastic bin to work inside or a plastic tablecloth over your space to protect it.
- Use a small paintbrush to liberally coat the surface of your design with the photo medium.
- Place the design sticky-side down onto the fabric.
- Smooth over the back of the paper with either a rubber roller or a rolling pin.
- Let the paper sit on the fabric for four to five hours.
- Soak a clean sponge in water and wring it out, so it feels damp but not too wet.
- Press the damp sponge to the back of the paper for two minutes.
- Gently rub away the paper as it dissolves in the water.
- Check out the design left on the fabric!
How to Print on Fabric Professionally
If you want to start a business printing custom t-shirts, you will probably want to look into more professional ways to print on fabric, like screen printing or sublimation printing.
You can get set up to print on fabric at home using either screen printing or sublimation printing pretty easily, with a small up-front investment for equipment. But DTG printing remains the purview of serious professionals in most cases because it does require a printer that costs thousands of dollars.
6. Screen Printing

Screen printing is one of the oldest and still most popular ways to print on fabrics. This method creates a design on the cloth by pushing ink through a stenciled mesh screen.
- Start by creating your design in the software you like. Screen prints work best with one to three colors, as you have to apply the colors on separate screens.
- If you pick a design with more than one color, use a color-separating tool in your software to split the colors into two different layers.
- Print each layer onto a clear transparency sheet. These should print out in black ink, no matter what color you will make the image later on!
- Next, coat your mesh screen printing screen with a special emulsion. This will help create the stencil of the image.
- Apply the transparency on top of the emulsion.
- Set up the screen under exposure to bright light. The amount of time the exposure requires can vary, depending on the strength of the bulb in your light and other factors. But usually, it needs several hours.
- Rinse away the emulsion and remove the transparency. Your screen should now have a stencil that forms the negative space around your desired image.
- Let the screen dry fully. Again, this will take at least a few hours, if not overnight.
- Finally, set up the screen over the fabric. You can get screen print frames that make this easier or arrange the screen by hand.
- Pour a line of plastisol ink across the top of the screen, inside its frame.
- Use a squeegee to smoothly pull the ink down the length of the screen so it covers the whole mesh.
- Lift the screen and admire your image!
- If your design involves multiple colors, you will need to let the first layer of ink dry and then repeat the inking steps to add additional layers of color one screen at a time.
- Finally, once the ink dries, you need to set it in a heat press. This cures the ink and makes it remain permanent.
7. Sublimation
Sublimation printing lets you print on polyester fabric. This newer printing technique does require a special printer and sublimation dyes, but these cost only a few hundred dollars.
Sublimation is a physics term that means a solid going straight to a gaseous state without turning into a liquid first. This happens when you apply heat to the sublimation dyes, which turn into gas particles and bond deep inside the fabric fibers when they return to a solid state.
Because of this special process, sublimation creates durable prints that still feel soft to the touch.
- Prep your digital design in your design software, and then mirror the image. You can use full-color designs like photos if you want with this kind of printing!
- Insert a sheet of sublimation transfer paper into your sublimation printer. The face-down side usually features a watermark, so you know where to place the paper. You need a special printer that can handle special sublimation ink, which contains a type of disperse dyes that can bond with polyester.
- Print out the design onto the transfer sheet. Don’t worry if the design looks less vibrant than you expected–it will look great once you finish! You can then save the transfer to use later or go directly to the next step.
- Next, prep the fabric you want to print onto. You must use fabric with a high polyester content for sublimation printing, so make sure you check the tag inside a t-shirt before beginning! You can also sublimate onto objects like earrings, mugs, hats, or signs so long as they have a polyester coating.
- Insert a Teflon protective sheet or a piece of parchment paper inside the shirt so the dye doesn’t get through to the shirt’s back.
- Briefly press the shirt with your heat press to remove any wrinkles.
- Align the transfer sheet ink side down where you want it to go on the fabric, and then use a heat press to start the sublimation process. The press must reach at least 350℉ for sublimation to occur, but every type of fabric will require slightly different pressing times and temperatures. Generally speaking, for a t-shirt, you will use a heat press temperature and time of 400℉ and about one minute.
- Allow the fabric to cool before you peel away the paper, leaving your design embedded into the fabric!
8. DTG
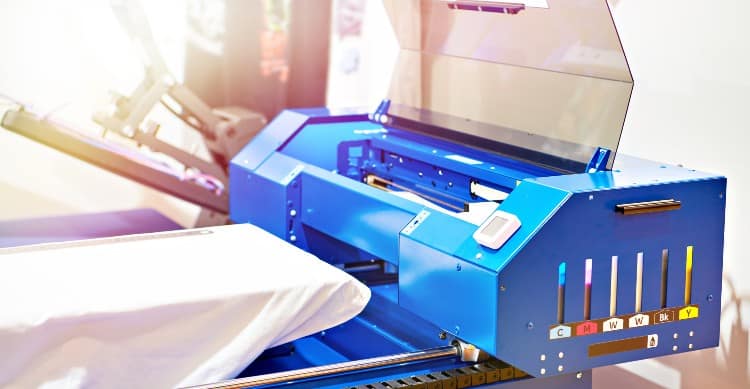
DTG printing stands for direct-to-garment printing, a process that uses giant printers large enough to fit entire garments or rolls of fabric. These large commercial printers allow you to print a design directly onto the fabric with ease.
Learning how to operate and maintain these complex machines does take some training, but once you master the system, you can quickly print out pretty much any design you want.
Good graphic design skills matter greatly in this process, as what you create on the computer screen is exactly what you will see on the fabric.
What Kind of Printer Do You Need to Print on Fabric?
You need a digital textile machine or direct-to-garment printer to print on fabric with high-quality results. For this reason, most at-home or small business printers use transfer methods like sublimation or inkjet transfers to apply prints to the fabric.
Can you use a regular printer to print on fabric? The only way you can use a regular inkjet printer to print directly onto fabric is to iron the cloth onto freezer paper and then cut the fabric into a rectangle that can fit through the printer. This method has some fun crafting applications but does not work for t-shirts or other garments.
Can You Print on Fabric With a Laser Printer?
You should not print on fabric with a laser printer because the toner in these printers does not adhere to fabric fibers well and will rub away. Use an inkjet printer instead if you plan to print onto a small sheet of fabric, or use a heat transfer sheet to adhere to a larger piece of fabric or a garment.
You can also use a sublimation printer with special sublimation transfer sheets to attach prints onto any polyester fabric or garment. This method has many advantages over inkjet transfer sheets. It does not leave a stiff, thick feeling on the surface of the fabric as an inkjet transfer does. It also does not fade away during multiple washes, as inkjet designs can.
How Do I Print Directly Onto Fabric?
You can print directly onto fabric at home using the freezer paper method or more professionally using a DTG printer. Most other methods of printing on fabric use the medium of a transfer of some kind to get a printed design onto fabric.
Can a paper printer print on fabric? A paper printer can only print directly onto fabric if you cut the fabric down to the size of printer paper and attach freezer paper to give it the proper stiffness.
Best Fabric To Print On
The best fabric to print on is usually 100% cotton, which works effectively for inkjet heat transfers, Cricut HTV designs, screen printing, and DTG printing. Cotton has a high absorbency which allows it to soak up water-based inks. It also feels soft and comfortable, which makes it a great choice for wearables like t-shirts.
The only exception to this rule is sublimation printing, which only works on 100% polyester fabric, or at least fabric that contains a high percentage of polyester fabric.
Is Printer Ink Permanent on Fabric?
 Printer ink can remain permanent on fabric depending on your printing method. If you use an inkjet printer to print onto a heat transfer sheet and then use a heat press to adhere the design to the fabric, it will remain permanently set because the heat cures the ink.
If you use a sublimation printer, the heat press and sublimation process will remain permanent.
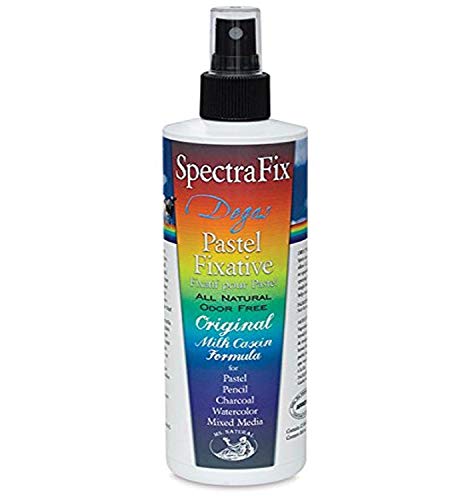
On the other hand, if you use the freezer paper method, the inlet design will not remain permanent. If you wash the fabric, the ink could come out. You can avoid this by rinsing your fabric in vinegar before printing or applying an ink fixative spray like this after printing.
What is the Best Fabric Printing Method to Use at Home?
The best fabric printing methods to use at home include using inkjet heat transfer sheets, a Cricut and HTV, or sublimation printing. Check out this quick list of pros and cons for each printing method in this article to get a good idea of which process will work best for you!
- The freezer paper method allows you to print directly onto fabric with ease on a regular inkjet printer. You can use full-color designs and you do not need specialized equipment. The downside is that you can only print on paper-sized rectangles of cloth, and the design does not have great permanency.
- The inkjet printer and transfer sheets technique allow you to print any type of design onto a transfer sheet and then use heat to transfer the design to any fabric surface, like a t-shirt or hoodie. This method does not cost much and gives you a lot of flexibility. But the transfer does leave a stiffened feeling on the surface of the fabric.
- If you want to print on fabric by hand with wood blocks, you can create fun designs with a Dremel or carving knife. This method has a lot of artistry and will create unique designs. But it takes a lot of time and may not look professional.
- Using a Cricut to cut out HTV shapes means you do not need a printer! You need Cricut and HTV sheets, though, which will set you back a few hundred bucks.
- The transfer fluid method chemically shifts the ink on a piece of paper to your fabric. This method has an old-school artistic quality but does leave the fabric feeling stiff and works better for decorative objects than for garments.
- Screen printing is a professional method of printing on fabric that creates high-quality, durable designs. It does work better with just a few colors. It also requires special plastisol inks, mesh screens, and equipment to prepare the screens for printing.
- Sublimation printing allows you to create full-color designs that permanently bond with polyester fabric. This easier printing process creates professional results with an affordable three-to-four-hundred-dollar printer that you can easily use at home! The downside is that it only works on polyester fabric.
- DTG printing is a commercial-scale process that prints digital images directly onto cotton fabric.
Conclusion
You can print on fabric using many methods, including screen printing, woodblock carving, or inkjet heat transfers. The easiest methods at home include carving wood blocks by hand, using image transfer fluid, using an inkjet printer and transfer sheets, or using the freezer paper technique. Professional ways to print on fabric include screen printing, sublimation printing, and DTG printing.
You cannot print onto fabric using a regular printer, but you can print onto a medium and then transfer that design to your fabric. You can print onto fabric or onto a garment if you have a commercial-scale DTG printer.