Block printing is the earliest known form of fabric printing in history – but just because it has an ancient status doesn’t mean it should be overlooked today. Block printing produces beautiful, artistic prints that can’t be created in any other manner. The good news? The process isn’t especially difficult. So, how do you block print fabric at home?
Block printing is the process of printing patterns onto fabric using carved blocks – traditionally made from wood. Nowadays, the process can easily be recreated at home by carving patterns into linoleum or rubber blocks and printing them onto fabric using specialized fabric-safe inks.
In this article, we will go over the step-by-step process for creating artful block prints on fabric at home. I will provide a detailed list of everything you’ll need for the process and the best – and worst – fabrics for block printing. Finally, we’ll finish with a few helpful tips for beginner block printers.
Quick Navigation
What Is Block Printing?
Originating in China in ancient times – block printing is the earliest form of textile printing known to man. Though the process is relatively simple, it is also the slowest and most time-consuming textile printing technique.
The designs and images are created from carved blocks – traditionally made from wood – that are inked and stamped onto the fabric’s face. This printing process was revolutionary for the times. Though the carving process was skilled work that took a significant amount of time – an untold number of prints could be produced from a single block.
The process of block printing spread throughout Asia and on into Europe – originally being used to print textiles, but eventually as a method for printing on paper as well. Block printing is still used in the textile world today, using techniques quite similar to the original method.
Block printing produces designs with aesthetic repetitive patterns that can be simple or ornate, in single or multiple colors. When people talk about block printing they are discussing a technique that is still done completely by hand. And though we live in a much faster-paced world in many ways – block printing is still a slow and meditative process.
What You Need For Block Printing on Fabric
There are several ways you can go about starting your first block print. You can easily purchase all of the specific supplies necessary online or at craft supply stores. If you want to save a few dollars or get started on your first project right now – there are basic items you could use that might already be lying around the house.
The first item you’ll need is the fabric. Whether you’ve already picked out the perfect throw pillow cover or just want to test out the process – the fabric will be the base. Next up is the block. You will need something sturdy to carve your design into.
Craft supply stores have many options for block types – linoleum and rubber are the most widely used. You could go the traditional route and carve straight into wood – just remember, this will be more laborious and likely require more expensive specialized tools.
Carving tools are next on the list. To get the best result – and most detail – you’ll want to work with linoleum cutting tools. These carving tools come in different shapes – such as a U or V gouge – and sizes, with easily graspable handles. These tools allow you to easily scoop and slide through the linoleum or rubber block to carve your design. In addition to the tools, you’ll want some sort of permanent marker to sketch your design onto the block before you begin the carving.
Next – you’ll need the ink. There are many different types of printing medium available on the market, so you’ll have to consider the desired end product to select the right one.
There are two types of ink – oil and water-based – specific to block printing. Each one may react differently to the type of block you’re using – so some experimentation may do you well. You could also get away with using other types of paint – with some simple tweaks and depending on your final product.
Applying the ink to the carved block will require supplies for one of the following methods: a soft rubber brayer is the most common with professional quality block printing today. Paired with a sheet of plexiglass or glass – something with a smooth flat surface – to roll the paint onto the brayer. Alternatively – a sponge and paintbrush or sheets of felt placed into a shallow dish with sides can be used – similarly to a stamping ink pad.
Finally – a few things you will want for your work area. When printing, you will want a somewhat supple – yet sturdy – surface under your fabric. A piece of cardboard or a double layer of felt will work well to absorb the pressure and allow the stamp to press fully into the fabric. Pins are also handy to have around so that you can keep the fabric in place while printing – especially important if you will be doing lots of prints.
How to Block Print on Fabric at Home
At its core – block printing is a very simple concept. Once you get the hang of it, it is a fun way to create unique, one-of-a-kind prints right in your own home! You only need a few supplies, and once you have them, they can be used to print over and over again. Follow the steps below to get started on your very first block print.
1. Prepare your materials. Besides making sure that you have all of your printing supplies ready – you’ll want to prepare your material. Many textiles are subject to chemicals at production facilities, inhibiting the ink from properly adhering to the fabric. All fabric should be washed – sometimes even washing twice is a good idea – and dried before being printed on.
Follow the care instructions for washing the specific type of material you’ll be using. If you are printing on linen – or any fabric that wrinkles easily – it can be helpful to iron before getting started. This way, you’ll have a nice flat surface for printing and decrease the risk of having partial prints when stamping the block.
2. Design your print! Sketch your idea on paper to ensure that you have something you’ll want permanently stamped onto your project. The options are endless, so have fun! Once you’ve created a design you love, draw it onto your block and start carving.
Remember – this will be a relief print. Anything carved away will be empty space, and the solid lines and areas remaining will be printed onto the fabric.
3. Read the instructions for the specific ink or paint you are working with to determine if and how the ink needs to be finished. This is especially important for anything you plan on getting wet or running through the wash in the future. Some inks simply need to dry for a set amount of time before they are permanently set. Others require the application of heat – such as with an iron.
4. Prepare your printing material. Place a piece of cardboard – or two layers of felt – at least the same size as your project on the surface where you will be printing. Lay the fabric you will be printing onto on top of the cardboard and pin it in place.
5. Ink the block. Ink should be applied to the block in a smooth, even coat using one of the following methods. In each case, balance is important – making sure you have a sufficient amount of ink without being excessive. Some trial and error may be necessary to get to the perfect amount:
Rubber brayer and plexiglass or other smooth, flat surface. Apply a thick line of ink – the same width as the brayer – onto the plexiglass. Roll the brayer back and forth through the ink until the roller is coated all the way evenly around.
Now – roll the brayer, using gentle pressure, over the surface of the carved block. You want to make sure that the entire surface is sufficiently covered, but not so much that empty spaces are filled in or there are any paint globs.
Sponge and paintbrush. Pour some ink into a small dish. Using the paintbrush, apply the paint to the sponge. You want a substantial amount of paint to soak in here – so several coats of paint may be necessary. Make sure that the area you are applying paint to on the sponge is large enough to accommodate the entire design on the block.
Next – take the block and dab it on the sponge using gentle pressure – as if pressing a stamp into an ink pad. Make sure that the ink coats the entire surface of the block and that there are no bubbles or uncovered areas. Alternatively – you don’t want an excessive amount of ink applied to the block.
Felt. Place two sheets of felt into a shallow dish with sides and cover the surface evenly with a thin layer of ink. Press the carved block onto the ink-soaked felt – similar to pressing a stamp onto an ink pad. Ensure that the entire design is covered with ink but without excess in the empty spaces of the design.
6. Print the block on a test surface before printing it onto the final product. To get a rough idea of the outcome, you can test the block on paper. To get a more accurate idea of how the print will turn out, the test should be done on a scrap of the same material as your finished piece. Make sure to hold the block in a manner that will produce a print in which the design is facing the correct direction.
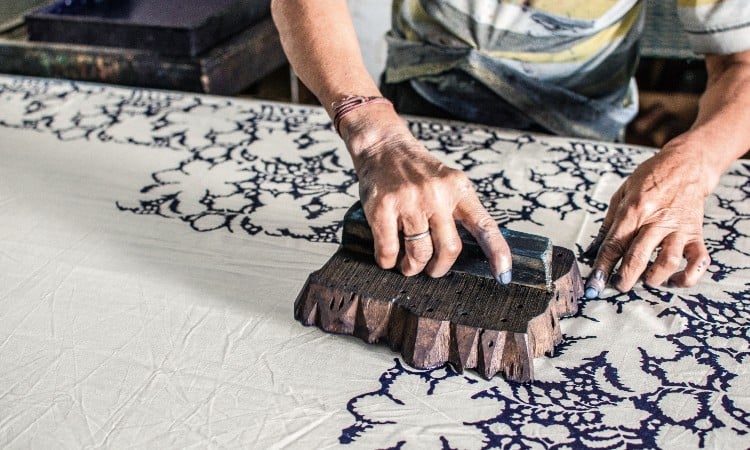
7. Take the freshly-inked block and firmly press it onto the fabric in the same manner that achieved successful results in the test. When creating a repetitive pattern – if you are right-handed – work left to right, top to bottom. If you are left-handed – work should be done right to left, top to bottom – to avoid smudging previous prints. Re-ink the block before each print.
Types of Blocks
Beyond the classic wooden block for carving, there are a couple of standard materials used widely for block printing today – linoleum and rubber. These – along with a few less traditional options – are all covered below.
Linoleum
Linoleum is one of the predominant materials used for modern block printing. Linoleum sheets can be found in all different sizes, specifically designed to be carved for printing. In most cases – a thin sheet of linoleum is adhered to a wood composite block. The desired design is then carved into the linoleum layer of the block.
When considering modern block printing materials – linoleum is a harder material to cut through. You will need to work with care – especially if just starting – and make sure you are working with sharp tools.
Because linoleum is a hard material, carving your design may be time-consuming. But – you can get a great deal of detail – especially as an experienced carver – and the block should stand up to numerous print repetitions.
Rubber
Rubber is another popular choice for block printing. This is a much softer material when compared with linoleum. Carving tools tend to slide right through the rubber surface of the block – the process being so smooth it can even be considered meditative by some.
Rubber is much faster to carve overall. Rubber is a good choice if you are carving a design that includes a lot of negative space – or for any speedy project. Working with such a soft material, it can be difficult to achieve great detail if you’re inexperienced. With practice, though, ornate designs can smoothly be carved into rubber.
Other
Other materials that are or can be used for block printing on fabric include – wood, potatoes, or anything with a highly-textured surface. The original material – wood, comes in many different types – and just about anyone can be used for block printing.
Softer woods will be much easier to carve – but will also limit the amount of detail you can achieve. The life of the block will also be shorter with softer woods. Hardwoods will allow great detail, give a professional-looking outcome, and can last for years of use. Carving wood – especially harder varieties – can require expensive specialized tools. Make sure this is a hobby you’ll want to stick with before going this route.
A fun and super easy way to test block printing for first-timers – or kids – is to use potato halves. You can’t get an extreme amount of detail, but you can still create beautiful and unique printed fabrics at home. Potatoes are easy to carve – simple shapes work best – and can be printed just like the instructions described above! Of course, these stamps won’t last forever – so you’ll have to carve new ones with each project.
Many things lying around the house on a given day could be fun objects to print onto fabric. Any item with a geometric shape or that is highly textured could work. Apples cut in half, the end of a paper towel roll or bark from a tree could all produce interesting results.
There is also always the option of purchasing pre-cut stamps or blocks if carving doesn’t sound enjoyable, but you still want to try hand printing.
Block Printing Inks
There are tons of options for printing inks. Some are specific to block printing, some are meant for other printing methods, and some aren’t intended for printing specifically – but that can still be used. One important thing to remember when choosing an ink for your block printing project is what you are looking for in the end result. Almost just as important: read the labels.
Many inks and paints – the term can be used interchangeably, so don’t just consider one when searching for options – are water-soluble. This means they won’t last when wet, and all your hard work will go down the drain once the item is thrown into the washing machine.
If you’re looking for something permanent – which is generally the case when printing onto fabric – you should look for inks specifically labeled. The wording can sometimes be tricky. If the label doesn’t state “for fabric,” or “heat set” chances are they won’t be permanent when washed and are probably intended for use on paper.
Textile ink may sound like it’ll do the job – but this is a much thinner type of dye that won’t adhere to a printing block and should be avoided. The two main types of block printing inks are discussed below.
Oil Based Ink
Oil-based ink has a thicker consistency and is more difficult to work with. It comes in many different colors and can create beautiful textural prints – but it also takes more ink and much longer to dry fully. Oil-based inks can be messy and require special substances to wash out. Another downside – if you don’t plan on printing often or abundantly – the ink has been known to dry up in the tube.
Water Based Ink
Water-based ink is the more user-friendly option. It has a slightly thinner and much smoother consistency. It spreads well and requires much less ink when printing. Water-based inks tend to dry much more quickly – and being water-soluble. They provide a super easy clean-up.
Acrylic Paint + Textile Medium
An affordable option – especially if you’re just testing the waters on block printing – is using acrylic paint. Acrylic paint gives a nice consistency that can work well for printing – and can be used for all sorts of other purposes if you aren’t committed yet. On its own, acrylic paint is water soluble, so it won’t be permanent on fabric. With the addition of a textile medium, you can easily create an ink that will set permanently.
Best Fabrics For Block Printing
Natural fibers are always best to use for block printing. Cotton, linen, hemp, and silk all take well to being dyed and can provide various products and outcomes for your printing projects. Polyester can be used as well – the best case is when it is blended with another natural fiber.
The fabric’s weave should also be considered when choosing a textile to print on. A heavy or coarse weave can create interest – but could also cut out details of the print’s design.
Fabrics to Avoid
Any fabric that is 100% synthetic should be avoided – as they generally do not take well to dying. Many synthetics also can’t take the heat that is sometimes necessary to set the ink – so it’s best just to steer clear of these materials. Wool and fleece of any type are also textiles that should be avoided when block printing. The fuzzy nature of the material tends to stick and collect in ink – as well as extremely difficult to achieve a clean print.
Block Printing Tips for Beginners
If you’re trying out block printing for the first time – here are a few helpful hints to make the venture more successful. Start printing on light-colored fabrics – from the list of natural materials above – in a plain weave. This will give you a nice smooth surface that will make printing for the first time much easier, and the prints will come out crisp and clear.
For your first time carving a block – choose a block that’s a smaller size. Carving large or detailed designs can be a lot of work! It’s best to start small until you get the hang of it. Linoleum or rubber can both be used for beginners. If you want a bit more detail – go with linoleum. It may be harder to carve, but it’s also more forgiving. If you want to carve a quick design and get on to printing – go with rubber.
Start out using water-based inks and make sure to choose opaque colors. Printing in one color at a time will also make the process much easier. You won’t have to worry about lining up specific designs or having colors run together undesirably.
Make sure to choose something that will also be permanent, so you will have something to show for all your hard work! And don’t forget to practice! Do tests on paper and scraps of fabric so you can get the precise feel of how the block will print at its best.
Conclusion
The only thing better than having a beautifully designed, hand-made fabric creation – is having something you produced yourself! The number of items you can make are endless – with patterns and design options galore. Pillow covers, drapes, tea towels, and tablecloths – are just a few items you could make for the home.
Tote bags, scarves and any sort of apparel can – and should! – be block printed on as well. It may seem like a lot of information at first – but block printing is a simple process that comes together quickly – especially after the block is made. Just think – this time next week, you could be printing one-of-a-kind t-shirts for all of your closest friends.