You can print or decorate t-shirts in many ways, like using commercial printers or simple cut-out shapes. But no matter what method you choose, you need one special piece of equipment for every method of creating graphic t-shirts, and that machine is a heat press! This means you need to learn how to heat press t-shirts for any fun t-shirt printing method you choose.
The key to heat pressing a t-shirt is learning what temperature, pressure, and length of time you should use for every type of fabric or type of design. Aligning the shirt correcting in the press and using the proper protective layers also helps create a perfect design. Some shirts need to cool down, ad others need finishing touches while still warm.
In this article, you will learn how a heat press works. You will discover six ways to use a heat press with different graphic t-shirt methods. Finally, you will discover what supplies you need for your heat press.
What is a Heat Press?
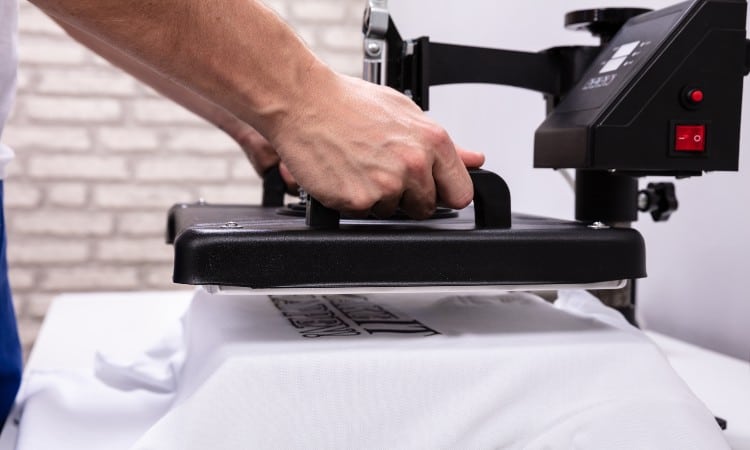
A heat press is a machine with a heated surface used to cure or transfer designs onto shirts and other substrates. Heat presses use temperature and pressure to set, transfer, or sublimate ink. They typically feature digital settings that allow the printer to set specific and accurate times and temperatures to complete the project.
You can use a heat press to cure any kind of printed design in a custom tee, such as screen prints or DTG prints. You can also use a heat press to attach any kind of shirt decor that has a heat-activated adhesive, like rhinestones, iron-on patches, or heat transfer vinyl. And some types of t-shirt prints require a high temperature to move the ink onto the shirt, like sublimation or heat transfer sheets.
While one of the most common uses for a heat press is to set a design into a graphic t-shirt, heat presses with specially shaped platens or heated plates can also work on items such as mugs, baseball hats, banners, and more.
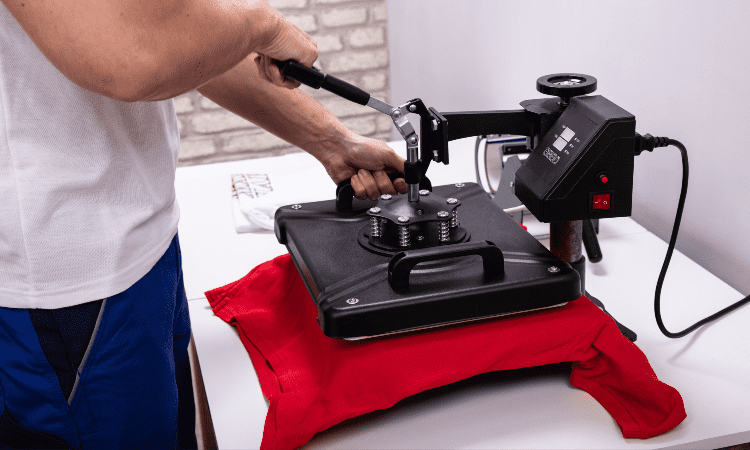
You can find a wide variety of heat presses on the market today due to the rising popularity of the custom t-shirt industry. Simple models like the Cricut Easy Press have a single heated surface, allowing you to set a specific temperature. Most professional presses have a clamshell-like appearance, with a top and bottom platen and a hinge to connect them.
The key parts of most heat presses include:
- The control panel or buttons. Even basic models will feature setting options like two sets of arrows for turning the temperature and time up or down. Most commercial models have a display screen to allow you even more specificity.
- The press handle. Again, simple models may have a small handle attached to the single plate, but most presses have a tall handle sticking up from the surface of the press for easy gripping and to allow you to open the clamshell.
- Most heat presses have either a rotating top plate that can swing away to allow you to place an item in the press or a hinged top plate that lifts to allow you access to the lower plate.
- The lower platen forms part of the base of the press and remains stationary. This lets you align your garment or item in the press without worrying about it shifting around before you lower the heated upper platen onto it.
- In many cases, you will also find a squishy pad on top of the lower platen. This helps hold things in place during the heat cycle.
- Of course, most presses will also have a power cord. In some cases, you will need to make sure you have enough power to support the press, as some models need special 220v power supplies.
How to Heat Press T-Shirts Step By Step 6 Ways

You need a heat press to add heat transfers, patches, vinyl, or sublimation designs onto a shirt. You also need a heat press to cure or finish other styles of t-shirt prints, like screen prints.
Every printing method commonly used on t-shirts requires a heat press! Even large commercial productions like DTG printers use either a heat press, a heat gun, or a dryer to cure the print and make it permanent.
1. Transfers
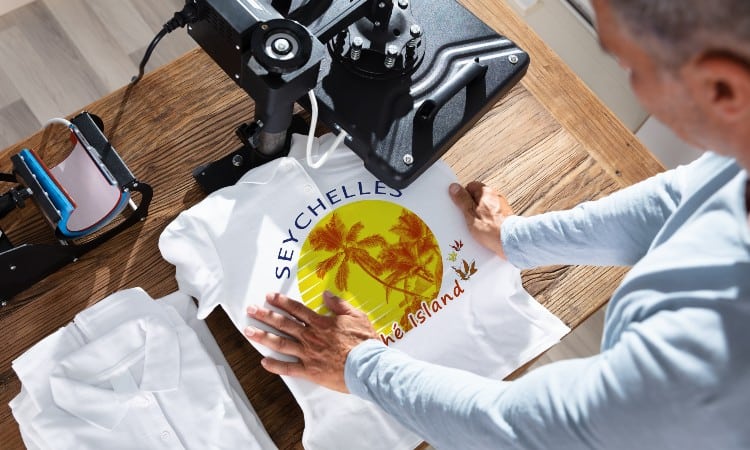
One of the easiest ways to create a custom graphic t-shirt is to use heat transfer sheets and a heat press.
- First, prep your digital image in a graphic design program. You can use full-color designs like photos or a simple lettering arrangement, but make sure you reverse or mirror the design as the last step in the editing process. Otherwise, it will end up backward on the shirt!
- Next, select a type of transfer paper. You will need to use a different kind of paper depending on your type of printer, either inkjet or laser. You can also select either dark or light transfer paper depending on the color scheme of your design.
- Print the image onto the transfer paper. You can use a regular home printer for this!
- If your design does not take up the whole page, trim away the excess paper.
- Set your heat press to the temperature recommended on the heat transfer paper package. Usually, this temperature falls between 350℉ and 375℉.
- Once the press reaches this temperature, pre-press the shirt for ten seconds to create a perfectly smooth surface for the transfer paper.
- Then arrange your transfer where you want it to go on the shirt, face down on the fabric (the paper will usually feature markings on the back side to help you know which side is face down).
- Close the press for ten to thirty seconds. For most transfer paper, you should apply a medium pressure to the press handle.
- Let the paper cool slightly and then peel away the backing paper, leaving the design inked into the shirt!
2. Patches
One of the less common ways to create custom t-shirts is to attach iron-on embroidered patches or badges. While you can use an iron to attach an embroidered patch, a heat press applies more intense and specific heat that lets you quickly and effectively attach the badge without worrying that it might curl away or fall off later.
- First, set the heat press to 375℉ and let it warm up. If the badges come with instructions, follow the temperature guidelines recommended there instead.
- Pre-press the shirt for a few seconds to smooth out any wrinkles.
- Place the patch on the shirt with the embroidered side facing up and the shiny glue side on the fabric of the shirt.
- Next, place a protective Teflon sheet over the embroidered patch. This often comes with a heat press, but if not, you can buy one like this quite cheaply.
- Close the press for twenty seconds (or as little as ten seconds for very small badges). You can use light or no pressure and simply let the press work.
- Finally, let the patch cool and gently pry at one edge to ensure it is fastened permanently to the shirt.
3. Vinyl

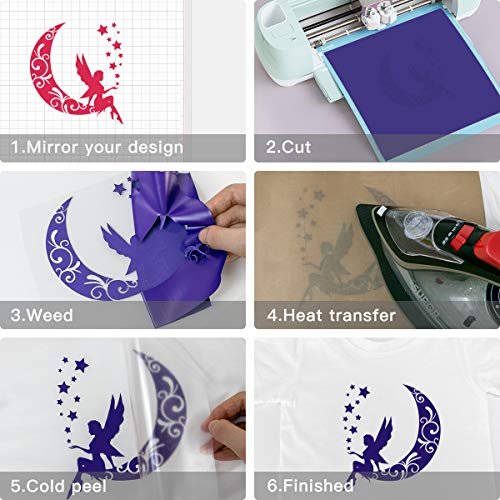
One of the most popular ways to use a heat press to create custom t-shirts is to use HTV, or heat transfer vinyl. With HTV, you can create images or lettering on a shirt without actually “printing”! Instead, you cut out the shapes from a vinyl sheet and use heat to permanently attach the HTV to the shirt.
- Start by designing an image in a graphic design program or software tool. Make sure you mirror the design as your final step here, or the letters will end up reversed!
- Next, select a type of HTV (it comes in wide varieties like matte, glitter, and metallic finishes) and place it on a cutting mat.
- Insert the mat into an electronic cutting machine and send the cut file to the machine. Watch the machine cut out the outline of your image or letters!
- Gently peel away all the vinyl that is not part of your design and discard it.
- Set your press to the temperature recommended on the HTV package. Generally, you will want to use temps of about 380℉ to apply HTV to a cotton shirt or as low as 270℉ to attach HTV to a polyester shirt.
- Pre-press the shirt to make a smooth surface for your design.
- Arrange the HTV shapes on the shirt. For complex designs, you may want to use heat-resistant tape to hold the letters or shapes in place.
- Apply the heat press for just fifteen seconds, using medium pressure.
4. Sublimation
Another trending way to use a heat press for t-shirts is to use a printing method called sublimation. This technique uses a physics principle called sublimation to turn a synthetic dye into gas and then allow it to bond with synthetic fabric as the gas cools into a solid. It sounds fancy, but you can quite easily set up a sublimation print at home!
- Create or edit an image to print. You can use full-color designs like photos with sublimation with great results. Once again, you want to make sure you mirror the image once you finish editing it.
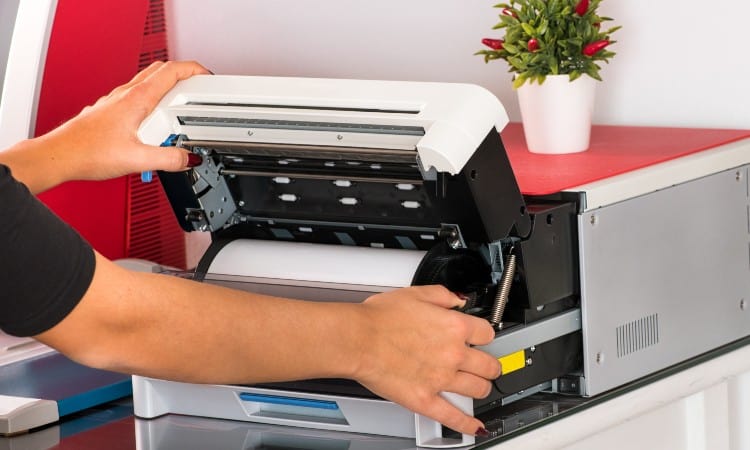
- Insert a sheet of sublimation paper into your sublimation printer. For this process, you need a special printer set up with synthetic dyes, called disperse dyes. But these printers only cost a few hundred dollars.
- Print out the image onto the paper. It will look dull, but don’t worry about that!
- Pre-press a polyester shirt briefly to give yourself a good fabric surface to work on. You do need to use 100% polyester shirts with sublimation.
- Also, place a piece of parchment paper inside the shirt to keep the sublimation design from leaking through to the back of the tee.
- Arrange the print face-down on the shirt.
- Use the temperature on the transfer paper package. Usually, this falls around 385℉ though it can range up to 400℉. Because the high temperature necessary to cause sublimation can damage the polyester, it is a good idea to place a protective Teflon sheet over the paper before you begin.
- Press for a time range of 50 to 120 seconds.
- Let the paper cool and then peel it away to reveal your design!
5. Print on Vinyl
You can combine sublimation, a heat press, and HTV to print onto vinyl for another popular t-shirt printing method. This process has a few more steps than simply using sublimation on a shirt, but it works well if you want to place a design onto a dark-colored tee. It also allows you to place a sublimated design onto a cotton tee because the sublimation will take place on the HTV, not on the shirt’s fabric.
- Like with the basic sublimation process, you start by prepping your digital image and then flipping or mirroring it.
- Print out the design onto sublimation transfer paper using a sublimation printer.
- Trim around the edge of the design. Set it aside for a moment.
- Next, set up your Cricut or electronic cutting machine with a sheet of special HTV on the cutting mat. Several types of HTV work for sublimation, but you must make sure you get a type that has a polyester coating on its surface for this process.
- Take the digital design you printed and copy it into your cutting machine design space. This will allow you to use the “trace” function to create a cut file with the same outline as your design.
- Shrink the cut file shape just a fraction so that, in the end, your print will overlap the vinyl with the merest hair. If you do not do this, you will end up with a white outline around your image.
- Cut out the HTV.
- Prep your shirt in the heat press to remove wrinkles.
- Once it cools, place the HTV on the shirt. Press it in the heat press for half of the standard time on the HTV package. You want to hold it in place here, not fully attach it.
- Place the cut-out sublimation paper on top of the vinyl, with the inked side face down on the HTV. Align the edges of the two cut shapes carefully and use heat-resistant tape to hold the paper in place.
- Place a Teflon sheet over the paper.
- Set your press to 375℉ and press down firmly for about 30 seconds.
- Lift the press and let the paper cool slightly before peeling it away.
If you do not want to attach the sublimated design to a shirt right away, you can also use a slightly more involved process to sublimate the design onto the vinyl without attaching it to the tee at the same time. This allows you to save the printed HTV for later use.
6. Screen Print
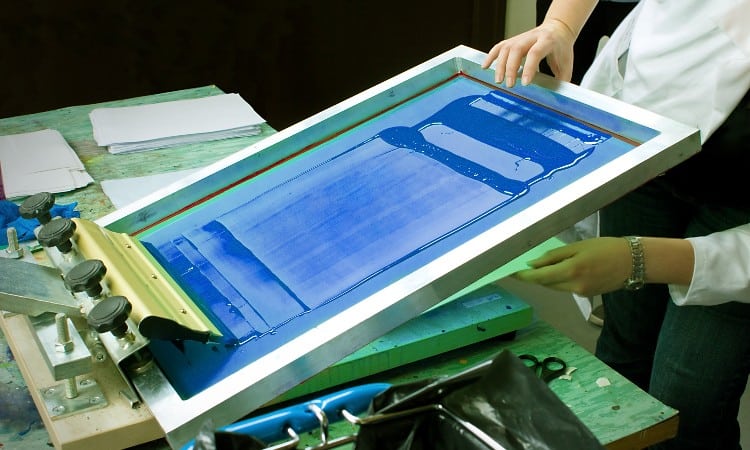
While you do not need a heat press to create screen print images like you do with HTV or sublimation, you need to cure the screen print ink, or it will not set properly. If you don’t cure the ink, the design will crack and peel away later on.
- Check your screen print ink to see what cure temperature it requires. Most plastisol inks need a low temperature of around 280℉ for this process.
- Place a Teflon sheet over the dried ink.
- Close the heat press, using medium pressure, for thirty seconds.
- Alternatively, if you use water-based screen print ink, you will use the heat press before the ink dries.
- Set the press to a higher temp of 330℉ and hold the top platen of the press close to the design without actually touching it. Remain here until most of the water evaporates from the design.
- Finally, apply a Teflon sheet and press for forty seconds.
What Supplies Do I Need for a Heat Press
You need basic supplies like a heat press, blank t-shirts, and your design medium to heat press t-shirts.
- Obviously, you need a heat press! You can get large commercial presses or small single-platen presses intended for home use.
- You will need to select the right type of blank t-shirt for your design method. Cotton tees work well for most methods, but sublimation requires 100% polyester shirts for the best results.
- Nowadays, every type of t-shirt design begins on the computer screen with a digital image. You will need a graphic design program to create and edit this image.
- Depending on your design method, you will need a printer, a screen print frame, or an electronic cutting machine to make your designs.
- For methods like sublimation and HTV, you will also need the medium for your design, such as sheets of vinyl or sublimation transfer paper.
- It’s a good idea to always use a protective Teflon sheet between the hot press and the shirt, so you do not damage the shirt fabric.
To start a heat press t-shirt business, you will probably want to purchase a commercial-grade press. You may also consider ordering the blank t-shirts in bulk to save money.
How Long Do You Press a Shirt With a Heat Press?
How long you press a shirt with a heat press depends on the type of shirt material and your design method, such as HTV vs heat transfer paper.
This means there is no right length of time to press a shirt. For instance, you need to hold the press down for a minute or two minutes for sublimation. But for HTV, you generally only apply the press for thirty seconds.
The easiest way to learn the correct pressing time for a shirt is to read the instructions on the package for the HTV, heat transfer paper, sublimation paper, and so on. This will tell you exactly what temperature and pressing time to use.
What Temperature Do You Heat Press?
The temperature you use with your heat press also depends on the type of material in the shirt and the design method you use. Every different type of HTV needs a different temperature, for example. Cotton requires a higher temperature than polyester.
Once again, the best way to find the correct heat press temperature for your project is to check the instructions that came with your materials.
You can also check out this list for the average temperatures used for the t-shirt printing methods described in this article:
| Method | Temperature |
| Heat Transfer | 350℉ to 375℉ |
| Embroidered Patches | 375℉ |
| Heat Transfer Vinyl | 270℉ (Note: this temperature will vary based on the kind of HTV you use) |
| Sublimation | 385℉ to 400℉ |
| Print on Vinyl | 375℉ |
| Screen Print | 280℉ |
Can Any Shirt Be Heat Pressed?
You cannot heat press just any shirt, as some forms of fabric will melt or scorch in high heat. You can safely press a shirt with a high cotton content and you can also heat press polyester shirts if you use the right temperature and protect the fabric with a Teflon sheet.
You should not use a heat press on:
- Acrylic, rayon, nylon, or most synthetic fabrics. These contain plastic fibers that can melt easily.
- Actually plasticky materials, like PVC or vinyl.
- Fabric with an obvious texture like velvet.
- Fabric with a loosely knit structure.
Can You Use Any Printer for Heat Press?
You cannot use any printer for the heat press because each design method requires its own special printer or set of tools.
- To create heat transfer sheets, you can use an inkjet or laser printer.
- To attach embroidered patches, you do not need a printer at all! Of course, if you want to make your own patches, you need an embroidery machine.
- To use vinyl with your heat-press, you do not need a printer but an electronic cutting machine.
- For sublimation, you need a sublimation printer filled with sublimation ink. You cannot use a regular printer for this method.
- To print on vinyl, you need a sublimation printer and an electric cutting machine.
- For screen printing, you do not need a printer, but special screens and a frame to hold them.
How Do You Heat Press With an Iron?
In some cases, you can substitute an iron in place of a heat press, but you will not get super professional results. This is because most irons do not have a smooth, even surface. They also do not allow you to set a specific temperature.
On the other hand, if you need to heat press a shirt at home and you don’t want to invest in an actual heat press, you can follow these steps:
- Set up your shirt on a flat space and iron it to remove wrinkles.
- Apply your transfer paper, HTV, or embroidered patch. (You cannot use your iron for sublimation–irons do not get hot enough for this).
- Set the iron to a hot or linen setting and allow it to warm up.
- Meanwhile, smooth a tea towel or cloth napkin over the design.
- Place the iron straight down on top of your HTV or transfer paper and push it down firmly for thirty seconds. If the iron does not cover the whole image, repeat this process on every part of the design.
- Let the shirt cool slightly and then check to make sure your design is stuck properly.
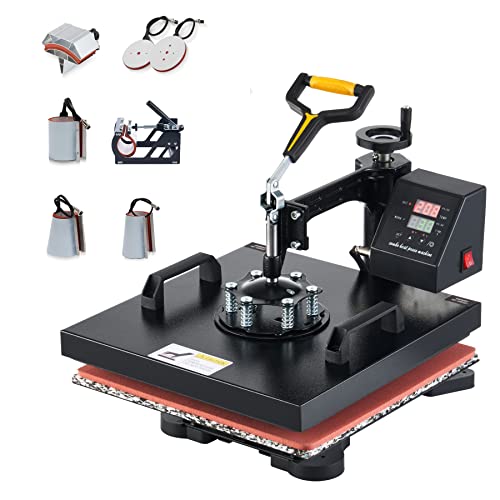
Heat Press Machine
All heat presses perform the same basic function, but you can find a lot of variations in heat press machines in terms of the size of the platens and the ease of use.
A few of the most popular heat press machines on the market today include:
- The Cricut Easy Press 2 comes in two sizes, 9X9 or 12X10. This handy home-use press allows you to set specific temperatures. It works like a large, flat iron you press down by hand.
- The latest VEVOR press has 15X15 plates and a rotating upper platen for easy shirt insertion. It has a digital screen to make inputting settings easy as well.
- While you can get mug or hat attachments for many commercial heat presses, the Cricut mug press offers an easy stand-alone solution for adding designs to ceramic mugs.
- If you want a large commercial heat press that comes with all the attachments you need, check out the RoyalPress 15X15 model. It has a hinged clamshell model for easy access, a thick silicone pad on the lower platen, and comes with a mug, hat, and other attachments for one-stop shopping.
T-shirt Heat Press Starter Kit
No products found.If you want all the basics for your heat press in one easy package, check out big-name brands like VEVOR or Cricut. These companies will sell you bundles like No products found. of a heat press that comes with all the bells and whistles you could want.
You will still need to buy blank t-shirts and prepare the print or transfer sheets yourself.
Conclusion
All heat presses use the same basic method of applying heat and pressure to a shirt, but you can use your press slightly differently to create designs using various print methods. The most popular ways to use a heat press for a shirt include applying heat transfers, vinyl cutouts, embroidered patches, sublimation transfers, or sublimation on vinyl cutouts. You can also use your heat press to cure screen print designs on a tee.
The key to properly using a heat press is to set the temperature based on your design method. For example, glitter HTV needs a different heat press temperature than a sublimation transfer. You will also need to vary the pressing time based on the type of design you use.