One of the best ways to decorate or personalize a t-shirt is to apply heat transfer vinyl. This handy material creates a raised design in whatever shape or lettering you desire and sticks to the fabric of the shirt when heated. If you want to learn how to make fun t-shirt designs, check out this guide on how to use heat transfer vinyl on shirts!
Heat transfer vinyl has a smooth plastic surface and a back coated with heat-activated adhesive. Electric cutters like Cricuts and Silhouettes make cutting out vinyl designs easy, though it is possible to cut vinyl by hand as well. Careful application of heat using an iron or heat press will make the HTV adhere to the fabric.
In this article, you will find out what makes heat transfer vinyl work. You will learn several simple methods for cutting out and applying HTV to your t-shirt. Finally, you will discover what temperature to use with your vinyl.

What is Heat Transfer Vinyl?
Heat transfer vinyl is a type of vinyl made from polyurethane with a heat-activated adhesive on its reverse side. It adheres permanently to most types of fabric and wood and other surfaces. The most popular use of heat transfer vinyl, or HTV, is in decorating t-shirts and sportswear.
HTV differs from regular adhesive vinyl, which comes with an already-sticky tape-like reverse side. Regular adhesive vinyl sticks to many surfaces such as glass, ceramic, and plastic but does not adhere permanently like HTV. Heat transfer vinyl will not feel sticky on the adhesive side before you apply heat (this is how you can tell it apart from regular adhesive vinyl!).
Some brands give these two different kinds of vinyl special names. For example, Cricut refers to adhesive vinyl as Cricut Vinyl and HTV as Cricut Iron-On.
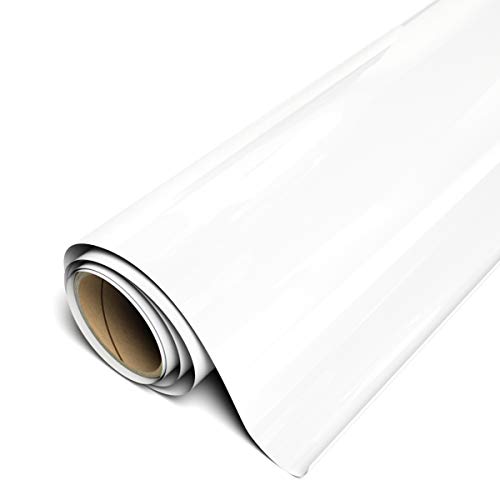
You can find HTV in many different colors, finishes, and textures. In some cases, you can even buy HTV that you can print on!
Typically, vinyl comes in flat squares or large rolls. Some electric cutters can only fit certain sizes of vinyl, so make sure you buy a kind that fits your machine.
How Does Heat Transfer Vinyl Work?

Heat Transfer Vinyl works through a careful application of heat. This activates the adhesive backing on the reverse side of the vinyl sheet, allowing it to bond to the fabric, canvas, or wood surface beneath it. You can apply this heat using a professional heat press, an at-home substitute such as Cricut’s Easy Press, or even a basic iron and ironing board.
Most vinyl artists use an electronic cutter such as a Cricut, a Silhouette, or a Brother ScanNCut to digitally design and cut out an image from the vinyl. This allows you to create super professional-looking designs, lettering, and logos. That said, you can also use an Exacto knife to cut out a design by hand, or even use scissors and a stencil if you prefer!
Most of the directions in this article will talk you through how to use a Cricut or similar electric cutter to create your HTV design on a shirt. If you choose to work by hand, you will still need to follow the post-cutting instructions for heating and bonding the HTV, though!
How To Use Heat Transfer Vinyl On Shirts
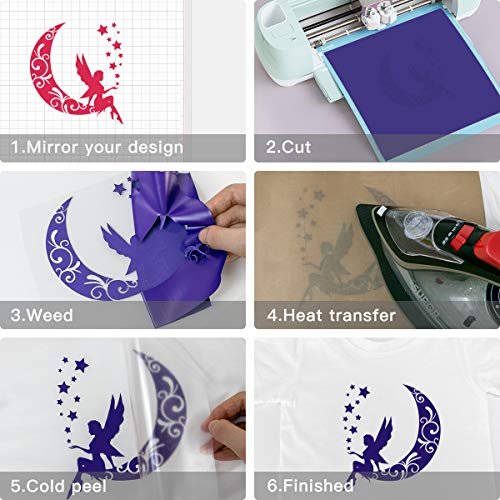
To use HTV on shirts, you will need to create or edit a design, cut out the design, weed away any negative space areas from the cutout, transfer the vinyl to the fabric, and then use heat to adhere the HTV to the shirt.
It’s not a complicated process, but it gets easier with practice and a few helpful tips! For example, some types of HTV create a neater design when you use a hot peel, meaning that you peel away the backing from the vinyl while the design remains warm. Other kinds of vinyl work better if you let everything cool completely and do a cold peel to remove the backing.
You will also find this artform much easier if you have the right tools at hand. For example, you can 100% effectively apply HTV using an iron. But it’s a lot easier to reach just the right temperature if you have a heat press you can use.
With Cricut
The awesome thing about making your HTV cut with a Cricut is that you get both digital and electric tools to help you create and cut out your vinyl decal. A Cricut is one of the most popular brands of electronic cutting machines that uses a small blade to cut out designs you send to it digitally.
Other popular types of electric cutters include the Silhouette brand and Brother’s ScanNCut models. These come with their own in-the-cloud design tools that have a few differences in functionality. Still, essentially you will follow the same basic steps no matter what digital and electronic cutting tool you use.
If this seems like many steps, keep in mind that you can always skip the design part of the process by downloading free pre-made SVG files online or by using the free designs often available in Cricut Design Space.
- First, you have to create or edit your digital design. You probably want to start with a solid color design for your first HTV project. You can use a pre-made design available in Design Space, upload an SVG file you bought online or found for free, or use the Design Space to make your own design or lettering.
- If you use another type of cutting machine, like a Silhouette, you can access a paid or free version of that cloud-based software, too! Silhouette offers a program called Silhouette Studio. It works very much like Cricut’s Design Space.
- Whether you create, edit, or upload a design, you may want to use Design Space to adjust the size, color, or font of your cut-out. You can do this very easily using the tools provided in the grid-like digital design space that opens up when you click on “Projects” or “New.” Think about how much space you want the design to take up on your t-shirt, and set the sizing accordingly.
- In Cricut and SIlhouette’s design tools, you can use a blank t-shirt template to help you visualize how the design will fit on your shirt!
- If you want to create lettering for a whimsical saying or a logo, you can find tons of tutorials online to help you figure out how to curve a line of lettering or upload a particular font to your design space.
- With the design all set up, you can turn to the physical side of things and get the vinyl ready to go in the cutting machine! Choose an Easy Grip mat and peel away its protective plastic covering. Turn the vinyl so that the dull side faces up at you, and spread it out nice and smooth over the sticky surface of the mat.
- Now you need to use the USB connector to connect your cutter to your computer. If you have not already, turn on the Cricut. Make sure you have a Fine Point Blade installed, as this type of cutter will handle HTV best.
- Complete the steps to cut out your design in Design Space by sending the file over to the Cricut. Design Space will walk you through this step by step.
- Align your mat with the guides in the front of the machine, and press the double-arrow button on the Cricut. This will draw the mat fully into the machine and align the blade for cutting.
- Now your Cricut will flash the Go button. Press that and watch it go to work!
- When the Cricut finishes, press the double arrows again to release the mat. Now you need to remove the HTV from the sticky mat.
- To do this, you can flex the mat until you get an edge or corner of the vinyl free. Use your fingers to peel away as much of the sheet as you can. Then use tweezers or a scraper to gently peel up any stuck parts of the design.
- Finally, you will need to weed the design. This means to remove any negative-space sections of the design, like the circle inside a letter O.
- Once you have your design cut out and weeded, you can apply it to your t-shirt using heat! To do this with an iron, read the following section on how to use HTV without a Cricut. To do this with a heat press, skip two sections down to read about how to use a press.
Without Cricut
You can design and cut out HTV decals for your t-shirt without a Cricut, but it does take a lot more manual labor to do everything by hand. Plus, you have to figure out the sizing and shape of the design on your own. The simplest way to make your HTV t-shirt design by hand is to print out the shape or lettering you want and use those as a stencil as you cut out the design using a craft knife.
The other option is to use another design tool in place of Cricut’s Design space. This still leaves you to cut out the design by hand but gives you some digital assistance in creating the graphic or lettering. One of the most popular free graphic design tools is Inkscape.
Whether you cut out your design by hand or in a cutting machine, you do not have to use a heat press to apply it. You can use a basic iron to adhere the HTV to your shirt. To do this:
- Turn on the iron and give the shirt quick ironing to prepare a falt fabric surface for the vinyl.
- Set the iron to its hottest setting, usually cotton or linen, if you have a 100% cotton tee. If you have a polyester tee, you may need to use a “synthetics” setting on your iron and apply the iron for a longer amount of time.
- Make sure you have the steam option turned off.
- Transfer the design to the shirt and smooth a pressing cloth over it.
- Press the iron firmly on top of the pressing cloth for the amount of time recommended by the vinyl manufacturer. This time range usually falls between 15 and 20 seconds.
Apply with Heat Press
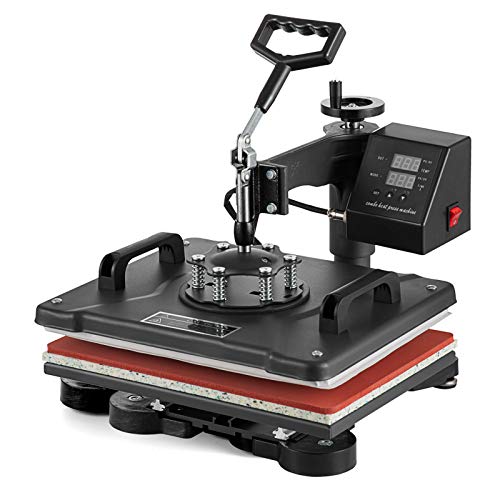
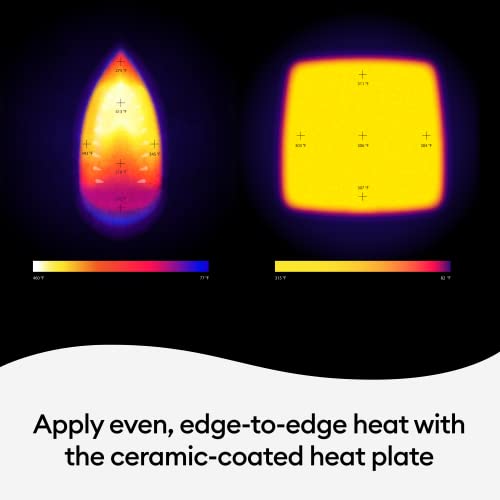
The easiest, most professional way to apply HTV to a shirt is by using a heat press. You do not have to have a heat press for this process, as you can use an iron instead! But the heat press allows you to set a specific temperature and apply heat and pressure evenly over the whole design at one time.
- If you have a Cricut Heat Press, you can use the Cricut guide to the temperature setting. Any heat press will work, though. You just want to set the temperature to a heat that works with the kind of vinyl you have. For more info on selecting a temperature, check out the section below on “what temperature to use with HTV.”
- Spread out the shirt on a pressing mat. Preheat and smooth the fabric’s surface by applying the heat press for just a couple of seconds.
- Arrange your vinyl design on the shirt. You could do this easily if you used a Cricut to cut it out, as the plastic backing will keep the vinyl properly spaced out. Otherwise, you may want to use transfer tape to help place your design on the fabric.
- Make sure you place the dull side of the vinyl down and the plastic backing side facing up to you.
- Apply the heat press to the plastic backing at the temperature and timing recommended for your kind of HTV.
- Flip the shirt over and apply heat to the reverse side of the fabric where the design lies.
- Finally, use either a warm peel or a cool peel, depending on the kind of HTV you’re using. Circut’s Everyday Iron-On instructs you to allow the design to cool completely before removing the plastic backing.
How to Cut Heat Transfer Vinyl
The best way to cut heat transfer vinyl is to use an electric cutting machine like a Cricut or Silhouette. These machines function like printers, except that they cut out a digital design instead of printing it with ink!
You can cut HTV with a knife or scissors as well, but you will find it difficult to create perfectly smooth curves and edges working by hand.
It’s true that a Cricut or any other electric cutting machine does have a pretty high price tag. On the other hand, they come with free access to online design tools to help you create, edit, and store your cutting files. If you plan to make a lot of HTV t-shirts, you probably want to invest in some kind of cutting machine!
Which Side of Heat Transfer Vinyl Goes Up?
When placing a sheet of HTV in a cutting machine, you want the dull side facing up and the shiny side facing down. This allows the machine to cut through the vinyl, but not through the plastic carrier sheet that allows you to easily move the vinyl design to your shirt after cutting.
On the other hand, when you use heat to apply the HTV to your t-shirt, you want to make sure the dull side faces down and the shiny side faces up at you. Otherwise, you would find yourself trying to glue the plastic carrier sheet to the fabric instead of the vinyl!
Do You Need Transfer Tape for Iron-On Vinyl?
In most cases, you do not need transfer tape for iron-on vinyl because it comes attached to a clear plastic carrier sheet. The plastic backing acts exactly like transfer tape, except that it comes pre-attached to the vinyl.
That said, you may sometimes buy HTV that does not have a plastic backing. Or you might cut out an HTV design by hand without the plastic backing. In this case, you would want to use transfer tape to help you move your design neatly to the shirt before applying heat.
If you’re wondering, “Can I use wax paper to iron on vinyl?” the answer is no. You can use parchment paper as a barrier between an iron and the vinyl, but it is not sticky and will not work in the same way as transfer tape does.
How to Iron on Vinyl to Shirt
You can use a regular iron to apply heat transfer vinyl to a shirt if you do not own a heat press. The iron can still apply the necessary heat and pressure. It does not come with precision settings for temperature and timing like a heat press. You may also find it a bit challenging to apply equal heat and pressure over the surface of the whole design if your vinyl cut-out is bigger than your iron.
To apply HTV using an iron:
- Place the shirt on a flat, smooth surface such as an ironing board, and iron out any wrinkles.
- For 100% cotton, set the iron to its hottest possible setting. For synthetics like polyester, you may need to use a lower heat setting such as a “wool” setting.
- Transfer the HTV design to the shirt and arrange it where you want it to go permanently.
- Smooth a pressing cloth over the design.
- Use the iron to press down on each portion of the design through the pressing cloth. You will want to use the pressing times designated by the vinyl you’re using. Typically, the pressing time ranges from 10 to twenty seconds for an iron.
What Temperature Should You Use for HTV?
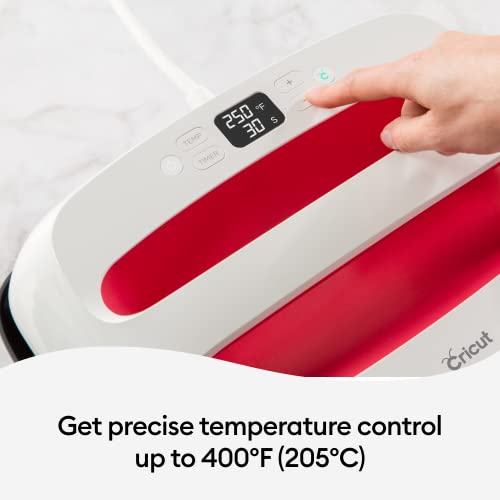
The best temperature to use for HTV depends on the type of HTV and the kind of fabric you plan to use. For instance, polyester fabric requires a lower heat than cotton fabric because polyester will melt or scorch when exposed to overly high temperatures.
The wrong temperature can cause your vinyl to peel back off the fabric. Or you might melt or damage the fabric, or even ( in rare cases) melt or damage the vinyl! Sometimes the vinyl will wrinkle or bubble when applied with incorrect heat.
All art takes practice, but to get the best results, you need to start with the right temperatures and timings.
With the caveat that you should always defer to any heating instructions that come with the vinyl you bought, you can follow these guidelines to get started:
- Matte HTV works best with a temperature of 310℉ on a heat press. You should apply the heat press for ten seconds to fifteen seconds, depending on the scale of the design. You will almost always warm peel a matte design.
- Glitter HTV also works best at 305-310℉, though you should check the individual instructions on your HTV product for this. You will want to apply pressure through the heat press for 10 to 15 seconds for this kind of HTV and use a warm peel rather than allowing the HTV to cool on the fabric.
- For metallic HTV, you will follow the same temperature and timing guides but use a cold peel. This helps the special metallic finish avoid crinkling up.
- For galaxy-style HTV, you will still use the 305-310℉ temperature and the timing range of 10 seconds to fifteen seconds. You will want to use a warm peel with this kind of HTV.
- And finally, if you want to use an iron instead of a heat press on any kind of HTV, make sure you set it to no steam. Use the temperature indicated on the dial for wool fabric. You will also need to apply it for a bit longer, usually between 15 to 20 seconds.
Does Heat Transfer Vinyl Need to Be Mirrored?
In most cases, your HTV design does need to be mirrored because the Cricut will place it front-side down on the fabric, with the plastic carrier sheet facing up to you. To mirror a design means to flip it horizontally, so you see it in reverse as if you had held it up and viewed it in a mirror.
If you use an online design tool such as Cricut’s Design Space, you can do this at the click of a button!
The exception to this is some patterned types of HTV, or cases in which you cut out the design by hand rather than using a Cricut.
Best Heat Transfer Vinyl for T-Shirts
 The best kinds of heat transfer vinyl for t-shirts are popular brands like Siser Easy Weed and Cricut Iron-On. You can use many different kinds of HTV with great success, but these two offer you the most basic, simple kind of HTV you can find anywhere! Plus, they are both highly recognized brands that deliver good products.
That said, you may want to expand out into the wide world of different types of HTV once you master the basics. For example, flocked HTV has a felted or velvety surface and foil HTV has a shiny, metallic surface. And you can find plenty of textured or patterned kinds of HTV as well!
One thing you probably do not want to do, though, is to use regular adhesive vinyl on a shirt instead of HTV. This sticker-like vinyl will stick temporarily but will not stay nice after washing the shirt. You need heat transfer vinyl for that!
You can buy HTV online and can also find SG cut files for sale in places like Etsy. You can also buy HTV by the square or by the roll at most craft stores, including Joann, Michaels, and Hobby Lobby.
What is the Best Shirt Material for Heat Transfer Vinyl?
The best shirt material for heat transfer vinyl is 100% cotton, though you can use a cotton blend or even bamboo quite successfully as well.
Working on a synthetic fabric like polyester gets tricky because these plastic-based materials can melt under high heat. However, you can safely place HTV on polyester if you use lower temperatures and follow the manufacturer’s recommended pressing times for synthetics.
HTV designs look awesome on cotton t-shirts, but you can also easily attach them to sweatshirts, bags, scarves, and many other surfaces! Just make sure you have a smooth, high-quality fabric surface to work on.
Conclusion
The easiest way to use heat transfer vinyl on shirts is to design and cut out the vinyl using an electric cutter such as a Cricut or Silhouette machine. You can then apply the HTV using an iron or a heat press to activate the adhesive on the vinyl and cause it to permanently stick to the fabric. You can cut out HTV by hand if you prefer, though you may need to use transfer tape to place it on the shirt in that case.
Heat transfer vinyl comes in many different types and brands, from flocked and foiled to a simple matte surface. The simplest kind of HTV to use as a beginner is any dull, smooth, plastic vinyl. Patterned or textured kinds of vinyl may require special treatment.
Have you ever decorated a shirt with HTV? What kind of design did you make? Leave a comment below to let us know!