Have you ever found the perfect Grumpy Cat meme online and thought, “that would make an excellent t-shirt!” Well, with a heat press and a few basic materials, you can turn that meme into a funny tee in no time. Whether you want to launch a home business selling tees or simply make that grumpy cat shirt for yourself, check out this guide to learn the basics of how to heat press a shirt.
A heat press uses heat and pressure to seal a transfer onto fabric. Common transfer types include vinyl designs cut out using a Cricut machine and screen prints on transfer paper. The controlled temperature of the press activates the adhesive on the back of the vinyl or the transfer paper and seals it to the fabric.
In this article, you will find out how a heat press works. You will learn seven basic methods for using your heat press. Finally, you will find tips for choosing the right materials as you get started.
Quick Navigation
What is a Heat Press and What Does It Do?
A heat press applies carefully calibrated heat and pressure that seals ink or vinyl onto the surface of the fabric, ceramic, or other types of material. One of the most common ways to use a heat press is for making t-shirts. For example, a heat press can permanently attach HTV cutouts to a shirt or bond sublimation transfer prints to a shirt or seal screen print designs to cure them and set them into the fabric of the shirt.
Two of the most common ways to use a heat press at home or for a small business are with heat transfer vinyl and prints on transfer paper.
Heat transfer vinyl, also known as HTV or iron-on, is a great way to get into the t-shirt world. You simply design your image in a computer program and then send the digital file over to an electronic cutting design. This is where the heat press comes into play.
To properly adhere the HTV to your shirt, you need just the right amount of pressure and the right temperature to activate the adhesive on the back of the vinyl without scorching the shirt.
If you want multi-colored designs, you can use screen printing or other printing methods to create a design on a piece of transfer paper, which is essentially a special type of paper with a heat-activated adhesive on its back. Then you use your heat press to seal the adhesive onto the fabric, and it looks like you printed right onto the shirt!
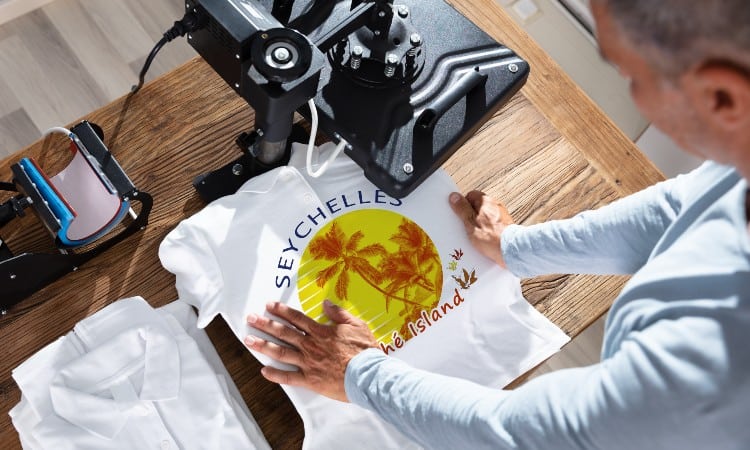
The most common type of heat press for shirts has a clamshell shape. This model will have a handle on the top attached to a pressure control knob and usually a setting panel for controlling temperature as well. The top half of the clamshell holds the Teflon-coated heating plate, while the bottom or base of the clamshell is called the platen and is usually coated with heat-impervious silicone.
To use this model, you arrange the shirt on the bottom platen, seal the top half of the clamshell down over the fabric, and hold the clamshell shut using the handle for a certain amount of time to allow the heat and pressure to do their work.
The flat platens in this kind of press only work on wide, flat surfaces such as the front of a shirt, though, so you can also find specialty heat presses, such as a type of press designed specifically to adhere HTV onto coffee mugs. In some cases, you can buy attachments for your heat press, like an attachment to work with baseball caps or an attachment to heat press mugs.
Basic beginner heat presses may cost as little as $100, but commercial presses can cost upwards of $1,000. They will come with many more digital setting options to control temperature and pressure precisely. High-end heat presses usually have much sturdier bodies and can handle heavy-duty materials instead of cotton t-shirts.
Presses also come in a lot of different sizes. For example, a common at-home press comes with 15” X 15” plates, but you can also get tiny Cricut Easy Press or really large commercial presses in all sorts of sizes.
No matter how simple or fancy your press, it will still perform the same basic operation of using heat to bond a decorative element onto your shirt!
How to Heat Press a Shirt
You can use a heat press to seal vinyl cutouts onto your shirt or attach a transfer paper design to your shirt. A heat press is a great tool for putting a logo on a shirt and for sealing the ink in a complex screen print or sublimation print job into the fabric.
Using a heat press is often the final step in your t-shirt design process, but this does not make it any less important! While not a difficult process to master, it does take some practice and it can impact the quality of your finished shirt.
1. Heat Press a Shirt Step By Step
The basic steps of heat pressing a shirt stay the same from one project to another, though you may need to adjust a few specifics such as temperature for different shirts or kinds of material.
- Set up your press on a flat, stable surface. Even if you have a tiny 6” press, this step matters! The press will get quite hot and you don’t want it to slip and fall on you at any point.
- For the first step, you will always need to begin by setting the temperature and pressure settings on your heat-press. If you’re new to your press, you should stick to the guides provided in the users manual for the press or the information on the HTV package if you plan to use vinyl. You can also find a detailed temperature guide later in this article.Why does the temperature matter so much? Different fabrics such as polyester and cotton can handle different temperatures. On top of that, every different transfer paper and HTV has its unique temperature requirements.
- Give your press a chase to heat to your selected temperature before you begin. Usually, this will take just a minute or two.
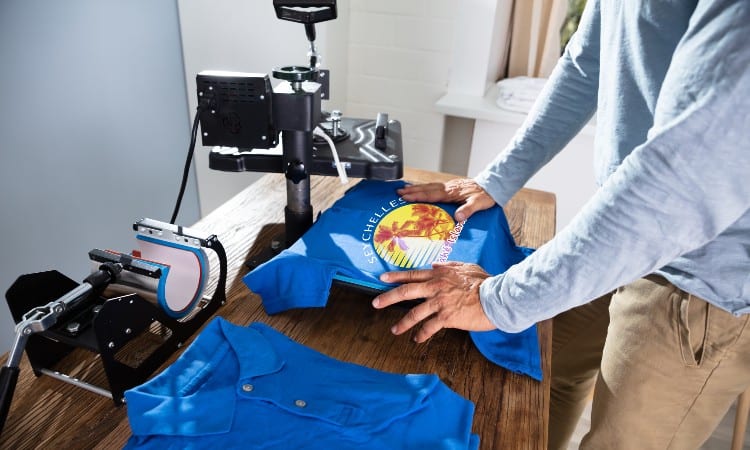
- Next, you will want to prepare the shirt by briefly pressing the area you decorate with HTV or transfer paper. Pressing it creates a flat, wrinkle-free surface to place your cutouts or transfer paper onto. To prep the shirt, simply arrange it on the lower platen and seal the heat plate down onto it for about five seconds.As a pro tip, try to arrange the shirt so that the sleeves, neckline, and hem do not rest between the platens. These bulkier parts of the shirt could prevent the heat plate from thoroughly sealing down onto the fabric.
- Next, open up the press but leave the shirt on the lower platen. Arrange your decorative elements–HTV cutouts or transfer paper–exactly where you want them on the fabric of the shirt. You will need to make sure you do not touch the heated upper platen or you will burn yourself!
- In some cases, you will need to spread a protective Teflon sheet on top of the design. Your HTV package will tell you if this is necessary. You can also use special cover sheets for the same purpose.
- Close the heat plate down on top of the shirt using the handle to seal it in place. Wait for the allotted time listed in the press user manual or on the HTV package, then open the press back up.
- For some special kinds of vinyl, you may need to quickly peel away the backing. Most of the time, you will want to let the shirt cool before touching it.
2. Logo on a Shirt
One of the quickest ways to customize shirts for your company is to add a logo on the shirt. A company logo is often small and fairly simple.
You can easily put a logo on a shirt using screen printing, a vinyl cutout, or a printed transfer. You can even order custom-made embroidery patches and then use your heat press to seal them in place on the shirts!
You will follow the basic steps described in the previous section to use the heat press, but here are some tips to help you heat press a logo:
- Getting the logo aligned just right is the key to creating a professional-looking custom shirt. Most of the time, you will want a large logo placed about four to six inches below the neckline, centered precisely between the left and right side seams. For a small logo, the most common placement is to the left of the chest, centered between the centerfold of the shirt and the left side seam and seven to nine inches down from the shoulder seam.
- If the shirt has a pocket, simply center the small logo just above the top of the pocket.
- For small designs, you may want to use thermo tape to hold the logo in place as you close the heat press. This will prevent any last-minute sliding or skewing sideways.
3. With Vinyl
Using HTV and a heat press is one of the easiest, most satisfying ways to decorate a t-shirt because you can learn how to get professional-grade results with a minimum of effort! Heat transfer vinyl, or HTV, is a special type of vinyl with a heat-activated adhesive backing.
You can buy HTV with all kinds of special finishes, such as a glitter finish, a matte finish, or a metallic finish. Plus, it comes in every color of the rainbow!
You can cut out shapes from the vinyl and stick them to a shirt, or you can print onto vinyl instead of onto transfer paper if you want more of a screen-printed, raised design look.
In most cases, using HTV cutouts is the easiest method that gives the best results for a beginner.
- Place your HTV in your cutting machine with the shiny side down. This is very important because this will leave the carrier paper intact beneath the cutout shapes.
- Cut out your design.
- Peel away or “weed” the negative space HTV out of the design, leaving the design itself on the intact sheet of carrier paper.
- Pre-press the shirt in your heat press to create a nice smooth, flat surface.
- Arrange the HTV design on the shirt. The carrier paper will keep any lettering or lose sections of the design in place.
- For most types of HTV, you will want to use a protective Teflon sheet laid on top of the design as well.
- Set your heat press to the recommended settings for that type of HTV. For example, the temperature setting for plain HTV is 315 ℉.
- Either close the press or place the Cricut Easy Press on top of the design and apply pressure for the necessary time. Usually, this will only take ten to fifteen seconds, but some fancy types of HTV may require a longer pressing time.
- Peel away the carrier paper from the top of the design. If any of the vinyl starts to come, the adhesive did not stick to the fabric and you will need to apply the heat press again.
4. With Cricut
A Cricut is an electronic cutting machine that makes prepping HTV cutouts to decorate your shirt very easy. You can also find other popular brands like the Silhouette, and plenty of cheap off-brand cutting machines, too! Whatever brand you choose, you will follow the same basic steps to create an HTV cutout for your shirt.
- First, you need to either download a digital design or create a digital design using a design program of your choice. You can use pre-loaded fonts in Cricut’s Design Space, or you can work in a more complex program like Adobe Illustrator.
- Use your design program to mirror the image. This means that everything in the image will flip as if you are looking at its reflection in a mirror. You need to do this because you have to place the vinyl shiny side down in the cutting machine to keep the carrier paper intact.
- Then send that digital cutting file to your electronic cutting machine.
- From here on out, follow the steps in the previous section for how to apply vinyl to a shirt using a heat press!
5. Screen Print Transfer
Another common use for a heat press is to attach a design printed onto transfer paper. Screenprint designs are the most common types of printing used to create logos or images in this way.
You can also use an inkjet printer to print onto transfer paper or a special sublimation printer to create sublimation designs using transfer paper.
In some cases, you may even prefer to have another company create the screen print transfer for you. Then you just need to attach the transfer to your shirt.
To attach a printed transfer to your shirt:
- Arrange the transfer on the shirt in the desired location. You do not need to use a protective covering or Teflon sheet for a screen print transfer.
- Preheat the press and give it some time to get hot. For screenprint transfers, you often use a hot temperature of about 350 ℉ to 375 ℉.
- Press the press down for seven seconds. You need very firm pressure here!
- Hot peel the transfer paper away, starting at just one corner. If the paper seems to stick to the fabric, stop and use the heat press again for three more seconds.
6. Both Sides of a Shirt
If you want to place a design on the front and back of a shirt, you can use two different methods.
First, you can place a protective Teflon sheet over the design you are not pressing. For instance, if you press the front of the shirt first, simply place a protective Teflon sheet inside the shirt to prevent the back design from getting heated. Then reverse this to heat press the back after you finish with the front.
Second, you can try inserting cardboard inside the shirt and then use your heat press to apply heat to both the front and back of the shirt at once. Finally, the cardboard should prevent any ghosting or ink from leaking from front to back.
7. Shirt with an Iron
In some cases, you can use a regular iron instead of a heat press to attach designs to your shirt. This works well for small HTV cutouts such as a logo. That said, an iron will not work well with transfer paper designs.
You face two common challenges if you choose to use an iron. First, the metal plate of the iron may be smaller than the shape of your design, especially if you want to create an image that covers the front of your shirt. Second, you will find it difficult to apply enough pressure when using an iron.
All that aside, you can use an iron on your shirt if you want to. Try these steps:
- Set your iron to a “linen” setting. For most household irons, this is as close as you can get to the precise temperature settings of a real heat press. This setting will work for plain HTV, though you may need to experiment with specialty HTV types such as magnetic or flocked vinyl.
- Arrange your cutouts on the shirt and then cover them with a pressing cloth or tea towel.
- Do not run the hot iron back and forth over the pressing cloth. Instead, press down in one spot and hold, pushing as hard as you can, for about thirty seconds. Repeat this motion till you have covered the whole design.
- Try gently peeling away the carrier sheet. If the HTV comes with it, you need to apply the iron again.
Materials for Heat-Press T-Shirt Printing
You need a few basic supplies to get started using either HTV or printed transfers. For many items, you have the choice of buying cheaper beginner-level equipment or investing in commercial-grade machines. Likewise, you can usually purchase materials like HTV much more cheaply if you buy it in bulk, but if you simply want to decorate a few shirts for yourself, you will probably want to buy a few sheets from your local craft store instead.
The basic materials you need to get started heat pressing HTV designs include:
- A heat press. These can range in price from $100 to more than $1,000, depending on the quality and capabilities of the machine.
- An electronic cutting machine. Two of the most popular brands on the market for home use are Cricut machines and Silhouette machines.
- Design software of some kind. You can use the basic program that comes with your electronic cutting machine, or you can create more elaborate designs in graphic design software such as Inkscape or Adobe Illustrator.
- Heat Transfer Vinyl. You can find dozens of different types of HTV for sale at your local craft store or online from places like Amazon or Etsy. You can also buy rolls of HTV in bulk from many online stores if you plan to make lots of shirts!
- Of course, you also need t-shirts. You can apply HTV designs to cotton, polycotton blends, or polyester tees. You may need to use lower heat press temperatures for polyester, though.
If you plan to work with printed transfer instead of vinyl, you will need a slightly different list of materials:
- You will still need a heat press. Again, you can get many different kinds of presses, depending on whether you want a small one for fun at-home crafting or a commercial-grade machine for making and selling many shirts at a time.
- You will need printing equipment. This can be as simple as printing onto transfer paper with your home office inkjet printer, or it can involve a complex screen printing setup.
- You can get many different kinds of transfer paper, as you will see in the next section! Make sure you purchase the type best suited to your project.
- You will need t-shirts as well. In general, you should only use 100% cotton when working with printed transfers. This allows you to apply extreme heat that could damage synthetic materials such as polyester.
Heat Press Transfer Paper
The basic process of using heat press transfer paper is quite simple, but finding exactly the right kind of paper might seem confusing at first!
You will find several popular types of transfer paper for sale at most craft stores. These include:
- Inkjet paper is intended for running through a regular inkjet printer. This kind of paper can work on white tees or dark-colored tees, though you mirror the image and put the transfer paper upside down for white fabric.
- Screenprint transfer paper for working with plastisol ink, which you may also see called hot-peel transfer paper. To use this kind of paper, you use a mesh screen to apply a stencil of the ink onto the transfer paper. You then apply the paper to your shirt and use a heat press to seal it in place, and finally peel away the transfer paper while it is still hot to leave the plastisol screenprint ink soft and flexible.
- In some rare cases, you can also cold-peel transfer paper, which is the same as freezer paper. In this case, you leave a screen print design to cool after using the heat press and then peel away the paper. This method makes a more plasticky printed design on top of the fabric.
- Sublimation transfer paper is one of the most interesting types because it helps transform ink into a gaseous state during the printing process. This process only works on polyester fabric, though.
Finally, you will also need to select between dark and light transfer paper for your project. For a white or light-colored shirt, such as a yellow or pink shirt, you will want to use light transfer paper. For dark-colored or black shirts, you usually need dark transfer paper.
How Long Do You Leave a Shirt on a Heat Press?
The amount of time you should leave a shirt inside the heat and pressure of the heat press varies depending on the material of the shirt and the type of vinyl or transfer you plan to apply.
You will usually find a list of heat press timings in your owner’s manual for the press. If you want to use a specialty material, material such as vinyl or transfer paper will usually have pressing times on the package.
These general guidelines should help:
- HTV usually requires only ten to fifteen seconds in the press. This can change if you use a specialty type of HTV, though. For instance, flocked vinyl should stay in the press for about fifteen seconds but at a lower heat.
- For printed transfer designs, you will want to apply pressure for about 20 seconds.
- For screen-printed transfers, you may need anywhere from ten to thirty seconds, depending on the thickness of the design.
- Polyester will melt or scorch if it gets too hot, so you should only leave a polyester shirt in your heat press for ten seconds or less.
Heat Press Temperature Guide
Every type of fabric, vinyl, and transfer paper requires special temperature settings. You can often find recommended temperatures in your heat press owner’s manual or on the packaging for the product.
Here is an overview of the most commonly used heat press temperatures:
| Light-colored cotton | 350℉ |
| Dark-colored cotton | 320℉ |
| Plain white 100% cotton | Up to 380℉ |
| Polyester | 270℉ |
| Regular HTV | 315℉ |
| Glitter HTV | 320℉ |
| Inkjet transfer paper | 325℉ |
| Screenprint transfer | 350-375℉ |
Conclusion
Using a heat press gives you many creative options for designing decorative t-shirts. You can use heat transfer vinyl cutouts to easily craft logos or lettering in a professional-looking style. You can also use your heat press to apply printed transfers made using screen printing or a regular home printer.
A heat press provides precise temperatures and pressure to thoroughly seal vinyl onto fabric if you want to use HTV designs. It also provides the right settings to permanently adhere printed transfers onto fabric. While you can try using your iron to apply vinyl cutouts, your home iron cannot apply enough pressure to successfully seal printed transfers.
What kind of t-shirt designs do you plan to make in your heat press? Do you prefer HTV or printed transfers? Leave a comment below to let us know!