If you love tie-dye but like to wear dark-colored clothes, you may want to try bleach dyeing a shirt! This fun technique adds mottled swirls to a dark shirt or even allows you to create reverse tie-dye by adding dye into the bleached spots on the shirt. If you want to make some of your black clothes more interesting, keep reading to learn how to bleach dye a shirt!
The most popular ways to bleach-dye a black or dark-colored shirt are to use a bleach soak or a spray bottle containing a bleach solution. When applied to a folded, scrunched, or twisted shirt, the bleach creates bursts, spirals, or swirls on the shirt. Re-dyeing the shirt creates a reverse tie-dye shirt and can have a stained glass effect on the shirt.
In this article, you will learn how bleach-dyeing and reverse tie-dye work. You will discover five easy methods for bleach dyeing a shirt. Finally, you will find tips on timing and safety as you work!
Quick Navigation
- What is Bleach Dyeing?
- What is Reverse Tie-Dye?
- How to Bleach Dye a Shirt: 5 Methods
- Bleach Dye Shirt Patterns
- What Bleach Should You Use for Tie-Dye?
- How to Bleach a Black Shirt White
- Can You Bleach Tie-Dye Any Shirt?
- How to Bleach a Sweatshirt
- How Long Does it Take for Bleach to Dye Clothes?
- How to Bleach Colored Clothes
- Conclusion
What is Bleach Dyeing?
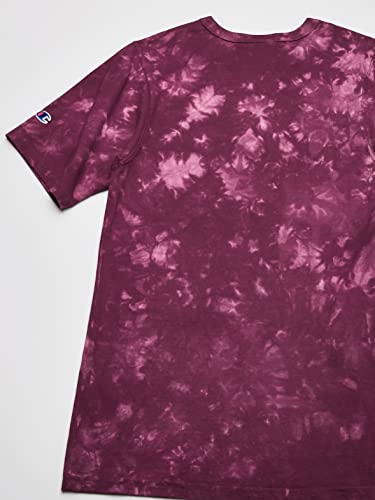
Bleach dyeing uses color removal to make intricate patterns on textiles like shirts, sweatshirts, napkins, or tablecloths. In some ways, it looks a lot like tie-dye because it creates the same patterns like swirls, spirals, or Shibori squares, but it makes the patterns out of removed color rather than adding color.
You prepare a garment or textile for this process just as you would for tie-dyeing by folding, twisting, or bending it into a special shape before applying the bleach. You can then apply bleach in several different ways, including a soak, a spray, or even over a layer of ice!
Bleach dyeing costs a lot less than most tie-dye projects because this common household cleaning product typically costs less than five dollars! Even generic tie-dye kits usually cost quite a bit more.
Plus, bleach dyeing usually takes much less time than regular tie-dyeing. For most tie-dye projects, you have to allow for a minimum of an eight-hour resting period as the dye sets. Bleaching works very quickly, in contrast.
You will learn that you need to rinse the bleach out quite promptly, or it will eat right through your clothes!
That is the big danger of bleach dyeing–without proper care, this corrosive cleaner can damage the fabric of your clothes. You will also want to take care to work in a ventilated area, wear gloves, and always handle the bleach slowly and carefully to avoid splashing it on yourself.
So long as you take the proper precautions, bleach dyeing offers a quicker, more affordable way to redecorate your dark-colored clothing.
What is Reverse Tie-Dye?
Reverse tie-dye takes bleach dyeing one step further by adding colorful dyes on top of the bleached pattern in a bleach-dyed garment. This creates an intricate, stained-glass-window look with colorful patterns inside the outlines left by the bleaching!
To use reverse tie-dye, you first fold, twist, or otherwise shape a garment just like your would to prep it for tie-dyeing. Then you apply bleach, using your method of choice, such as spraying vs soaking. Finally, after rinsing the garment out thoroughly, you apply colorful dyes that will re-dye the bleached spots in the garment.
Reverse tie-dye does require more time than either regular tie-dyeing or bleach dyeing because of its two-step process. It makes really beautiful textiles and is also the best way to tie-dye a black or dark-colored garment. Simply applying colorful dyes to a black garment will not do much since the color won’t show up against the original black of the garment!
You can buy reverse tie-dye kits that come with “color changer” solutions–in other words, bleach! Or you can bleach the shirt yourself and then use a tie-dye kit or whatever other fabric dyes you prefer to add color to the shirt.
How to Bleach Dye a Shirt: 5 Methods
You can bleach-dye a shirt in several ways, including soaking the shirt in bleach or using a spray bottle to spritz the shirt with bleach. Each method creates a unique design style.
In this section, you will find out how to bleach a shirt step-by-step using five different methods.
1. Tie-Dye Black Shirt
The best way to “tie-dye” a black shirt is to use a bleach soaking technique. Technically, you are not “tie-dyeing” the black shirt since you will not apply any dye! Instead, you will use bleach to remove the color from the black shirt, creating unique patterning and designs.
This method works best on a black cotton shirt or a shirt containing at least 60% cotton fibers. You can also use this method successfully on any dark-colored cotton shirt. If you use a light-colored, pastel, or neon shirt, the bleached spots will not show up very well.
- Set up a safe space to work. Open a window or have a vent fan running to suck away the fumes. You may also want to cover the floor or your area with plastic tablecloths in case of any spills or splashes.
- Next, soak your shirt in cool water. You can do this in a clean kitchen sink or a bucket of cool water. Wring out the water so that you can work with a damp, but not too wet, shirt.
- Fold, twist, or bind the shirt into the desired shape. You can find more details on preparing a shirt for special patterns in the section of this article called “Bleach Dye Shirt Patterns.”
- Next, pour a gallon of chlorine bleach into a clean plastic bucket. If you have a very large shirt or a sweatshirt, you may need more. You need enough to submerge the garment entirely.
- Use tongs or wear gloves to lower the folded shirt into the bucket.
- Let the shirt soak for five minutes. After this, check the level of color change. If not much color has disappeared yet, you may need to leave the shirt for up to 20 minutes, checking every five minutes to determine the progress.
- Once you like the level of color change, use your tongs or gloves again to carefully transport the garment to the sink. At this point, you can remove any rubber bands or twine you used to fold the shirt.
- Rinse the shirt under cool running water, then run it through a cold water wash in the washing machine. You can add soap to combat the bleach scent if you want, but you don’t need to.
- Finally, put the shirt through the dryer on a normal cycle, and it is good to go!
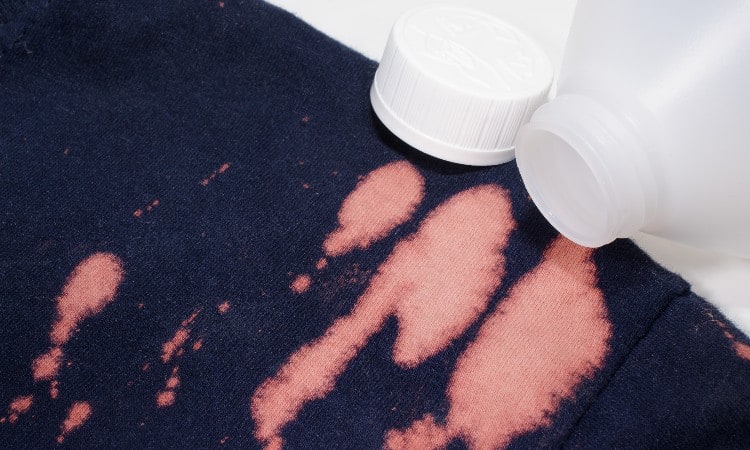
2. Spray Bottle
Using a spray bottle to apply bleach to a shirt creates a uniquely splattered design. If you want a galaxy or star swirl tie-dye design, you may want to try this method!
The big advantages of this method are that you do not need to use as much bleach and that it creates a truly unique design you can’t replicate any other way. The downside is that it will not delineate the folded/twisted pattern of the tie-dye design as clearly as the soaking method will.
- If possible, set up a workspace outside to avoid breathing in any of the bleach as you spray it. A large plastic trash bag or plastic tablecloth spread out will work great!
- Soak your shirt and then wring it out till it feels damp to the touch.
- At this point, you can either fold/twist/bind your shirt to create tie-dye designs, or you can skip that step entirely and use just the bleach spray to create a galaxy-like design on the flat shirt. Or you can spread out the shirt on your flat surface and then scrunch up handfuls of it before spraying on the bleach.
- Carefully pour bleach into a clean plastic spray bottle.
- Spritz the shirt in whatever areas you want a design. If you spray heavily, you will get larger blobs in your design. If you spray lightly, you will get a splatter or galaxy effect.
- Let the shirt sit for five to ten minutes and then see how it looks. You may want to spray it again, let it sit, and then check several times in a row until you get the desired effect.
- After your shirt reaches the level of color change you want, go ahead and rinse it out. If you’re outside, you can use a garden hose for this step!
- Wash the shirt in your washing machine and then run it through the dryer.
3. Reverse Tie-Dye with Bleach
Reverse tie-dye with bleach goes a step beyond simply bleaching patterns into a dark-colored shirt. It also adds color back in, like the glass panes inside the leading in a stained glass window!
To do this, you can start by using any of the bleaching techniques in this section. You can use the soaking, spraying, or ice method. They will all provide interesting backdrops for adding color back to the shirt.
You can use several different types of dye for the re-coloring portion of the process. Any tie-dye kit designed to use with cotton shirts will work well. In general, any fiber-reactive dyes will give you a colorfast and vibrant color. You can also use an all-purpose dye, but it will wash out and fade over time.
- First, use one of the bleaching methods from this section. Soaking works well to create bold designs, but spraying makes a more delicate galaxy pattern that you might like better. The icemelt technique gives you a uniquely watercolor look, too!
- Before washing and drying the shirt, rinse it in water and then again with hydrogen peroxide. You need to make sure you fully neutralize any remaining bleach before adding dye to the shirt!
- Wash and dry the shirt.
- Prepare your dye bath according to the instructions on the dye package or tie-dye kit package. You can use multiple colors if you want a stained-glass look or just one color for a bold contrast with the remaining black portions of the shirt.
- You may need to allow the shirt to rest after the dye bath. Follow the instructions on the dye packet for this timing.
- Finally, rinse and wash the shirt according to the dye instructions!
4. Ice Dye With Bleach
Using ice as a medium to gradually convey bleach to the shirt creates a blurry, watercolor-like design.
- You will need to set up a workspace that you can leave undisturbed for 12 hours. A large rubber-made tote works well for this! You can also use a sink if you do not need to use the sink for 12 hours.
- You do not need to dampen the shirt before you begin this process. It works best on dry fabric.
- Start by either placing a large cooling rack in the bottom of your tote or crumpling up handfuls of foil to line the bottom of the tote. This will provide a raised surface for the shirt to rest on so that it does not become soggy as the ice melts.
- Next, smooth out the dry shirt over the rack or foil.
- Layer a thick coating of ice cubes over the shirt.
- Sprinkle powdered bleach on top of the ice. You do need to use powder rather than liquid bleach for this process! Sprinkle the bleach more heavily in some areas and very lightly in others. This will help create a unique design full of contrasting colors.
- Let the ice-covered shirt rest for 12 hours.
- Finally, rinse and wash the shirt, and then put it in the dryer!
5. Wet vs Dry Bleach Tie-Dye
In most cases, you can bleach tie-dye a shirt most easily when the shirt is damp. In a few instances, such as if you use the ice method, you will find that a dry shirt works better to maintain the unique melting pattern of the ice and bleach powder.
So, why does it matter if you use a wet or dry method? Both bleach and dye soak into fabric differently if the fabric is wet versus dry.
Damp fabric folds, twists, and holds its shape better. This makes it a better choice for bleach tie-dyeing if you want a traditional tie-dye design such as a starburst. The water in the fabric fibers also helps convey the bleach more smoothie and quickly into the material.
Using dry fabric gives you more precise designs because the bleach will not spread through the fabric as much. You can create bold stripes using this method, for example.
Bleach Dye Shirt Patterns
You can create a practically unlimited number of unique tie-dye designs depending on how you fold, twist, or bind the shirt before applying bleach. In this section, you will learn how to create a simple scrunch design, a starburst design, and a Shibori design.
Scrunch Bleach Tie-Dye Design
 Perhaps the easiest of all tie-dye methods, the scrunching method gives you a crumpled paper look in the finished design. Sometimes, this design is also called a crumple tie-dye technique.
It has lots of wiggly edges. It works well with either the icemelt or spray method, though you can make it work for the soak method if you add rubber bands at step 6.
- Prewash the shirt using laundry detergent but no fabric softeners. Do not put it in the dryer, as the scrunching works best on damp material!
- Cover your workspace with a large trash bag or plastic tablecloth. Place a large wire rack on top of this plastic covering.
- Put the damp shirt on the metal rack.
- Start in the center of the shirt and scrunch together handfuls of the fabric. If you want a bolder design, make tight crumples. For a looser, more flowing design, lightly squeeze the handfuls of the damp shirt.
- Work out toward the edges until the whole shirt has crumples in it.
- If you want to soak the shirt in bleach, wrap large rubber bands crossways over the shirt to hold the crumples in place. If you want to use the spray method, you can skip this step.
- Finally, apply bleach according to the bleach dye method of your choice!
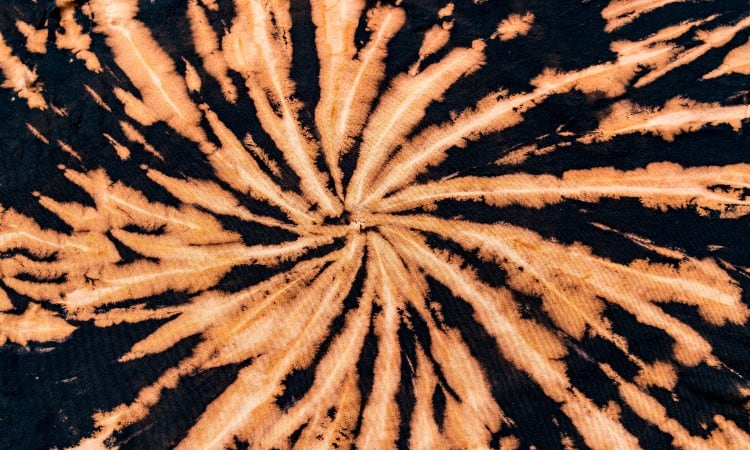
Starburst Bleach Tie-Dye Design
The starburst design gives you pops of bleached color explosions all over your shirt! Plus, this fun design works well for beginners because you can set it up quite easily.
- Wash your shirt in cold water using plain laundry detergent, and then remove it from the washer when the cycle finishes.
- Spread out your damp shirt on a covered workspace.
- To make the design, you will pinch lots of small sections of the shirt, squeeze them into small cones of fabric, and then wrap small rubberbands around each cone to hold it in place. You can make as many or as few cones as you like. The more you make, the more intricate your design will become!
- Once you have secured all the rubber bands around the cones of the fabric, you can use any bleaching method you like. If you use the spray method, you will add a galaxy-like background to the starbursts!
Shibori Bleach Tie-Dye Method
 Shibori is a Japanese art form that has many variations, but all of them involve folding and tying the fabric before applying dye or bleach. This fairly simple square fold version will allow you to create intricate, unique designs on a dark-colored shirt.
- Fold in the sleeves of the shirt so that they lie flat on the shirt’s body.
- Fold the left third of the shirt toward the center longways.
- Fold the right third of the shirt over the top of this lengthwise. This will create one long rectangle.
- Measure the width of the rectangle from the short side to the short side. You will want to make the next folds the same size as this measurement to create squares.
- Now you will fold up from the bottom of the rectangle, accordion-style. Make each fold the same size, as close to your previous measurement.
- Once you have a square of fabric left, place small wooden blocks on either side of the square. Use five or six rubber bands to hold this all together with the square shirt like the filling in a wooden block sandwich.
- Finally, use the bleach soak method described earlier in this article.
What Bleach Should You Use for Tie-Dye?
No products found.The best bleach to use for bleach dyeing or reverse tie-dyeing is No products found..In general, oxygenated bleaches like OxiClean provide a much safer way of treating stained or dirty clothes. But in the case of bleach dyeing, you want to remove the original color from your shirt, so you need a very strong chemical agent like chlorine bleach.
Should you dilute the bleach, you use for dyeing shirts? This is a tough question and no one in the textile art world agrees on the answer!
Using diluted bleach takes longer but is safer on the shirt’s fabric. Using straight bleach creates bolder designs and works a lot faster, but there is some danger that the strong bleach could damage the shirt. You will have to decide for yourself which method you prefer!
How to Bleach a Black Shirt White
In some cases, you can bleach a black shirt white by using an extended soak in a bleach and water solution. But much of the time, even prolonged exposure to bleach will not turn a black shirt fully white. You will more likely achieve a tan or ivory shade. Plus, this process works on cotton but will not work well on polyester.
- Mix one quart of bleach with four quarts of cold water in a plastic bucket.
- Lower the shirt into this solution and let it sit for ten minutes to one hour. Keep a sharp eye on it after the first ten minutes to see how much the color changes.
- While the shirt soaks, prep a second bucket with one quart of hydrogen peroxide and one quart of water.
- Carry the bleach bucket to the sink to avoid dripping bleach everywhere. Remove the shirt and rinse it in the sink under cold running water.
- To neutralize the bleach and stop it from eating into the shirt, submerge it in the hydrogen peroxide solution in your second bucket. Let it sit there for 15 to 20 minutes.
- Wash the shirt in your washing machine without detergent, and then place it in the dryer.
Can You Bleach Tie-Dye Any Shirt?
In general, bleach tie-dyeing works best on dark-colored cotton shirts. You can remove color from polyester, but the process takes longer and does not usually work. This is because cotton absorbs water-soluble dyes, but polyester chemically bonds with synthetic dyes that do not bleach as easily.
Plus, it is much easier to re-dye cotton than it is to re-dye polyester if you want to go beyond bleach dyeing and use the reverse tie-dye technique of adding color back onto the shirt!
If you want to update old clothing that you already own, you can easily find out what kind of fabric the garment is made out of. Simply find the manufacturer’s tag inside the clothing. Usually, you will find this tag on the inside back of the collar or inside one of the side seams.
This label will tell you if the shirt contains cotton, polyester, or a blend of the two materials. So long as the garment contains at least 60% cotton fibers, your bleaching and dyeing process should work fine!
The other factor to consider is that even if you use a cotton shirt or sweatshirt, bleaching the garment will not create pristine white spots on the shirt. So, what color will it turn? This depends on many factors, and the best way to find out is to spot-test a tiny drop of bleach on an inside seam in the shirt.
Let the bleach sit for five minutes, then promptly rinse that area. Allow it to dry and then check the post to see if the bleached area turned yellow, green, grey, or white! That is the color you will get when you bleach-dye your shirt.
How to Bleach a Sweatshirt
You can bleach a sweatshirt in almost exactly the same way you bleach a shirt. First, the process works best on cotton sweatshirts or sweatshirts with at least 70% cotton in them. Second, you may need to extend the bleaching times slightly because a sweatshirt is a bulkier garment that contains more fabric.
Otherwise, you can bleach a sweatshirt using the soaking, spraying, reverse tie-dye, or ice melt methods!
This is a great way to update a cozy but old hoodie. You could also purchase a cheap black hoodie and make it look like an expensive name-brand model by using the bleach tie-dye method on it!
How Long Does it Take for Bleach to Dye Clothes?
Bleach can change the color of the fabric in just a few seconds, but typically it needs five to twenty minutes to create a vivid tie-dye pattern. If you use dry bleach powder over ice, you will need to allow time for the ice to melt.
In most cases, you do not want to leave bleach to sit in the fabric for more than half an hour, as prolonged exposure could damage the fabric.
How long does it take for bleach to turn something white? Not every garment will bleach to a true white. In many cases, the original material used underneath the dye is not even white to begin with! Instead, bleaching a garment may turn it yellow, tan, pale orange, or greenish-brown.
How to Bleach Colored Clothes
You can bleach any darkly colored clothes in the same way as you would bleach black clothes. Colors like bold red, navy blue, or forest green will provide a strong contrast to the bleached areas, giving you a cool design. Light-colored clothes will not work well for bleach-dyeing because you will not see the bleached areas against the light color.
To bleach dark-colored clothes, choose any of the methods described in this article, such as soaking or spraying with bleach.
Conclusion
You can bleach dye a shirt using several popular methods, such as soaking or spraying the shirt with bleach. To create a tie-dye effect using bleach, arrange the shirt in a folded or twisted pattern before applying bleach. For a reverse tie-dye effect, complete these steps and then expose the shirt to a dye bath to recolor the bleached areas.
Bleach dyeing a shirt works best on black or dark-colored cotton shirts. Chlorine bleach will provide the best results and work the most quickly.