Tie-dyeing is an easy way to personalize your clothing. We’ve all seen the bright colors and beautiful designs you can create on white shirts. But does tie-dyeing work on dark clothing too? Can you tie-dye black shirts?
You can tie-dye black shirts, but not in the traditional tie-day way. Different colors of dye will not show up on black. There are two methods you can use instead:
- Bleach tie-dye
- Re-dye
Both of these methods involve removing some of the black dye to create tie-dye designs. But how can you use these methods effectively? Will you achieve the same effect as you would with tie-dyeing white shirts?
Can You Tie-Dye Black Shirts?
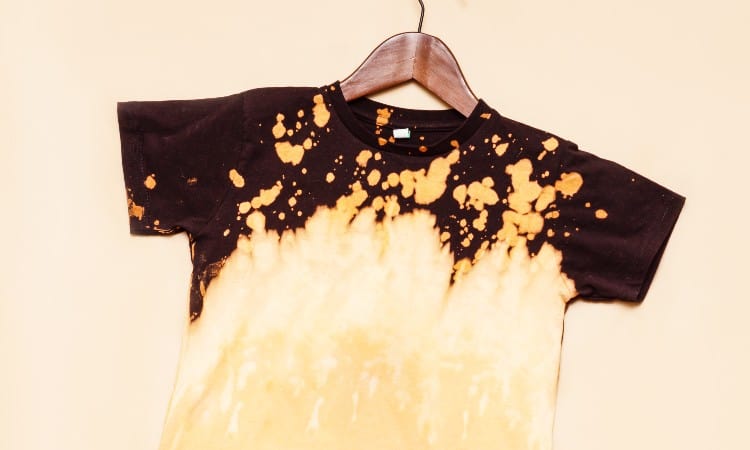
Black shirts can’t be tie-dyed in the traditional way. That means that you can’t tie-dye them into a rainbow of colors or even a single color. Black is a combination of colors already, and dyes are transparent. No matter what color dye you use, it won’t show up on a black shirt.
However, you can use a technique known as reverse tie-dye or bleach tie-dye. With bleach tie-dye, you won’t be adding color. Instead, bleaching the shirt will remove the color from it. You can create the same tie-dye patterns that you would when using colors, but the pattern will show up as being bleached instead of dyed.
If reverse tie-dyeing sounds like something you want to try, it’s not difficult to do. But because you’re using bleach, you will need to be more careful when tie-dyeing. It’s important to familiarize yourself with the process before you attempt to do it. I’ll cover all of the techniques and steps in the next section.
How to Tie-Dye Black Shirt With Bleach
Safety
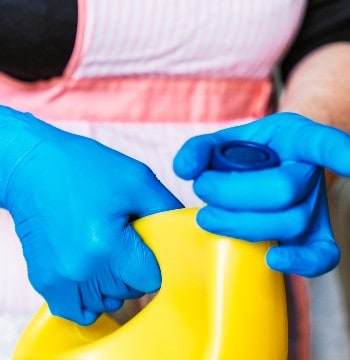 Bleach is a dangerous chemical. It can cause harm to your skin and respiratory system, as well as damage any fabric that you use it on. Before you try to bleach tie-dye a shirt, there are some safety measures that you need to make sure you are following.
The most important thing to know about bleach is that it is extremely powerful, even in small amounts. You don’t need to use much of it to see results. Bleach contains a chemical called sodium hypochlorite, which is what removes the color from clothing. Even a small concentration of a sodium hypochlorite bleach solution will do the trick. You don’t need to buy concentrated bleach. Regular bleach will work just fine.
It’s best to bleach dye shirts in a well-ventilated area so that you aren’t breathing in too many fumes. Bleach tie-dyeing shirts outdoors instead of indoors is recommended. You will also want to wear long rubber gloves to prevent the bleach from getting onto your skin. If bleach does get on your skin, rinse it off with water as quickly as possible to avoid it causing any harm.
Lastly, it is not recommended to use bleach on synthetic fibers. This includes fabrics such as polyester and nylon. Also, you should avoid using it on delicate fabrics such as wool and silk. The chemical strength of bleach can damage the fibers. Plant fibers such as cotton and linen are safe to bleach.
Creating Your Design
The great thing about tie-dyeing with bleach is that you aren’t limited to certain designs. You could create the same designs that you could if you were tie-dyeing the shirt. But before you start to create the design, make sure that you wash the shirt first to remove any dirt or chemicals that could interfere with the dye being absorbed.
It is recommended that you don’t completely dry your shirt before you dye it. You will want to leave it a little bit damp because it will help the dye to be absorbed more easily. After washing your shirt, you’re ready to start creating your design.
If you’re new to tie-dyeing, the video below will show you how to create different patterns. Note that it uses dye instead of bleach, but you can create the same patterns using bleach instead.
Techniques
After you’ve taken the right safety measures and created your design, you will then need to decide which technique you want to use. Three common techniques are used with bleach tie-dyeing. The technique that you use will affect how much color is removed, so keep that in mind when choosing which one to use with your particular design.
And, of course, you’ll need to dilute your bleach first. But you don’t want to use too much, so to avoid being wasteful, I’ll cover how to dilute the bleach depending on which technique you use. I’ll follow that with the steps needed to do each one.
Squirt Bottle
This is the most common technique used for tie-dyeing with colored dye, but it works just as well with bleach. You are simply diluting the bleach and then squirting it over the fabric, which can help ensure that your design turns out the way that you want it to.
The amount of bleach you’ll need depends on the size of your squirt bottle. For bleaching shirts, you will need to dilute bleach in water using a 2:1 ratio. So if you are using the squirt bottle technique, you will fill it with ⅔ of the way full the water and fill the rest up with bleach.
After diluting the bleach, all you have to do is squirt the solution directly onto the shirt. Since you’ve created a design, make sure that you only squirt the bleach where you want it to go. It will soak into the fabric and slowly remove the black dye, which usually takes about 15 minutes.
Spray Bottle
Another technique you can use to bleach designs into black shirts is the spray bottle method. This can work regardless of whether you’ve created a tie-dye design or you just want to create certain effects. You will dilute your bleach using the same ratio as with the squirt bottle. So fill your spray bottle ⅔ of the way full with water and fill the rest with bleach.
Depending on the type of spray bottle you use, some of them have different nozzle settings. For example, you can set a lot of them to either ‘stream’ or ‘spray.’ Stream allows more of the solution to come out while spray produces thinner droplets. Keep this in mind when deciding how much black dye you want to remove and where.
If you have a certain design, you can use ‘stream’ to remove color more quickly. But if you want to go for a more speckled effect, use the ‘spray’ setting. Then, just spray the solution onto the shirt and wait for the color to start to change. Again, this takes about 15 minutes. You can also imprint certain designs onto the shirt, such as leaves, flowers, or letter stencils using this same technique.
Bleach Bath
Lastly, you can give your shirt a bleach bath by submerging it in a bleach solution. This is a great method to use when removing the color from a large area or even one specific area of the shirt only. It can be done with or without a specific design in mind, meaning you can tie-dye the shirt or just remove the color from the bottom half.
When diluting your bleach, you will still use the same 2:1 ratio, modifying it for the size of your container. For example, you may need one cup of bleach per two cups of water. Then, you just dip the areas of your shirt that you want to be bleached into the solution and wait about 15 minutes for the color to be removed.
Rinsing
After giving the bleach plenty of time to react, you will need to rinse off the excess bleach. To do this, it is recommended to wear gloves if you haven’t been doing so already. You will need to unwrap and completely unfold the shirt.
The best way to rinse your shirt is in the kitchen sink or bathtub. They are both deep enough that water and bleach shouldn’t splash on other surfaces during rinsing. Rinse your shirt thoroughly until most of the bleach has been washed off.
Neutralizing
After rinsing the shirt, you will need to neutralize the bleach. Neutralizing it will prevent it from reacting any further and taking away more color or possibly degrading the fibers over time. The best and easiest way to neutralize bleach is to use hydrogen peroxide. Just pour or spray it onto the areas that have been bleached.
Washing
Once your bleached has been neutralized, you can wash your shirt with detergent either by hand or in the washing machine. For the first few washes, it’s a good idea to wash the bleached shirt by itself, just in case some of the bleach is still active.
After the first couple of washes, you don’t have to take any special precautions. You can wash it with other clothing, use your regular detergent, and even dry it in the dryer.
Can You Use Other Products Besides Bleach To Remove Color?
Some people are hesitant to use bleach due to it being a harsh chemical. If you’re one of those people, you may be wondering what else you can use to bleach tie-dye a black shirt.
While bleach is certainly the quickest and easiest way, you can try using Rit Color Remover instead.
Here’s how to do it:
- Wash the shirt to make sure it is clean, but do not dry it. Remember that you want it to be a little wet, and it will get wet anyway when you use the color remover.
- Create your tie-dye pattern to ensure that color is only removed in the areas that you want it removed.
- Fill a stainless steel pot with water, place it on the stove, and turn the eye on to heat up the water.
- When the water starts to simmer (not boil), add a packet of color remover and stir it into the water. Maintain the simmer of the water throughout the whole process.
- Add the shirt to the water and leave it in there for around 15 to 20 minutes. Be sure to stir it around occasionally.
- Remove the shirt from the water when it starts to lose its color. Unwrap and completely unfold the shirt.
- Rinse the shirt in warm water, then gradually cool the water while continuing to rinse the shirt until the water runs clear.
- Wash the shirt by itself using your normal detergent, and let it dry.
Can You Bleach a Black Shirt and Then Tie-Dye It?
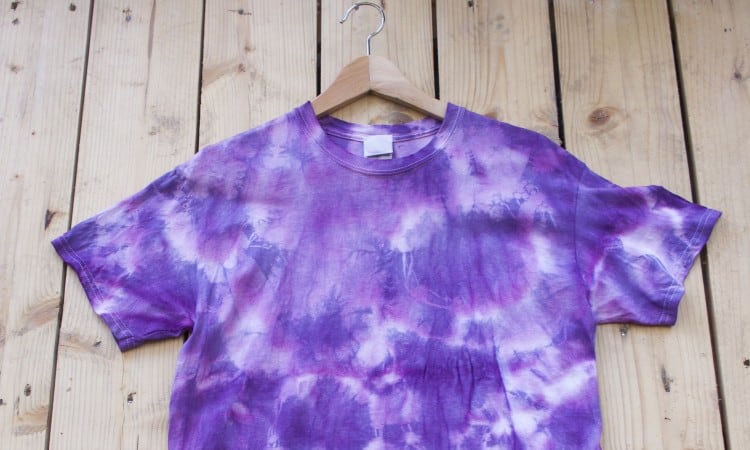
If you don’t like the bleached effect, there’s another technique you can use for tie-dyeing a black shirt. It’s called re-dyeing and it is accomplished by first removing the color from the shirt, then re-dyeing it a different color.
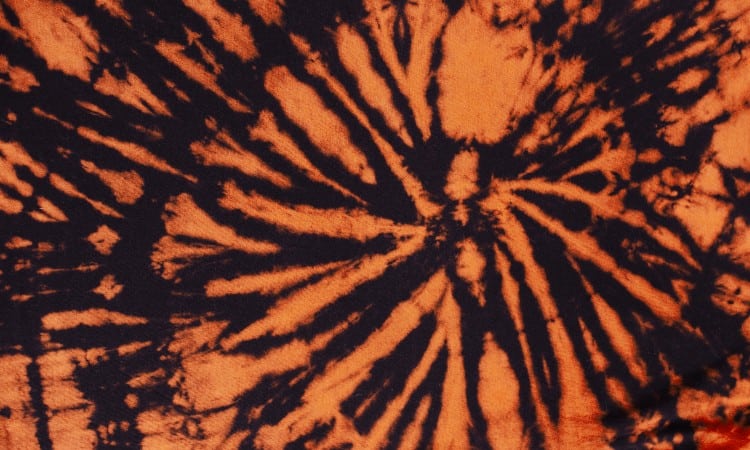
Before trying this technique, there is something that you should know. The first is that when you bleach a black shirt, the bleached areas may not turn completely white. Instead, you will likely be left with faded orange color. That means that if you try to add color on top of the bleached area, the color may look slightly duller than it would on pure white fabric.
But if you’re okay with that and still want to attempt the re-dyeing technique, then let’s proceed. First, you will need to reverse tie-dye your design into the shirt. You can do this by using either the bleach tie-dye technique above or the Rit Color Remover method, including rinsing out the bleach or color remover afterward.
Once you’ve bleached the shirt, you will still need to neutralize the bleach before you attempt to dye the bleached area another color. This is a step that you don’t want to skip because it could affect whether or not the dye is absorbed during the re-dying. But, you do not have to completely wash and dry the shirt in between bleaching and dyeing it.
After neutralizing the bleach, you can now re-dye your shirt in the color of your choosing. One thing that is important to note is that you don’t necessarily have to refold the shirt into the same design. You can simply dye the whole shirt, and the colored dye will only show up on the bleached areas. It will not be noticeable on top of the black dye.
When you’re ready to add the colored dye, it’s easiest to use the dye bath method. Dyeing a shirt is a little different than bleaching it, so follow the directions on the package of whatever brand of dye you choose to learn how to do this.
Can You Tie-Dye Colored Shirts?
Just like you can “tie-dye” black shirts, you can tie-dye other colored shirts as well. However, the color of the shirt determines the methods you can use to dye it. For example, dark-colored
shirts won’t respond to dye in the same way that light-colored shirts will. You can tie-dye some colors the traditional way, but in others, you will have to either bleach tie-dye or re-dye.
Light-colored shirts can be tie-dyed the traditional way, but be aware that the colors may look duller than they would on a white shirt. Darker colors will likely need to be bleach tie-dyed to remove the color from them. You can then re-dye the shirt, but be aware that unless the shirt is black, you will still be able to see the dye even on the parts that weren’t bleached.
To keep this from happening, you will first need to create and bleach the design into the shirt, then rinse and neutralize the bleach. After doing this, you will need to refold the shirt into the same pattern so that you can dye only the parts that you bleached earlier.
The best way to do this is to use the squirt bottle method, which gives you more control over where the dye goes. Apply the dye to the same areas that you applied the bleach to earlier, then give the fabric plenty of time to absorb the dye. Rinse out the shirt, then wash it by itself. If you do this successfully, you can create some really beautiful, two-toned shirts.
Conclusion
I hope this guide was effective in teaching you how to tie-dye a black shirt. Tie-dyeing a black shirt is possible, but not in the traditional way. You will need to bleach the tie-dye design into your shirt instead of dyeing it, or you can bleach it and then re-dye it a different color. If you enjoyed this article, share it with others and leave a comment. Thanks for reading!