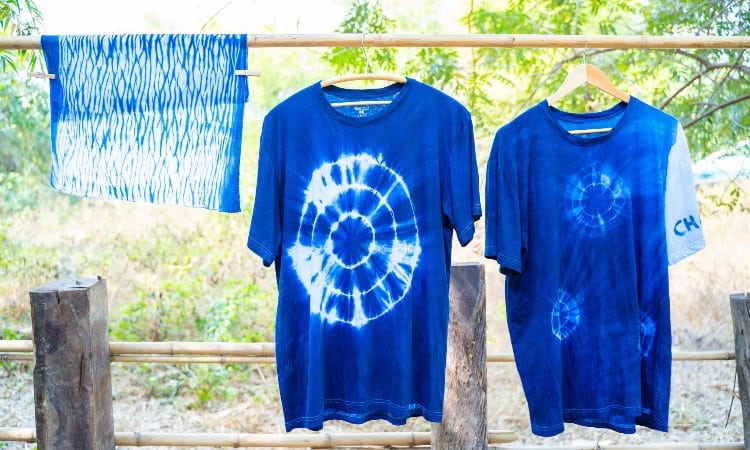
Lately, it seems like every time I hop online, I see lots of videos showing off people’s elaborate tie dye creations. Tie-dye is no longer a relic of decades like the 1960s and 1970s when hippie culture fully embraced these bold, unusual looks. More and more people are choosing these fun patterns as a way to add some flair to their everyday life.
Two main styles of tie dye are growing in popularity today: wet tie dye and dry tie dye. Wet tie dye involves slightly damp dyeing cloth, which allows the dye to move quickly through the fabric and gives a more even finish. Dry tie dye is slightly different since dyes are added while the fabric is completely dry, giving you more control over where it spreads.
If you’re trying to decide which style you prefer between wet vs dry tie dye, you’re probably not alone. This article will walk you through the different steps for each method and how to decide which of the two styles is best for you. Before long, you’ll be creating these bold and colorful looks for yourself!
Quick Navigation
- What Does It Mean to Wet Tie Dye?
- What Does It Mean to Dry Tie Dye?
- What is the Difference Between Wet and Dry Tie Dye?
- How to Tie Dye Wet or Dry:
- How Much Dye Should You Use When Tie Dying?
- How Long Should Tie Dye Sit Before Rinsing?
- What Happens If You Don’t Wet a Shirt Before Tie Dyeing?
- How Do You Get the Best Tie Dye Results?
- Is It Better to Tie Dye Wet or Dry?
What Does It Mean to Wet Tie Dye?
Wet tie dye is just one of many dyeing options available to you, though it just so happens to be one of the more popular ones in use today. This method gets its name because colorful liquid dyes are added to fabric that is already wet. The added moisture makes the dyes spread easily and move through the fabric evenly, producing solid and consistent colors.
Because this method is easy to use, wet tie dye is often a good choice for beginners new to this hobby. However, it can be difficult to control how far the dye spreads, especially if your fabric is too wet. This method is a good option for designs that are not too intricate or where accidental dye spread won’t ruin the overall look you are going for.
What Does It Mean to Dry Tie Dye?
Dry tie dye involves adding liquid dyes to completely dry fabric, which is the opposite of the wet tie dye method. Dyes won’t move through dry fabric quite as easily as they will through the wet fabric, meaning that they won’t spread as far or as evenly across the material. This makes this method more challenging if you’re brand new to this craft.
Dye does not spread as far on dry fabric as on wet, which can be a good thing in certain cases. If you’re trying to create intricate or elaborate designs, dry tie-dying will give you more control over where each color is placed and how far it bleeds into the colors around it. This makes this method very popular with more experienced tie-dye users.
What is the Difference Between Wet and Dry Tie Dye?
The largest difference between wet and dry tie dye is how the fabric is prepared before the dye is added. Wet tie dye requires the fabric to be slightly damp but not dripping. Dry tie dye requires the fabric to be completely dry whenever the dye is added. Beyond that, the application process is very similar for both wet and dry tie dye.
Another main difference between the two is how easy each technique is to use. Wet tie dye is beginner-friendly since it allows colors to spread quickly and evenly. This helps to make an overall better-looking design if you’re a crafter who is not very familiar with dyes and how to create even colors. Dry tie dye is much more suitable for moderate to expert-level tie-dyers.
When it comes to the finished looks of the two, most of the time, it is hard to tell if a shirt has been wet tie dyed or dry tie dyed. Colors will often spread more with wet tie dye, blending more with the areas around them. Dry tie dye spreads less, allowing it to be used for more intricate designs. But either method can create fantastic final patterns on your fabrics.
How to Tie Dye Wet or Dry:

Both wet and dry tie dye require you to use liquid dyes to stain your fabric’s bright colors. Before you begin, you’ll need to purchase your dyes and mix them according to the directions on the package they come in. Dry tie dyeing does require more dye than wet tie dyeing methods, so plan for this if you choose to use this technique.
When choosing your dye, you need to use the correct dye for the type of fabric you are working with. Natural and synthetic fibers cannot typically be dyed by the same products, meaning that using the wrong dye can cause the color to rinse out the first time you toss the fabric in your washing machine. Fortunately, most major tie dye products will tell you which types of fabric they work on.
Preparing Your Fabric
Before you begin, you need to make sure that your fabrics are clean and prepared to go. Even if the fabric is brand new, you must make sure to wash it completely before you dye it. This is because many manufacturers add protective coatings or chemicals to their fabrics before they leave the factory. These additions can affect how well the dye sets into the fabric.
Use soap and as warm of water as the fabric can safely handle when washing your material. However, be careful to steer clear of any liquid fabric softeners or fragrance boosters in this wash cycle. Both of these products can leave a residue on the fabric that will look splotchy once the dye is added.
If you plan to dry tie-dye your fabrics, dry them fully before you proceed. Otherwise, you can allow your clothes to stay slightly damp for the next step. Just make sure they have been rinsed very thoroughly so that no soap residue is left behind.
Creating Designs
Before you apply your dye, you need to decide what design you plan to create on your fabric. Most tie-dye styles are created by folding the fabric in intricate ways and tying it with rubber bands or string. How you arrange the fabric into folds and creases is what determines which of the signature stripes, swirls, and other patterns tie dye is known for are visible in your final designs.
Fortunately, many professional dye companies have created online tie dye libraries containing designs for you to replicate if you’re looking for a bit of inspiration. They’ll also often tell you how to fold your fabrics to get the look you want your final design to have. You can also play around with the designs on your own, bending, twisting, and folding your materials to see what fun looks you create!
How to Wet Tie Dye:
If you have chosen to use the wet tie-dye method, grab your slightly damp fabric and make sure that you have folded and tied it into the design you want. Then, take your liquid dyes and begin to slowly apply them to different areas of your fabric. Add enough so that the dye fully seeps through the material to the other side of the fabric but not so much that it bleeds heavily into other areas of the material.
Try to be strategic about where you place your dye colors to complement one another. The dyes will almost always spread throughout the wet fabric and blend with the other colors they touch. You don’t want to make the mistake of placing green dye next to red, for example, and creating odd brown colors wherever they meet!
A good rule of thumb is to keep complimentary colors next to one another. Blues and greens, for example, pair well with each other. So do reds, oranges, and pinks. You can also create buffer zones by leaving white space or adding black dye in between your colors to help stop them from mixing.
Once the dye has been fully added, the fabric needs to sit to allow the complete color change to happen. The fabric needs to stay wet and warm during this process, so be sure to carefully seal it in plastic wrap or in an airtight plastic bag. Don’t be tempted to rinse the dye out too early, or you won’t get the full effect!
How to Dry Tie Dye:
The dry tie dye method is very similar to the wet tie dye method, except that your fabric starts completely dry instead of slightly damp. Once you’ve folded your dry cloth into the design you want, you can then begin to slowly add your liquid dyes to the fabric. The key here is to add the dye gradually to give it time to soak in. Otherwise, it can bead up and run off the fabric instead of soaking in where you want it to.
You’ll want to be careful to fully saturate the fabric to give you the best results possible. Dry fabric fibers absorb a lot of the liquid as you add it, making it difficult for the dye to fully reach the other side of the material. Because of this, you’ll need lots of dye on hand to make up for what is absorbed by the fabric.
The plus side to dyeing with this method is that the dyes will better stay where you want them to be on the material. They will also typically be more intense in color since there’s no water in the fabric to dilute them. This makes it possible to create bold and intricate designs on your fabric projects.
Once you’ve added your dye, carefully wrap the cloth in plastic wrap or place it into a water-tight bag. You want to keep the dye wet while it sits to stop it from drying out and not fully changing the color of the cloth. Be sure to set the fabric in a warm place to wait for the final results.
Rinsing and Washing Dyed Clothing
With either tie-dye method, you’ll need to let the dye sit for a while to let the color fully set in. How long you let your dye sit will depend on the specific dye you are using and how intense you want your colors to be. You should always follow the instructions on your dye packaging to ensure you let the dye sit for however long the manufacturer recommends.
Typically, you can get lighter color tones if you rinse the fabric out sooner than what is recommended. However, bold colors will need to sit the full recommended time for the dye you are using. At a minimum, you should expect that your dye will need to sit for anywhere between 8 hours and 24 hours to get full results.
Once the dye has finished setting in, it is time to rinse and wash the material. To remove any excess dye, you should always rinse your tie-dyed fabric in cold or cool water. Hot water can cause the dye to fade since the process isn’t entirely complete at this stage. Hotter temperatures also tend to make colors look a bit dingy and less bright than they should be.
You should rinse your fabric in cool water until the water runs clear. This is how you know you have gotten all the excess dye out of the material. Then, wash the fabric in your washing machine separately from your other clothes. The first few times you wash the material, the fabric will likely let off excess color that could accidentally stain your other clothing.
If your fabric can safely handle the heat, you can dry your tie-dyed fabrics. This will help to further set the color into the material. After the first few washes, your tie-dye creations can be washed with your regular clothes as long as they are similar in color.
Caring for Tie-Dyed Clothes
Tie-dyed clothes are fairly easy to care for long-term. Your colors will stay brighter if you carefully minimize how much heat they come into contact with. Cold water wash cycles and air drying your material will make your colors stay bright for longer.
You should avoid adding bleach or other cleaners that can lighten colors since these will run the dyes in your tie-dye. You can also purchase special fabric detergents, such as Synthrapol detergent, specially designed for tie-dyed projects. These help to further protect your colors in the wash.
How Much Dye Should You Use When Tie Dying?
How much dye you use in your tie-dye projects depends on the type and brand of dye you use. It is always recommended that you check the packaging information on your dye to see what the manufacturer recommends. You can also look online at the manufacturer’s website to see what amount of dye they recommend for your project.
Most store-bought tie-dye kits will usually contain enough dye to make several shirts. The packaging will often tell you how far the dye will stretch to give you an idea of just how large of a project you can make.
Adding extra water to your dyes will dilute them, allowing the dye to stretch further but also weakening the color and producing lighter shades. If you’re planning on making a large project or lots of pieces, this can be a way to make your dye cover more fabric.
Remember that wet tie-dye projects will almost always take less dye than dry tie-dye pieces will. The dry fabric used in the dry tie-dye method will absorb much more liquid dye than other methods. If you plan to dry tie dye, you should plan to use as much as double the amount of dye you would otherwise need.
How Long Should Tie Dye Sit Before Rinsing?
Most tie-dye should sit for between 8 to 24 hours before rinsing to get the complete result intended. The longer the dye sits, the more intense the color will be. However, you shouldn’t leave your dyes much past the 24-hour mark since this can lead to dark splotches on the material.
As a general rule of thumb, rinse your fabric at the 8 to 12-hour mark if you want lighter colors. Leave the dye for 24 hours to get bright, bold color tones. You can always add dye to a scrap piece of fabric while doing your projects and rinse it before you rinse your larger pieces to check if the dye is as dark as you want it to be.
What Happens If You Don’t Wet a Shirt Before Tie Dyeing?
If you don’t wet a shirt before tie dyeing, the dye will still work on the fabric. However, the dry fabric will absorb much of the dye as it makes its way through the fibers, which can stop it from fully penetrating through the entire piece. This can lead the dye to look splotchy and uneven.
If you don’t wet your shirt, be prepared to use a lot more dye to get an even finish. The dye will also not spread as far as it will when the shirt is wet, so take care to place the dye everywhere you want it to be on the fabric. However, not wetting the shirt is perfectly okay and won’t ruin the fabric.
How Do You Get the Best Tie Dye Results?
The best tie-dye results come from fabric that has been carefully folded and tightly tied to create interesting patterns. You then want to make sure that you fully saturate the material to get the dye to completely soak every strand. If you don’t do these two steps, the lines in your patterns will not be sharp and crisp and your finished project will have uneven colors throughout.
You’ll also get the best tie dye results if you let the dye sit for the full length of time recommended by the manufacturer. You should also take care to only rinse out your dye in cold water. Both of these steps will help ensure your dyes fully set into the material and stay bold and bright.
Is It Better to Tie Dye Wet or Dry?
When choosing your tie-dye style, both dry and wet methods produce good results. However, wet tie dye is often the best choice for beginners and is typically the easiest method to use. Because of this, we recommend you start your tie-dyeing journey by trying the wet dye method before moving on to the dry technique. Either way, we can’t wait to see your results!