There’s nothing like a comfy sweatshirt to make you feel cozy, especially as the temperatures get colder. And lately, distressed sweatshirts have been all the rage. Not only do distressed sweatshirts look vintage, but they can also be more comfortable. But you don’t have to shell out money for a pre-manufactured sweatshirt. Why not distress one you already have at home instead?
You can use several things to distress a sweatshirt, including sandpaper, a razor, scissors, bleach, and even a cheese grater. The key is to focus on areas that would naturally become worn out over time. You can run sandpaper over the sweatshirt, cut strategically placed holes in it, or use bleach to fade the color. You can use a razor to distress any graphics as well.
In this article, I’ll explain how to distress a sweatshirt at home. I’ll discuss all the tools you have at your disposal that can be used to distress a sweatshirt and the steps you need to follow. I’ll also explain how to bleach a sweatshirt to make it look more vintage and how to fade a sweatshirt without using bleach.
Quick Navigation
What Can Be Used to Distress a Sweatshirt?
Before we get into how to distress a sweatshirt, it’s good to know what tools you might need. There are many things you can use to distress a sweatshirt, including some that you may not have even considered. I’ll explain these tools in more detail to know if you want to use them and how to use them when creating your distressed sweatshirt.
1. Sandpaper
 One of the most common tools used to distress a sweatshirt is sandpaper. Essentially, you can run sandpaper over the sweatshirt fabric to make it softer and give it a softer texture. This is great for brand-new sweatshirts that still feel super stiff when you wear them.
It’s better to use fine-grit sandpaper rather than coarse grit. The reason is that coarse-grit sandpaper creates too much abrasion, which could pull the fabric too much and damage it. Some people prefer the “damaged” look for their distressed sweatshirt, but you don’t want it to become damaged unintentionally by using the wrong type of sandpaper.
2. Cheese Grater
 Consider using a cheese grater if you want a more damaged look to your sweatshirt. This may not have ever crossed your mind, but cheese graters are great for distressing sweatshirts because many of them have different-sized grates and textures on them.
Essentially, cheese graters can create rips and tears in your sweatshirt, depending on which side of the grater you use. But if pulling and tearing your sweatshirt isn’t your intention, you may wish to skip the cheese grater altogether.
3. Bleach
 Bleach is another popular tool that people use to distress t-shirts. Using bleach can give your t-shirts a faded and vintage look and make them look and feel more worn-in. Be aware that bleach will pull some of the colors out of your sweatshirt, so don’t use it if that’s not your intention.
You also want to be careful when using bleach because it can damage some fabrics. Make sure that whatever fabric your sweatshirt is made of is safe to bleach by checking the care tag. Follow the instructions for diluting the bleach carefully as well. Also, take measures to protect yourself when using bleach since it can create respiratory irritation and damage your skin.
4. Razor
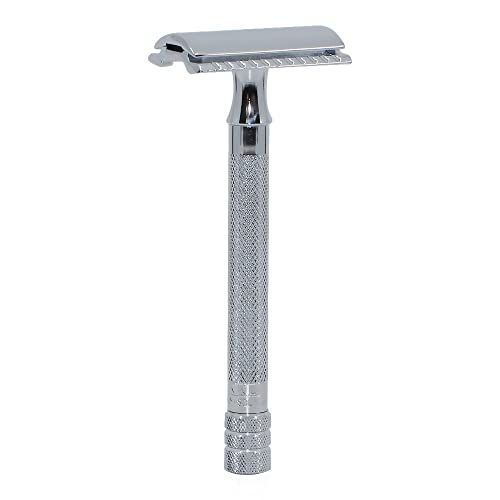 If your sweatshirt has a graphic printed on it, you can also use a razor to distress the graphic.
Distressing the graphic can give your sweatshirt a truly vintage look, especially if you’ve also distressed the rest of the sweatshirt.
It’s certainly your preference whether you want to distress the graphic or not. But some people may find their sweatshirt looks weird if they distress the sweatshirt itself but not the graphic. The graphic may still look new, while the other sweatshirt looks old.
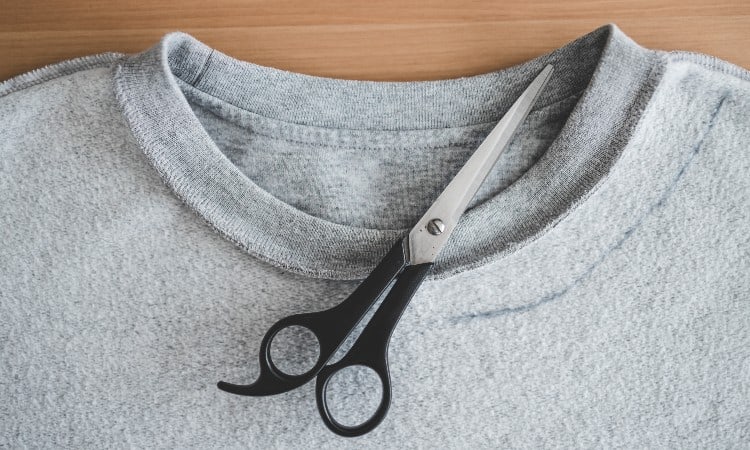
5. Scissors
Another tool you can use is your trusty scissors. Scissors can be used to create holes in your sweatshirt. You can cut holes of different lengths and in different locations.
You can even use scissors to loosen up some hemlines and seams to make the sweatshirt fit more comfortably overall. You just want to make cuts carefully and strategically because once you make cuts, you can’t undo them and your sweatshirt could start to look messy quickly.
6. Salt
Finally, you can use salt to distress a sweatshirt. Using salt serves two purposes. The first is that it can be used to fade the sweatshirt to give it a more vintage look. But salt can also be used to soften sweatshirts due to their abrasiveness. Just be aware that this method of distressing a sweatshirt can take longer to be effective than other methods.
How to Distress a Sweatshirt
Now that you know what tools you can use to distress a sweatshirt, you can plan how you want to go about distressing it. You can use several of these methods together if you want. It just depends on how distressed you want your sweatshirt to be. The following are general things that you want to keep in mind when distressing your sweatshirt.
You want the sweatshirt to look as naturally distressed as possible. Otherwise, it can start to look a bit messy. That being said, you first need to decide what areas you want to distress. Start with areas that would become naturally worn out over time, such as around the shoulders, collar, and side seams. Once you’ve distressed those areas, you can decide whether you want to continue or leave the sweatshirt as is.
It’s good to start by using sandpaper to make the sweatshirt feel softer and more comfortable overall. Support the sweatshirt by placing your hand underneath the area you’re distressing. Then, rub the sandpaper over the areas you want to look more worn and feel softer. Make sure to use consistent pressure to create an even look.
If you want, you can run a cheese grater over the fabric to create “tears” and pulls in the fabric. The types of tears and pulls will depend on what part of the cheese grater you use. This will also determine the overall look of the sweatshirt, so choose carefully. Finally, if the sweatshirt has a graphic, you can simply run a razor over it to also distress the graphic.
With Scissors
If you want to make your sweatshirt look distressed by having rips and tears in it, you can do this by using just scissors. Scissors allow you to create more precise rips and tears in the fabric than you would use by using a cheese grater. Plus, you can use scissors to distress a sweatshirt even if you don’t want to use sandpaper to make it softer.
This is where you want to be a little bit more strategic when planning your cuts. You can create cuts in different lengths and different places. Just make sure not to go overboard. Cutting too many holes can make your sweatshirt go from looking distressed in a neat way to just looking sloppy.
Another thing you can do with scissors is use them to cut the hemlines and seams. This can help give the sweatshirt a more relaxed and comfortable fit by loosening it up. For example, maybe you want to cut out the collar to give your sweatshirt an off-the-shoulder look. Or, you can cut the seams up the sides to loosen the band at the bottom. You can also cut the sleeve cuffs so the sleeves don’t fit as tightly.
With Bleach
Bleach is one of the fastest and most popular ways to distress sweatshirts and other clothing. Bleach can add depth to a sweatshirt by fading the colors as a whole or only on certain areas, depending on the look you’re going for. This can give sweatshirts a vintage look. Be aware that bleach can also deteriorate fabrics, so you don’t want to use too much.
There are two ways you can use bleach to distress a sweatshirt. The first is to simply spray the bleach directly onto the shirt. Start by laying the sweatshirt on some newspapers, then fill a spray bottle with straight bleach.
Lightly spray the sweatshirt to give it a blotchy, faded look. The closer you get to the spray bottle, the bigger the blotches. Just be careful and make sure that you aren’t spraying the bleach toward yourself. It’s a good idea to wear rubber gloves and eye protection, just in case.
Another option is to dip the sweatshirt in bleach. You can create a two-toned look by dipping only part of the shirt in bleach or soak it in bleach to fade the whole thing. It’s good to dilute the bleach with water according to the instructions on the packaging. This will ensure you don’t take out more color than you intended.
Stir the shirt in the bleach every 3-5 minutes to make the effects more even. The longer you leave the shirt in the bleach, the more faded it will become. You may wish to check it periodically to keep it from fading too much. But usually, 45 minutes is the maximum time you should leave the sweatshirt in the bleach. Afterward, rinse the shirt with just water and wash it by itself.
How to Fade a Sweatshirt
Even if you don’t want to distress your sweatshirt by making it softer, cutting holes in it, or bleaching it, you can still make it look distressed or vintage. There is another way to fade a sweatshirt without using bleach. This method is more controllable, but it takes a bit longer than bleach.
You can use salt to fade sweatshirts over time. It works best with brightly colored sweatshirts, not sweatshirts that are gray, black, or another neutral color. All you have to do is add ¼ cup of baking soda and 1 cup of salt into the washing machine.
Place the sweatshirt in the washer by itself. Wash on a normal cycle using a hot water temperature. The salt creates an abrasion that can fade the color and make the sweatshirt. You can repeat this as often as necessary until the desired color and softness are reached.
Conclusion
So there you have it! Why spend money on a distressed sweatshirt when you can do it yourself at home? There are several ways to distress a sweatshirt, depending on the look you want to achieve.
Whether you want the sweatshirt to look and feel softer, have rips and tears in it, or give it a vintage, faded look, I hope this guide helps you achieve it. If you enjoyed this article, share it with others and feel free to leave a comment as well. Thanks for reading!