Sewing machines have come a long way since the invention of treadle-powered machines in the late 1800s. But despite all the advances, every sewing machine still uses a set of basic parts. This means that understanding the parts of a sewing machine and their functions will help you sew!
The basic parts of a sewing machine include the needle, the threading mechanism, and the bobbin. The thread path running from the thread spool through the tension discs and down to the needle also plays a key role in the machine’s operation. User controls like stitch selectors, a power on/off switch, and a foot pedal also help run the sewing machine.
In this article, you will learn about the basic parts of a sewing machine and how this kind of machine operates. You will discover thirty essential parts of a sewing machine and their function. Finally, you will find tips for locating parts for a Brother or Singer sewing machine.
Quick Navigation
- What are the Basic Parts of a Sewing Machine?
- How Many Parts Does a Sewing Machine Have?
- 30 Essential Parts of a Sewing Machine and Their Functions
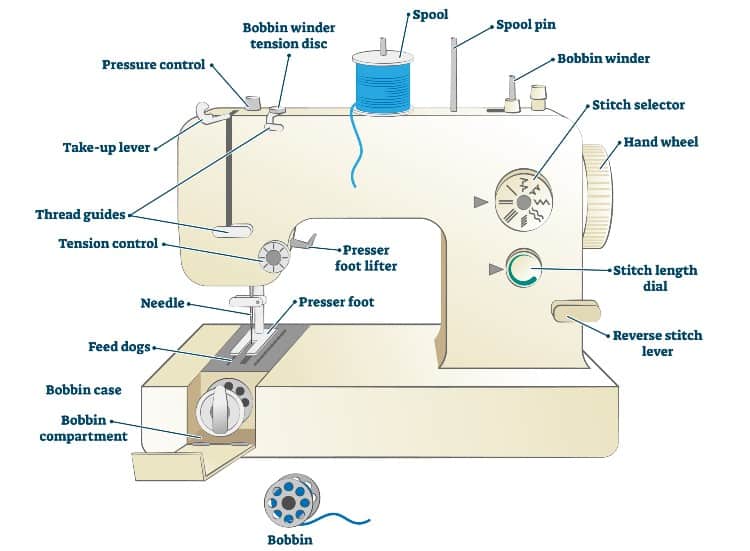
- 1. Arm
- 2. Throat
- 3. Free Arm
- 4. Needle
- 5. Needle Plate
- 6. Needle Bar
- 7. Needle Clamp
- 8. Needle Threader
- 9. Handwheel
- 10. Bobbin
- 11. Bobbin Case
- 12. Bobbin Winder
- 13. Bobbin Winder Thread Guide
- 14. Bobbin Winder Stopper
- 15. Shuttle Hook
- 16. Feed Dogs
- 17. Thread Spool Pin
- 18. Thread Guide
- 19. Tension Discs
- 20. Thread Take-Up Lever
- 21. Presser Bar Lifter
- 22. Presser Foot
- 23. Walking Foot
- 24. Zipper Foot
- 25. Stitch Width Selector
- 26. Stitch Length Selector
- 27. Stitch Pattern Selector
- 28. Reverse Stitch Control
- 29. Foot Pedal
- 30. Power Cord/Power Switch
- Parts of a Sewing Machine Singer
- Brother Sewing Machine Parts
- Old Sewing Machine Parts
- Conclusion
What are the Basic Parts of a Sewing Machine?
The basic parts of a sewing machine are the pieces that operate the upper and lower thread, like the needle and the bobbin. Most modern sewing machines have a lot of somewhat essential parts, such as stitch selectors these days as well. But at its core, a sewing machine uses a needle, bobbin, and two threads to create stitches.
So, what allows a sewing machine to do this? Let’s take a quick look at the most basic operation of a sewing machine before you learn about each part.
When you make a stitch using a handheld needle and thread, you pass the thread through the eye of the needle. Then you put the pointy tip of the needle into the fabric and push the needle and thread all the way through. When you push the needle and thread back through from the back side of the cloth, a portion of thread remains there, forming a stitch.
This is not how a sewing machine makes a stitch. At first glance, the process may look similar because, of course. The machine still uses a needle and thread! But the mechanics of the process look quite different.
A sewing machine uses two threads, not one thread like a handheld needle and thread. These threads come from the thread spool on the top of the machine and the bobbin below the needle.
The kind of stitch made by a regular sewing machine is called a lock stitch. The machine forms this stitch by following these steps:
- The needle carries the upper thread down until both the needle and thread puncture the fabric.
- This happens very quickly in real life, but let’s freeze-frame this instant for a moment and see what’s going on here. At this point, the pointy tip of the needle and a loop of the top thread are both hanging out on the reverse side of the fabric, below the needle plate.
- Several other key pieces of the machine also hang out in this area below the needle plate, including the lower thread carried on a round bobbin.
- As the needle starts to rise back up, the shuttle around the bobbin rotates.
- The rotating shuttle has a hook on it. This hook catches on the loop of thread around the needle.
- As it catches, the hook also forces a loop of the bobbin thread out into the loop of the upper thread.
- In this one instant, the upper and lower threads interlock together.
- When the needle goes all the way back up, it leaves a section of its thread locked on the reverse of the fabric because of the bobbin thread.
- This creates a lockstitch.
This basic process holds true whether you want to sew a straight stitch, a zigzag, or even a fancy row of leaves or flowers!
How Many Parts Does a Sewing Machine Have?
Every sewing machine has dozens of moving parts, though the exact number of parts varies depending on the type of machine. A high-end computerized machine will have a lot of computerized parts, while a mechanical machine will have fewer parts and simpler controls, for example.
As you saw in the previous section, the basic function of most sewing machines remains the same no matter how fancy the machine is. But it’s also true that fancier models provide additional features and often come with additional parts.
You can add on extra parts to many sewing machines. You can attach a buttonhole maker to even a simple mechanical machine. This allows the machine to sew the edging around the buttonhole.
Or you can insert a double needle into some machines and use two upper threads instead of just one. This allows you to sew a double row of stitches at the same time!
This means that you can’t pin down the average number of parts sewing machines generally contain. On the other hand, you can count the thirty core, essential parts of all sewing machines, as you will see in the next section!
30 Essential Parts of a Sewing Machine and Their Functions
When you leave aside all the frills and optional extras, almost every sewing machine has thirty essential parts that drive its core functions. These include obvious elements like the needle and bobbin and pieces you may not know, like the needle bar and free arm.
Understanding how these parts work will help you master your sewing machine. If you know how the machine is supposed to work, you can much more easily fix it when things go wrong!
1. Arm
The arm forms one of the most important parts of a sewing machine’s anatomy. When you look at a sewing machine, the body of the machine forms the shape of a rectangle missing the left side. The arm is the top of the rectangle and holds key elements like the tension discs, the upper thread, and the bobbin winding mechanism.
The arm also contains many of the mechanics of a sewing machine and any computerized elements. It connects the rest of the machine to the powerful electric motor contained in the right-hand side of the casing, called the stem of the machine.
Specialty models like quilting machines may have an extra-long arm to allow for more room for bigger sewing projects.
2. Throat
When you look at a sewing machine, you see a space between the arm and the bed of the machine. If you think of a sewing machine as a rectangle, this space forms the middle of the rectangle. This space is called the throat.
While not a part of the machine per se, it is essential because it is where you place your fabric to sew! You will also find that some models highlight the fact that they have extra throat space. This is a key feature for large-scale projects such as quilts.
3. Free Arm
Almost all modern sewing machines provide the option of a free arm, which is a portion of the sewing machine bed sticking out into the air.
Generally, you remove a portion of the sewing machine case from in front of the needle plate. This allows access to the back left corner of the sewing machine bed held off your table or work surface. You can slide tubular sewing projects like sleeves onto this free arm as you sew.
4. Needle
The needle performs the essential task of carrying the upper thread through the fabric as you sew.
The top portion of a sewing machine needle has a flat, rectangular shape called the shank. The narrow cylindrical portion of the needle is called the shaft, and the pointed part at the bottom of the needle is called the point. The hole in the needle is called an eye, just like it is in a handheld needle.
Most sewing machine needles also have something called a scarf, or groove, on one side of the eye. This helps the loop of the upper thread catch onto the lower thread during the lockstitch process.
You can use many different shapes and sizes of needles in the average sewing machine. You should always choose a needle to match the type of fabric you want to sew. Small, sharp needles work best for delicate or silky fabrics, while knit fabric requires a dull, rounded ballpoint needle.
5. Needle Plate
Sometimes also called the throat plate, the needle plate sits on the base of the machine right below the needle. This small metal plate has several holes cut into it for the feed dogs and for the needle to go up and down. It also features sewing guides to the right that help you line up your seam allowance width as you sew.
The needle plate almost always has a screw holding it in place. You may need to remove this and lift the needle plate to clean or repair things like the bobbin casing.
If your machine has a top-loading bobbin, the needle plate will sit just behind the slot that opens to access the bobbin.
6. Needle Bar
The needle bar holds the needle in place. It connects to the crankshaft, a long spinning device within the arm of the machine that is powered by the motor. This crankshaft drives the needle bar up and down, which in turn lifts the needle up and down!
7. Needle Clamp
The needle camp loosens or tightens to allow easy access to the needle. This tiny device deserves its own mention, as it can cause lots of trouble if you insert a needle into the needle bar and do not tighten the clamp properly.
The clamp looks like a small screw attached to a loop of metal that goes around the needle bar. To loosen or tighten the clamp, you use a special flathead screwdriver.
8. Needle Threader
Many modern sewing machines come with a simple automatic threading device. A machine with this feature is called a self-threading sewing machine, though this is a bit of a misnomer since the self-threading does require some help from you!
The automatic threader often looks like a small metal hook on a separate shaft next to the needle. As you thread the upper thread, you loop the tail of the thread beneath the hook, which turns sideways and inserts a loop of thread into the eye of the needle. This can save a lot of time as you sew.
9. Handwheel
The handwheel can manually drive the crankshaft, raising and lowering the needle and essentially manually powering the machine. This device is always located on the stem of the machine on the far right, just above the power cord.
Why do machines still feature a handwheel when they are powered by electric motors? This handy tool allows you to raise or lower the needle at the beginning and end of projects. It also allows you to test out how parts of the machine work without turning it on.
10. Bobbin
The bobbin looks like a tiny cylindrical spool. It holds the lower thread and rotates as the machine runs, allowing the shuttle hook to catch the upper thread and create a lock stitch.
Some machines have a top-loading bobbin that you drop into a hole in the bed of the machine in front of the needle. Other machines have a front-loading bobbin that you access through a small door in the base of the machine.
While all sewing machines use bobbins, bobbins do come in slightly different shapes and sizes. Make sure you use the kind intended for your sewing machine!
11. Bobbin Case
A bobbin case looks like a snail-like shell for the bobbin. It encloses the bobbin on all sides except the front and provides a slot for the bottom thread to go through.
The bobbin case is what makes it easy for the bobbin to rotate smoothly during the sewing process. It also provides a small but key amount of tension for the lower thread. You can alter this tension by turning tiny screws on the bobbin case, though this tension is pre-set on most machines.
12. Bobbin Winder
The bobbin winder looks like a small, stubby pin sticking up from the top of the sewing machine. Unlike the thread spool for the upper thread, the lower thread requires you to put thread onto each bobbin before use. This way, you can match the color of the thread for the upper and lower thread.
The bobbin winding mechanism on most sewing machines is typically located on top of the arm, often to the right. You slot the empty bobbin onto this and then use the bobbin winder thread guide to move the thread from the spool to the bobbin.
13. Bobbin Winder Thread Guide
The bobbin winder thread guide shows you the path the thread takes to get from the spool of thread to the empty bobbin slotted onto the bobbin winder. For most machines, you twist the thread around a small screw to provide tension before stretching the thread across the top of the machine to the bobbin winder.
14. Bobbin Winder Stopper
The bobbin winder stopper looks like a small screw or pin located to the right of the bobbin winder.
Once you have threaded the bobbin on the bobbin winder, you push the bobbin sideways till it bumps into the bobbin winder stopper. This alerts the machine that it should wind the bobbin instead of sewing when you step on the foot pedal.
The bobbin winder stopper also has a feature that tells the machine to stop spinning the bobbin winder when the bobbin fills up with enough thread.
15. Shuttle Hook
The final essential part of the bobbin apparatus is the shuttle hook. This part carries the thread around the bobbin case and is the hook that catches the upper thread and allows the lock stitch to form.
Sewing machines can have either a rotary or an oscillating hook system. Generally, less expensive machines use an oscillating system that goes around half of the circle of the bobbin case and then rolls back up. It does not complete a full circle the way a rotary system does.
Expensive and industrial-strength machines often use a rotary hook system. In this model, the shuttle hook makes a full circle around the bobbin case. This fancier system does not cause the machine to vibrate as much as it sews and provides a smoother, quieter sewing experience.
16. Feed Dogs
Feed dogs look like two rows of tiny, triangular teeth that stick up out of the needle plate. These teeth move the fabric smoothly beneath the needle as you sew. Without the feed dogs, the needle would keep going up and down on the same spot in the fabric!
A somewhat complex system of cams and gears drives the feed dogs. On more high-end machines, the feed dogs may also provide something called differentiated feed, which means that the machine can sense different kinds of material and operate the feed dogs accordingly.
17. Thread Spool Pin
The thread spool pin provides slots through the middle of a spool of thread and holds the spool in place as it spins. On most machines, you can find this pin either on the top of the arm or behind the arm.
The spool pin will also come with a spool cap that prevents the spool from flying off as you sew.
18. Thread Guide
The thread guide describes the route the upper thread takes as it winds from the spool pin all the way down to the needle. On many sewing machines, you will find numbers or colored lines marked on the body of the machine to indicate this path.
The thread path is one of the most important functions of the sewing machine because it forces the upper thread into the tension discs.
19. Tension Discs
The tension discs typically hide behind the casing of the machine, but they provide the super-important function of controlling the pressure on the upper thread. With no tension, the thread would sag or droop on its way down to the needle and get all tangled up.
When you thread the upper thread, the thread path carries the thread through the tension docs. This allows the discs to apply pressure.
Most sewing machines provide a control knob or touchscreen settings to alter the tension applied by the discs. The most common tension setting is a 3 or 4, but you can increase or decrease tension for different fabrics.
20. Thread Take-Up Lever
The thread take-up lever forms another key part of the thread path for the upper thread on a sewing machine. You can find this lever in the arm of the machine just over the needle. The lever rises up and down as the machine sews, helping the thread easily move up and down with the motion of the needle.
As you follow the thread path, you will hook the upper thread through the thread take-up lever before you carry the thread down to the needle.
21. Presser Bar Lifter
The presser bar lifter sits just behind the needle bar, usually to the right of the needle. You can raise or lower this small bar to manually raise the presser foot off the feed dogs.
As you sew, you need the presser foot bar lowered. But you need to lift this bar for other functions, such as inserting the fabric beneath the needle.
22. Presser Foot
The presser foot attaches to the presser bar lifter and exerts a small amount of pressure on the top of the fabric to hold the fabric onto the feed dogs as you sew. A standard presser foot looks kind of like a very square foot with a hole in the center.
You can also swap out the standard foot for many specialized types of presser feet that provide specific functions. To do this, you will find a small lever or button attached to the presser bar lifter that will release the current foot and allow you to click another foot into place.
23. Walking Foot
One of the most popular types of presser feet used almost exclusively on some types of machines is called a walking foot. A walking foot is a big presser foot that has extra feed dogs attached to it. It allows high-end sewing machines to regulate the amount of pressure used on different types of material.
24. Zipper Foot
Another super important presser foot that comes with almost every kind of sewing machine is a zipper foot. This little guy allows the needle to stitch right next to the teeth of a zipper, which you cannot do using a standard presser foot.
25. Stitch Width Selector
The stitch width selector allows you to determine how far a stitch will stretch side-to-side as the machine sews. If you plan to sew a straight stitch, you will leave the width at 0. But for a zig-zag or any other stitch that moves side to side, you need to set the width before you begin sewing.
Your sewing machine may have knobs or buttons you press to select stitch width, or it may have a touchscreen panel.
26. Stitch Length Selector
The stitch length selector determines how long each stitch will be on the fabric. Every sewing machine has some means of setting and altering this length, such as knobs, buttons, or a touchscreen.
Why do you need to change stitch length? Different stitches work better on different fabrics. Plus, you sometimes want very long, loose stitches called basting stitches as a temporary way to hold pieces of fabric together.
27. Stitch Pattern Selector
Most sewing machines offer various stitching patterns that you can select using buttons, knobs, or a touchscreen. The machine then uses the cams and gears in the arm to direct the needle to stitch in this pattern.
The most common stitching patterns are a straight stitch and a zigzag stitch, but many machines also offer fancier options like double-needle designs, embroidered letters, or shapes like flowers and leaves.
28. Reverse Stitch Control
Every sewing machine has a small button, switch, or tab you lift that tells the machine to sew in reverse. You sometimes see this called “back tacking,” which is one of the best ways to secure a seam you have just stitched.
You can find this feature in different places on different machines. Some models locate it on the arm above the needle. Others place it near the power switch on the stem of the machine, and others may put it near the stitch length controller.
29. Foot Pedal
The foot pedal plugs into the machine near the power cord. This pedal works much like the gas pedal in your car by telling the machine when to sew and when to stop sewing without using your hands.
Some high-end machines may use knee control instead, but the foot pedal remains the most popular option for most machines today.
30. Power Cord/Power Switch
It seems super basic, but the power cord and an on/off switch also form an essential part of a sewing machine! Most of the time, you will find the place to connect the power cord and the on/off switch at the bottom of the stem of the machine, all the way to the right.
You can often solve simple sewing machine issues by checking that the power cord is firmly plugged into the machine.
Parts of a Sewing Machine Singer
Singer sewing machines use all of the essential parts described in this article. Singer is one of the world’s oldest and most respected sewing machine brands. Even cheap, beginner-level Singer models will perform all the basic functions you expect from a sewing machine.
The other great thing about Singer sewing machines is that the large company provides good customer support. If you need replacement parts for your Singer sewing machine, you can often find what you need through the Singer website.
Brother Sewing Machine Parts
Brother is the oldest Japanese sewing machine brand in the world and has an excellent reputation for providing simple, durable sewing machines. Brother machines also use all of the basic parts described in this article.
If you need replacement parts for a Brother sewing machine, you can try searching the Brother website. You can also search Amazon for parts and accessories for newer sewing machines.
Old Sewing Machine Parts
Finding old sewing machine parts for a vintage or antique model can get tricky, but you can try searching Etsy, Amazon, or specialty sewing stores online.
Online forums like eBay and Amazon often link you to third-party sellers specializing in old sewing machine parts.
Make sure you search for parts specific to the make and model of your old sewing machine, though. You will quickly learn that old sewing machines only work with the specific parts and accessories designed for that model!
Conclusion
No matter how fancy or expensive a sewing machine gets, it still provides many of the same functions and uses many of the same parts as a basic beginner-level model. This means that knowing the basic parts of a sewing machine can help you master your machine, no matter what model you use! A few of the most important parts of the machine include the needle and everything that attaches to the needle and the bobbin along with everything around the bobbin.
The thread path is also a key part of the sewing machine because it provides the pressure that prevents the upper thread from tangling. User controls like stitch settings, the reverse tab, and the foot pedal all help you sew.
Do you think you can name all the basic parts on your own sewing machine? Is there a part you can’t name? Leave a comment below to let us know!