I had to return to a store last week because the security tag was still attached to my sweater. I had the receipt, so the tag was removed. But what happens if you can’t find your receipt? How do you remove the security tag from your clothes?
The best way to remove security tags from clothing is to return them to the store. Show a receipt of the purchase and the tag will be deactivated. Removing security tags at home is possible but can damage clothing. Place a strong magnet under magnetic tags to dislodge them. Mechanical tags can be removed by levering the pin with a screwdriver.
In this article, you’ll discover the best way to remove a security tag from your clothes. You’ll learn about the three different tag types and how to remove the tags at home.

Quick Navigation
What Are Security Tags?
Security tags are electronic devices that many retail stores put on clothing and expensive items like jewelry, alcohol, and even aftershave. They were introduced as a countermeasure to shoplifting.
Not only because they work as an alarm but also because they can damage the item if it’s not removed correctly. Making the theft of luxury items for illegal gain a less lucrative prospect.
As soon as you see the tag on a product, you know it’s electronically protected. Trying to take one beyond the entrance to the store is pure folly. Everyone in the store will know you have a tagged item in your bag.
It can be embarrassing as everyone turns around to look at you. Usually, to find out what’s being stolen and who’s stealing it. Electronic tags aren’t just a visible deterrent, though. They have another trick up their sleeve.
Stores using electronic tags have sensors just in front of the exit. They can look like two tall columns that you have to walk between to get out of the building.
If you try to walk through to the exit with the tag attached to your garment, the sensors will emit an extremely loud, maniacal beeping. Alerting staff or security guards that there is a potential theft taking place.
Most of us can avoid this degrading experience by taking the item through the checkout. The cashier will remove the tag using a specially designed tool and you can leave the building with your reputation and your eardrums intact.
Although, as we’ll see later in the article, theft isn’t the only reason electronic tags get left on products. Particularly products like clothing and accessories.
There are three types of tags in use around the globe. Ink tags, mechanical tags, and magnetic tags. Let’s take a look at them in detail.
Ink Tags
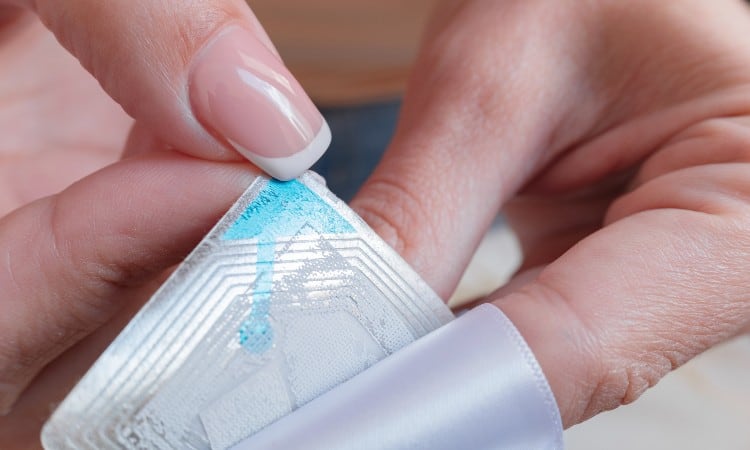
Although this type of tag used to be popular, it isn’t as widespread as it used to be. They are costly to use and more than a little bit messy. It’s almost guaranteed you’ll cause damage to the item if you break one of these tags.
That’s because they are filled with indelible ink. The ink is contained within a small vial or glass tube set into the tag. Using too much force to remove the tag causes the vial to break. This leaks ink all over the garment.
While some ink tags are transparent so you can see the ink, others aren’t. It isn’t always easy to tell if you are dealing with a tag full of ink. That’s what makes this type of tag so difficult to remove. If you don’t know if your tag contains ink, play it safe and assume that it does.
One wrong move can see your garment dyed a permanent shade of blue. Or black, depending on the color of the ink. This type of tag falls into the benefit denial category. Once the vial has released its ink, you lose the benefit of the garment, either for personal use or profitable gain.
Mechanical Tags
These tags are possibly the easiest to remove. They work through the use of a mechanical holding device. This is usually a pin that passes through the fabric of a garment and fastens into a lock at the back.
Mechanical tags can be audible and visual, emitting a beep and being seen on a garment. Or they can be visible. In the latter case, they act as an honesty system, relying on a person’s good nature to not steal an item.
Due to the nature of their design, these tags are usually reserved for garments, soft furnishings, and fabric accessories like gloves and scarves. They don’t all look the same, though. There is a wide variety of shapes and sizes to suit any size of fabric item. You can get square, round, and even shell-shaped tags.
Magnetic Tags
Magnetic tags are possibly the most difficult to remove of all the tags available. They come in a range of strengths from standard through to extra powerful multi-polar. It’s not always apparent from looking at the tag whether they have a super strong magnet.
The bad news with magnetic tags is the stronger the magnet, the harder it will be to remove. You have to have the right tools and expertise to disable a magnetic tag successfully. Otherwise, you risk damaging the garment.
Again, there is an option to have an audible and a visual tag or just a visual. These tags are also used mainly on garments due to the use of a pin that needs to be pushed through the fabric.
Why Do Security Tags Get Left on Clothing?

Security tags get left on clothing for several reasons. The main one is not paying for an item. Or intentionally skipping the checkout.
Shoplifting is one of the biggest factors behind tags being left on clothing. It’s also one of the largest problems faced by retailers. Thought to be victimless as it’s a crime against a company rather than an individual, shoplifting can severely dent a retailer’s profits. Not just from the lost stock, but also through earnings and higher insurance premiums.
It doesn’t help that everyone gets caught up in the mess and inconvenience caused by shoplifting. Although the tags were meant to be a warning to prevent theft, they can be an annoying hindrance to innocent shoppers.
Sometimes the security tags can go off when you unknowingly carry one through the sensors. You’ve been through the checkout and paid for your items, yet the dreaded beeping starts as soon as you reach the doors.
The reason is simple. A cashier in a hurry to clear the line failed to notice the tag and left it on the garment. Leaving you frantically searching for that receipt you had in your hand less than 2 seconds ago. While a poker-faced security guard is silently glaring at you.
It’s not only the poor cashier who can be guilty of human error. It’s easy to forget an item at the bottom of your cart. Especially if you need to be somewhere else and time’s not on your side. Forgetting to pay for an item is probably one of the top reasons for tags making their way back to your home.
Then there is online shopping. Ordering your garments online is quick, simple, and free from the hassles of security guards and electronic tags. Unfortunately, selling online doesn’t necessarily mean the clothing will be tag free. As you discover to your horror when your purchase arrives with the security tag intact.
How to Remove the Security Tag From Clothing: 9 Ways
The simplest way to remove a security tag from your clothing is to return to the store. Show them your receipt at customer services and they’ll remove the tag for you. Better still, they won’t damage the garment while they do so. You might even get an apology for having to return to have the tag removed.
But that can be embarrassing and inconvenient, especially if the store is far from your home or you’ve lost your receipt. With that nagging thought in your head, “will they believe me?”, it’s sometimes easier to remove the tag yourself.
In this section, we’ll take a look at some of the solutions you can use to remove the security tag at home. Please note that these instructions are intended to help you out when a tag is accidentally overlooked.
Don’t use them to aid you in shoplifting. That’s illegal and frowned upon. You could end up in a lot of trouble.
1. Rubber Band
You can use a rubber or elastic band to remove security tags from clothing. However, this method will only work on mechanical tags that don’t include a magnet. You will also need extreme caution if the tag has an ink-filled vial or cartridge.
You will need:
- Rubber band
- Mechanical security tag
- Drop cloth
- Bucket
Step 1
Check the tag to see if it has a visible ink container. If you can’t see one, treat the tag as though it has got an ink vial to be on the safe side. Turn the garment so that the ink canister is facing down and away from the fabric. For tags with invisible ink vials, you’ll need to give their location your best guess. Normally the canister is on the opposite side of the tag from the pin.
Step 2
You’ll want to do this step over a drop cloth or a bucket. If the ink spills, you don’t want it going over you or the furniture in your home. Use an old bed sheet or a towel and place them underneath the tag. Gently pull the tag away from the garment. Don’t force it. If you feel any resistance, stop pulling.
Step 3
Wrap the rubber band around the pin. Twist the band as you wrap it to build a little wall between the tag and the garment. When the rubber band is wrapped around the pin, grab the top of the tag and turn it. It should snap off. If it doesn’t, grab another rubber band and wrap it around the pin.
Step 4
Keep adding rubber bands and turning the tag until it comes off in your hand. As this is a gentle and slow method that uses little force, you should find that the ink vial will remain intact.
2. Screwdriver
A screwdriver makes an excellent leverage tool if you have the right sort. There are two main types. You’ve got a Phillips screwdriver with a pointed end in the shape of a cross. Or a flat-head screwdriver with a flat end that looks like a wedge.
The Phillips isn’t good for prising things away from each other, so make sure your screwdriver has a flat end.
You will need:
- Flat head screwdriver
- Mechanical security tag
- Flat surface
Step 1
Make sure the tag is mechanical. This method won’t work on a magnetic tag. If there is an ink cartridge, keep it facing upward. Place the clothing tag side up on a flat surface.
Step 2
Push the flat end of your screwdriver under the raised section of the tag. Push down on the handle of the screwdriver. As you do so, the flat end should lift. Taking the raised section up with it. Repeat this action all the way around the raised part of the tag. What you are doing is levering one part away from the other.
Step 3
Once the raised section has been removed, you should be able to see metal prongs holding the pin. Using your screwdriver, lift one of those arms. The pin should drop out and you should be able to remove both the top and bottom of the tag.
3. Needle Nose Pliers
You can find a pair of pliers in your garage or garden shed. Like screwdrivers, they come in different styles for different tasks. The sort you need for removing security tags are needle nose pliers. These have long jaws that are slim and can fit into tight spots. They are also called long-nose pliers or snipe-nose pliers.
You will need:
- Two pairs of needle nose pliers
- Mechanical security tag
- Flat surface
Step 1
Make sure you are working with a mechanical tag. This method isn’t going to work as well on a magnetic tag. Put your clothing on a flat surface with the tag facing upwards. Check for an ink cartridge. If there is one, it needs to be facing upwards too.
Step 2
Use one pair of needle nose pliers to grab one end of the tag. The other pair should be used on the other end of the tag. So basically, you have two pliers with a tag sandwiched in the middle.
Step 3
Carefully bend each end of the tag with the pliers. Don’t use too much force, just in case there is ink inside the tag. Go slowly and use extreme caution. Keep applying pressure on each end to bend the tag until it finally pops open.
Step 4
Once the tag is open, you should be able to remove the pin. Remove all sections of the tag and dispose of it carefully. Even though the tag is no longer attached to your garment, it could still spill if there is any ink.
4. Freezing the Tag
If you freeze the tag, you can make your life easier. Freezing isn’t going to make any difference to the tag itself. But it will freeze the ink. This means you can work to remove the tag without worrying about ink spills.
You will need:
- Freezer
- Screwdriver or needle nose pliers
- Mechanical security tag
- Flat surface
Step 1
Make sure you are working with a mechanical tag, as a magnetic one can’t be removed without a magnet. Put the garment in the freezer. Leave it in there until you are sure the ink has frozen.
Step 2
Remove the garment from the freezer and let it sit for about an hour. You need to do this so as not to damage the frozen fabric. It will be easier to work with when it’s slightly thawed. Don’t leave it for any longer than an hour, as you want the ink to stay solid.
Step 3
Using a screwdriver or needle nose pliers, pry the two sections of the tag apart. You can use more force with this method. The ink isn’t going anywhere as it will be frozen.
5. Using Two Forks
If you don’t have screwdrivers, pliers, or even a rubber band, then you probably have forks. Any fork in your cutlery drawer will do. Although, they do need to be metal. Plastic forks will break.
You will need:
- Two metal forks
- Mechanical security tag
- Flat surface
Step 1
Put your clothing on a flat surface, tag side up. Grab your forks and place one between the fabric and the top half of the tag. The other needs to go between the fabric and the bottom section of the tag.
Step 2
Pull both forks in opposite directions. Gently twist them slightly as you pull. The tag should pop right off.
6. Hitting the Tag
When everything else has failed and you’re reached your desperation point, you could try hitting the tag. This option isn’t for the faint-hearted. Hitting a tag filled with ink could end in an inky garment.
You will need:
- Hard surface
- Mechanical security tag
- Hammer
- Large head nail
Step 1
Pull the tag away from the garment and release it. Do this about ten times. What you are attempting to do is loosen the pin so that it moves. Be gentle at this stage. All you want to do is wobble that pin back and forth.
Step 2
Find a nail with a large flat head. The head should be about the size of a penny and the nail needs to be longer than the tag.
Step 3
Put your garment onto a hard surface. It needs to be a surface you don’t mind hitting things on. Position the tag, so it is at the side of the garment and resting on the hard surface. Move the garment as far out of the way as you can.
Step 4
Place the nail on top of the tag’s edge. Hit the nail with the hammer. This action should prise the two halves of the tag apart. Don’t use too much force, though. You want to split the tag, not smash it. Keep hitting the tag until it comes apart. This could take a few tries.
7. Candle and Pliers
We’ve tried freezing the tag. Now let’s take a look at heating the tag up. For this method, you can use a candle or a lighter.
You will need:
- Candle or lighter
- Mechanical security tag
- Pliers
Step 1
Using either a candle or a lighter, heat the domed part of the security tag. It’s plastic, so it won’t take long for it to start to melt.
Step 2
Grab your pliers and start to remove the melted plastic. As you remove it, you’ll start to see a spring. Behind that will be a needle or a pin. Remove both and the tag will fall off.
8. Powerful Magnet
This method is how you remove magnetic security tags. A strong magnet will interfere with the electromagnetic properties within the tag, making its removal a piece of cake.
You will need:
- A strong magnet
- Magnetic security tag
- Flat surface
Step 1
Put your strong magnet on your flat surface. Next, lay the tag on top of it. Make sure the tag’s dome section faces downwards toward the magnet.
Step 2
Wait for the beep. This will let you know that the magnetic tag has been disabled. Then it’s just a case of removing the pins by giving the tag a bit of a wiggle.
9. Purchase a Commercially Made Security Tag Remover
No products found.Although most DIY methods for removing security tags can be really effective, they have their downsides. One of which is the potential risk of damaging the garment. It’s all too easy to be too heavy-handed and end up splattering everything in sight with indelible ink.Stores don’t have to grab a screwdriver or melt the tags with a lighter. Can you imagine the length of the checkout line if they did? No, they have a simpler way of removing security tags. They use a commercially available security tag remover.
Their tag remover comes with security tags. It’s designed specifically for their tags and is part of the security package and the door sensors. You can’t get your hands on that device, but the good news is you can buy something similar.
You can purchase security tag removers from places like Amazon. There are different types to suit the different tags out there. One of the best-selling tag removers is the No products found.. Reusable and durable, the device is portable, with a handy key chain for attaching to your bag.
How to Avoid Removing Security Tags
The most effective way of avoiding the need to remove security tags at home is to check your item before you leave the store. Cashiers are busy people and tags are small.
Overlooking the tags or forgetting about them is understandable. We’re all human and sometimes speed is more important than efficiency. Particularly if it’s getting close to the end of the day and the cashier has a long line of customers to get through.
Then there are the self-checkouts. These may be slightly quicker than going to a cashier, but they have one inherent flaw. They rely on you to notice the security tag. This is fine if you know it’s there, but what if you don’t?
If working a checkout isn’t your day job, there’s a good chance that security tags aren’t on your radar. You’ll scan the items, pack them in bags, and leave the store. Out of the two styles of checkout, your tag is more likely to get left on if you go through the self-checkout option.
To avoid an embarrassing confrontation with the security guard, use a manned checkout when you buy tagged items.
If you prefer the self-checkout, always make a point of checking your items for tags. Even if you know, there are none. It’s a good habit to get into.
When you spot a tag, don’t be shy! Push the button on the self-checkout screen for assistance and call a member of staff over. They’ll remove the tag for you.
Regardless of the checkout you use, give that cart a quick double-check before you leave the till. Make sure you have taken everything out and put it on the conveyor belt. That way, you’ll know there is nothing left in there to cause the door sensors to beep.
If you don’t want the hassle of removing security tags from garments, make sure you pay for the item before you leave. Accidentally leaving a store with a tag attached is understandable and excusable, especially if you have a receipt.
Intentionally leaving without paying isn’t. So don’t shoplift. It’s not a good thing to do. You can get into heaps of trouble. Not just with the store and the local police, but also getting indelible ink out of garments isn’t a fun way to spend your days.
Conclusion
There are lots of ways to remove security tags from clothing. The safest way is to return the garment to the store. Take your receipt with you and the staff at the store will remove the tag.
You can remove the tags at home using screwdrivers, magnets, freezers, and hammers. But, there is a high possibility that you will damage the garment in the process.
Always make sure you check the security tag has been removed before heading home. That way, you’ll be spared the embarrassment of a return trip.
Have you ever left a store with a security tag attached to your garment? Did you take it back? Or did you try to remove the tag yourself? What method did you use? Let me know in the comments.