If you love to sew, you know how annoying it is to untangle fabric from your sewing machine when thread bunches up beneath it. The most common cause for tangled sewing projects is incorrect tension on your sewing machine. One easy way to fix this is to learn how to adjust bobbin tension.
The most common way to adjust bobbin tension on a sewing machine is to tighten or loosen the small screw located on the outside of the bobbin casing. To tighten the bobbin tension, the small screw on the bobbin case turns to the right. To loosen bobbin tension, the screw turns a fraction to the left.
In this article, you will learn when you should adjust bobbin tension and when you should try another fix. You will discover how bobbin tension works and how it impacts your sewing. Finally, you will learn how to adjust bobbin tension on common sewing machine models.
What is Bobbin Tension?
Bobbin tension is the amount of force applied to the lower thread in the sewing machine as it runs. This keeps the lower thread from sagging or tangling as the machine forms stitches.
Your sewing machine forms stitches when the upper thread comes down below the needle plate and interlocks with the lower thread keeping it in place below the fabric to form a stitch. Both threads must have the right amount of tension to form smooth stitches.
Unlike the tension applied to the upper thread via dials, knobs, and controls, the bobbin tension often has only one simple mechanical adjustment. This is because you do not need to adjust bobbin tension very often. In contrast, you often need to adjust how much tension is applied on the upper thread for each new sewing project!
Technically, you should consider two different types of bobbin tension controls. The first and easiest to adjust is the screw that goes through the tension spring in the case that holds the bobbin. You can commonly adjust this by twisting the screw in one direction or the other.
That said, please note that you do not need to adjust the screw on the bobbin case very often. The manufacturer will set it to the tension setting that works with most thread types when you buy a new machine. But you should always consider it as a factor in the quality of your sewing machine operation.
Reasons you may need to adjust bobbin tension include:
- Using super thin or slippery thread, such as silk thread. The average amount of tension applied to the lower thread may not grip tightly enough on this fine thread, and you may need to tighten the lower thread tension.
- Using thick or coarse thread could lead to the tension on the lower thread gripping too slightly, causing the machine to stall out and refuse to stitch. You will need to loosen the tension on the lower thread in this case.
- Using an older sewing machine could mean you need to make more frequent adjustments to the lower thread tension, too. If you get a used sewing machine and clean it up, make sure you test out the bobbin tension as part of your repair process.
The second factor impacting bobbin tension is the tension used by the bobbin winding mechanism on your machine. How tightly or loosely the thread winds onto the bobbin will also change how tightly the lower thread forms stitches.
What Does Correct Bobbin Tension Look Like?
Correct bobbin tension is easy to spot because it simply means that your stitches lie flat and smooth on the fabric with no puckering or tangled threads. This is conveniently also how you can see that the tension on the upper thread is set correctly.
Ideally, the stitches should look the same on the top and bottom of the fabric. You should not see the lower thread sticking onto the top of the fabric or any puckering or pulling of stitches on either side of the material.
How do you know if the bobbin tension is off? Well, that one is a bit trickier to answer. The problem is that you can’t always instantly tell if a tension issue comes from the upper or lower thread.
Because of this, you should always check the upper tension first if you notice common signs of tension trouble, like:
- A bird’s nest or tangle of thread beneath the fabric causes the machine to jam and refuse to sew.
- Loose or skipped stitches in the fabric, sometimes looking like loops of thread sticking up from the fabric.
- Stitches pulled taunt, causing the fabric to pucker and wrinkle around them.
How Do I Know If My Thread Tension Is Correct?
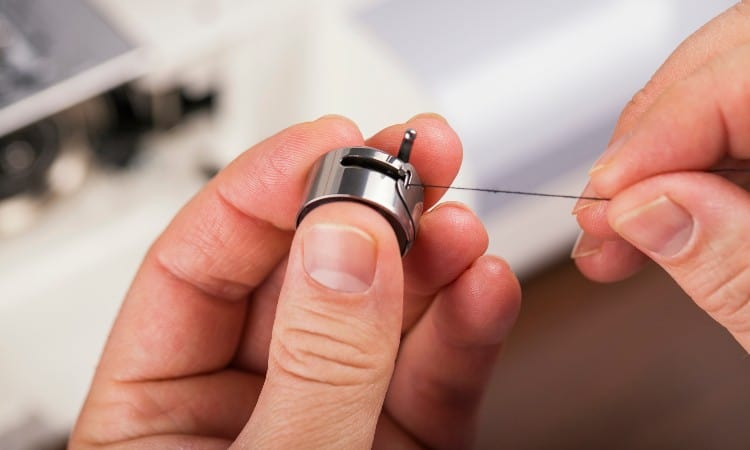
Doing a bobbin test is one easy way to determine if your lower thread tension is correct. This lets you know if the standard bobbin tension setting will work with a new type of thread in your machine. The test works for front-loading bobbins with a removable case.
- Wind the bobbin as usual, but instead of slotting it and the case into the machine, slot it into the case and hold it in your hand.
- Slot the tail of the thread through the slit in the side of the bobbin case, just as you normally would thread your machine.
- Now pinch the thread in your right hand and let go of the case.
- Watch how quickly the case falls from the thread. If the thread unwinds and the case falls fast with no resistance, you will know that the tension is too loose. The tension is too tight if the case does not fall at all and the thread does not unwind.
Of course, you can also sew a few inches of stitches as a test run to find out if the tension settings work for your new project. Keep an eye out for any of the warning signs listed in the previous section to spot a tension problem.
What Number Should Bobbin Tension Be?
Unlike the upper thread, the bobbin thread does not have a dial, number, or setting guide on most sewing machines. Some embroidery machines may have more complex setting features because a certain measurable amount of tension is necessary to create some kinds of satin stitches.
But domestic sewing machines–even high-end computerized models–typically all use the same basic, mechanical bobbin tension adjustment.
How to Adjust Bobbin Tension Step-By-Step

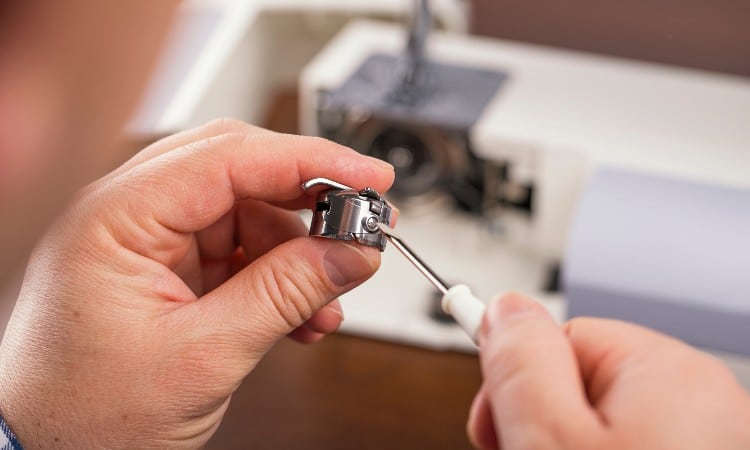
You can adjust the bobbin tension in your sewing machine by loosening or tightening the screw that goes through the tension spring on the bobbin case. You will find this screw in two different spots, depending on whether your machine uses a drop-in or a front-load bobbin.
Front-load bobbins have an easy-to-spot screw. Simply take out the metal case that you remove every time you put the bobbin into the machine. You will see a small screw on the outside of the case.
Top-loading or drop-in bobbins also slot into a case, but you don’t often take the case out of your machine. However, it does come out! You will see a tiny screw, often set into a small indentation, on the side of this case.
To adjust bobbin tension:
- Always start by unthreading the top thread and rethreading it to find out if the top thread caused the problem. At least 90% of the time, tension issues stem from the top thread, not the lower thread.
- But if you do need to adjust the lower thread tension, start by taking the bobbin case out of the machine and locating the screw.
- Before you turn the screw, use a fine-tip Sharpie to mark the current alignment of the screw on the case. That way, you can easily return the tension to its normal setting.
- Use the tiny screwdriver that came with your machine to adjust the position of the screw. If you lost this screwdriver, find a tiny jewelry or glasses repair flathead screwdriver instead.
- Turn right to tighten the tension and left to loosen the tension.
- Turn the screw in tiny, gentle increments. Think of the circle of the screw as if it was a clock and try to adjust it in fifteen-minute increments.
- After each tiny turn, stop and sew a few inches to see if you have fixed the tension.
- Make sure you do not turn the screw too harshly, as this could strip the threads off the tiny tension screw in the bobbin case. You also do not want to loosen the screw too much because it could come out and damage your sewing machine.
Bobbin Tension Problems
Common bobbin tension problems include bunching thread, taunt stitches, or skipped stitches. If you know what common bobbin tension problems look like, you can quickly fix the problem to get back to your sewing!
Why is Thread Bunching Underneath My Fabric?
Thread can bunch or “bird’s nest” underneath your fabric as you sew because of an issue with either the upper or the lower thread tension.
- When your machine stalls out and you find bunched thread beneath the fabric, immediately stop trying to sew.
- Cut the tangled threads out carefully so you can remove the fabric. You can use a seam ripper to get the ugly tangle off your sewing project later!
- Make sure you get any loose threads out of the bobbin area.
- Next, re-thread the upper thread. Often the thread slipped free of a tension disc, causing the tangle.
- If this does not fix the problem, take a look at your bobbin. Does the thread wind smoothly and tightly around it, or do you see loose loops of bobbin thread? In this case, you need to re-wind the bobbin. Check to make sure it winds smoothly and evenly around the spool of the bobbin.
- Finally, if you try to sew again and still get tangles of thread, follow the guide earlier in this article to adjust the bobbin tension.
Bobbin Thread Tension Too Loose
You will know that the bobbin tension is too loose if you can see the lower thread poking loosely on top of the fabric. Sometimes too-loose bobbin tension also leads to bunched or bird’s-nested thread beneath the fabric because of backlash, which means that the bobbin thread unwinds too fast and accumulates faster than the machine can stitch, leading to tangled threads.
Your machine may normally sew with the pre-set bobbin tension and then suddenly have an issue if you use a new type of thread. Superfine or silky threads sometimes need a tighter tension setting so that the bobbin can hold onto the skinnier thread with more force.
To tighten the bobbin tension, adjust the tension screw to the right by tiny fractions, testing after each turn of the screw.
What the Tension Dial Looks Like on the Sewing Machine
The tension dial on a sewing machine typically looks like a knob that you can twist to a higher or lower setting, though some computerized models may use a touchscreen or buttons to control the tension instead.
Keep in mind that the tension settings only control the amount of force exerted on the upper thread. You commonly have to adjust the tension on the upper thread with each new sewing project because every type of fabric needs a slightly different amount of tension from the upper thread.
Before you mess with the bobbin tension, always try re-threading the upper thread and adjusting the tension dial for the upper thread.
How Much Thread to Put on a Bobbin

Most sewing machine bobbin winders have an automatic cut-off that knows how much thread to put on a bobbin. The thread should never extend beyond the edges of the bobbin spool, as this will cause it to get stuck in the bobbin case and refuse to turn.
While you may find advice stating that you need a full bobbin to sew, you can sew with a partially full bobbin without any difficulties. You may only want to partially wind a bobbin if you have a small amount of sewing to complete, for example, and you don’t want to waste extra thread.
Ideally, you want to see thread wound smoothly and evenly around the bobbin spool, not skewed with more thread toward the top or bottom of the spool.
The average M-class bobbin can hold roughly 90 yards of standard cotton thread. Most of the time, you should use the same thread for the bobbin as for the upper thread. This ensures smooth, matched stitches.
How to Adjust Bobbin Tension On:
Now that you know how bobbins work and how to alter bobbin tension, you can discover how to adjust bobbin tension for special sewing machines.
Brother Sewing Machine
Brother sewing machines come with a pre-set tension setting that works well for most sewing projects, but you can adjust it easily when necessary. One thing to note about this brand of sewing machines is that Brother sewing machines may have either a top-loading or front-loading bobbin, depending on the model of your machine.
- Take the bobbin out of its case and set it aside.
- Take the case out of the machine and locate the screw that goes through the tension disc. This is so easy on a Brother machine because you want to find the only screw with a single-line slot for a flathead screwdriver. Ignore any screws with a tiny + cut into them that would fit a Phillips head screwdriver!
- Use the small flathead screwdriver that came with the machine to make incremental adjustments to the position of the screw.
- Pauses to sew a few inches of sample stitches after every adjustment.
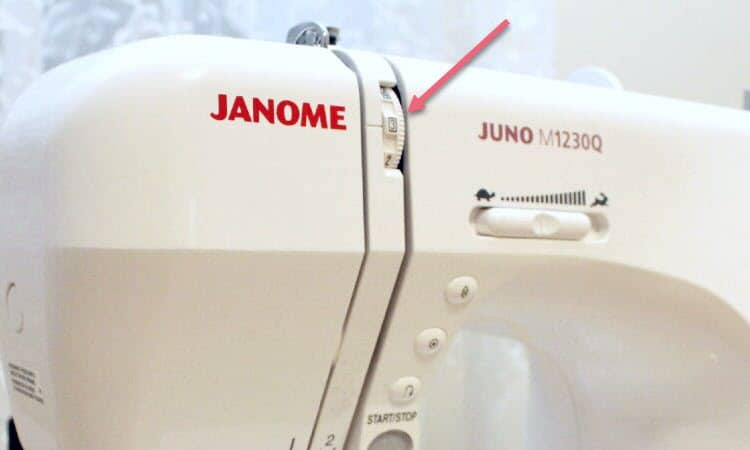
Janome
Many Janome machines have drop-in or top-loading bobbins, and some high-end models may even have computerized settings that will tell you when you need to adjust lower tension!
That said, you still fix bobbin tension in the same way, even on fancy sewing Janome sewing machines.
These pro tips may help your Janome machine maintain correct bobbin tension:
- When you wind the thread onto the bobbin, hold onto about three inches of thread as the machine runs the winder. Keeping this gentle pressure on the thread allows the winder to evenly wrap the thread around the bobbin spool.
- Before you place a full bobbin into its case, make sure the thread unwinds from it in a counterclockwise direction.
- Make sure you frequently replace the needle and clean it beneath the needle plate. A bent needle or clogged dirt could make it look like your bobbin tension has a problem when it is just dirt or a damaged needle slowing down the lower thread!
Heavy Duty Singer
Heavy-duty Singer sewing machines can sew 50% faster than average sewing machines and have powerful motors and solid metal casings that allow them to handle thick fabric and stronger thread.
This can mean that you want to use different types of thread on your bobbin, meaning that you may need to adjust the tension to accommodate a thicker or coarser thread that needs less grip on it for perfect stitches.
Of course, heavy-duty Singer machines also come with a preset tension that works well for most sewing projects, so always adjust the upper tension before you try to adjust the bobbin tension.
Singer heavy-duty sewing machines often have top-loading bobbins. One trick to getting the bobbin case out of these models to make tension adjustments is that you will find a bar or arm pressing down on the case.
This arm keeps the bobbin case from wobbling because the heavy-duty machine can sew at such high speeds. You will need to remove two tiny screws from that arm to remove it and allow you to take the bobbin case out of its bed.
Drop-In Bobbin
Many popular brands of sewing machines, such as Brother and Janome, offer models with drop-in bobbins that require a few extra steps to adjust the lower tension.
Drop-in or top-loading bobbins slot into a space in front of the needle plate on your sewing machine. Accessing the case that holds these bobbins is a bit more work than it is for a front-loading bobbin.
- Take the presser foot off the machine and set it aside. You can do this by pressing the small lever located either to the side or to the back of the foot.
- Use a small screwdriver to loosen the needle and take it out.
- Remove the bobbin and gently draw out the thread tail with it.
- For most sewing machine models, you also have to remove the needle plate to get at the bobbin case. To do this, you often have to take out two or three small screws holding the needle plate in place. It’s tricky to fit a screwdriver over these screws, so you will need the small triangle-shaped screwdriver that came with your machine for this step.
- Now you will see a domed, round shape that the bobbin usually sits inside. You have found the bobbin case! Gently remove it from its bed.
- In some models, you may notice a small arm holding the case in place. Slide this to the side or unscrew the screws holding the arm in place if necessary.
- Once you have the case out, continue to adjust the tension screw as described earlier in this article!
Conclusion
You can adjust the bobbin tension in your sewing machine by turning the tension spring screw in the bobbin case to the right to tighten the tension and to the left to loosen tension. For front-loading bobbins, you can easily slot out the removable bobbin case to make this adjustment. Look for the screw with a thin flat groove, not a crossed groove from Philip’s head screwdriver.
Top loading or drop-in bobbins take more work to adjust. You have to remove the presser foot, needle, and needle plate to get to the bobbin case in many sewing machine models. Once you access this case, you adjust the screw similarly by making incremental turns. Always test sew after every tiny turn of the bobbin case screw to see if you fixed the issue!
Have you ever tried to adjust the bobbin tension on your sewing machine? Did it work? Leave a comment below to let us know!