While working on my most recent sewing project the other day, I came across an instruction to cut my fabric from selvage to selvage. I can honestly say that I haven’t ever paid much attention to the selvage of my fabrics, but this step got me curious and wanting to learn more. What is selvage in sewing? What is its purpose?
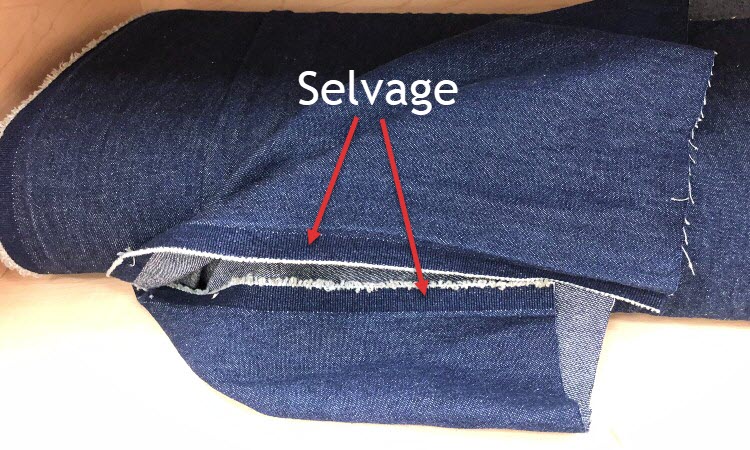
Selvage is the narrow border that runs along the length of your woven fabrics. This strip will typically vary from the main fabric by texture, color, or other deliberate markings. Selvage is used for helping to stop woven fabrics from fraying while also providing a useful guide for finding the fabric’s grain lines.
This article will dive into everything you need to know about selvage before starting your next sewing project. Keep reading as we discuss the many features of selvage, its purpose, and what you should do with this fabric when you sew. We’ll even give you a few ideas for fun projects you can make using any leftover selvage you may have from your fabrics.
Quick Navigation
- What is Selvage in Sewing?
- What is the Purpose of the Fabric Selvage?
- How to Find the Selvage of Fabric
- Is the Selvage Edge Always Straight?
- Does the Width of Fabric Include Selvage?
- Do You Have to Cut the Selvage Off of Fabric?
- What Does it Mean to Cut Selvage to Selvage?
- What Do the Colored Dots on the Selvage Mean?
- What is a Selvage Quilt?
- Other Projects to Make with Selvage Strips
- Conclusion
What is Selvage in Sewing?
Selvage, or “selvedge” in British English, is the finished edge that runs along the top and bottom of woven fabrics. This edge is visibly different from the rest of the material and can serve several purposes, the most important of which is helping to stop the woven fibers from fraying.
You will rarely find selvage on non-woven fabrics. This is because they don’t need it since they won’t fray on their own as woven fabrics will. However, some manufacturers will include a lighter strip of fabric along the edge of non-woven materials to give you information about the fabric. This isn’t necessarily the same thing as selvage.
Most sewing patterns do not use the selvage portions of the fabric, which are often removed before any pattern pieces are cut. But don’t count this strip of fabric out completely! There is a lot of useful information from your selvage strips, as well as many unique crafts you can make with them.
What is the Purpose of the Fabric Selvage?
Selvage edges are placed on the fabric for a variety of reasons. The first is that it helps to prevent woven fabrics from fraying before you have the chance to use them. Specifically, selvage traps the weft threads that run the width of the fabric in place as they turn and make their way back across the fabric.
The selvage also typically includes important information you should know about the fabric. It may have colored dots that show the specific shades used in the fabric’s pattern, which many sewers will cut off and use as a guide to picking coordinating colors at the fabric store. Selvage may also contain information about the manufacturer and care instructions for the material.
Fabric selvage can also be used to find the grain of the fabric. Woven fabrics will have three grainlines – two straight and one on the bias. You can locate these grainlines because they are located either parallel, perpendicular, or at an angle to the selvage.
Using Selvage to Find Straight Fabric Grain
Woven fabrics will typically have two straight grains, one that runs the length of the fabric and the other the width. You can use the selvage edge of the fabric to find these two straight grains and to determine where to place your sewing pattern pieces.
The warp grain runs in a straight line parallel to the selvage. This grain is the stronger of the two straight grainlines. Simply find your selvage edge and cut parallel to it along the warp grain.
The weft grain runs perpendicular to the selvage edge of the fabric. This grain is not quite as strong as the warp grain, though it is still a straight grain. You can find this grainline by cutting at a 90-degree angle to the selvage edge.
Finding Fabric Bias
The bias line of fabric runs at a 45-degree angle to the selvage line. You can mark the bias by taking the top corner of the selvage and folding it diagonally until it meets the bottom edge. This will create a 45-degree angle across the surface of the fabric.
If your pattern asks you to place your pattern pieces on the bias, it means that you need to place them at a 45-degree angle to the selvage. The same goes for patterns that ask you to “cut on the bias.”
How to Find the Selvage of Fabric
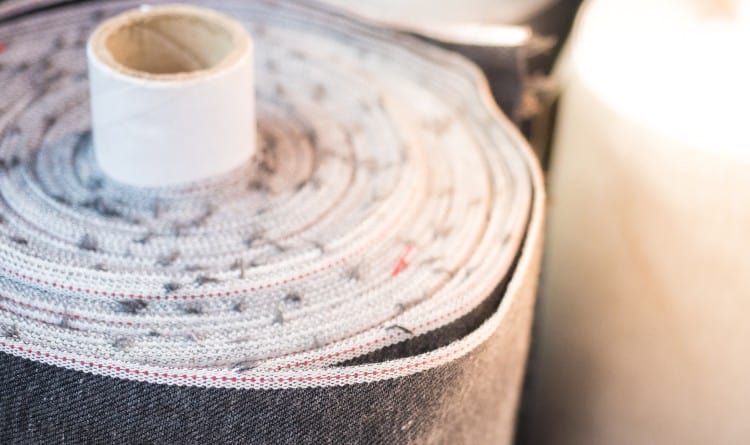
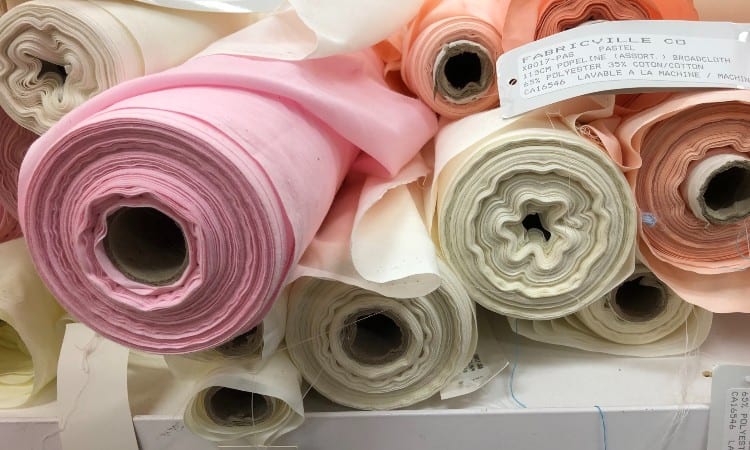
The selvage edge of the fabric always runs along the length of the material. When you go to a fabric store, the selvage edge will be visible at the top and bottom of the fabric bolt. It is the edge that is not cut whenever your fabric is measured out.
Fabric selvage is usually visibly different from the rest of the fabric to help distinguish it. Look for areas with a different weave or texture, which may even feel a bit thicker than the rest of the material. You may also notice a border that is a different color or will have tiny holes to mark its edge.
Remember that some fabric selvages will also have colored dots representing the shades used in the fabric’s pattern. These can be an excellent indicator that you have found the selvage of the fabric.
Is the Selvage Edge Always Straight?
The selvage edge of your fabric is usually straight and can be used as a guide for finding the grainlines of the material. However, because it is made of cloth, the selvage can sometimes waver a bit. You should never use it as a guide for cutting pieces that need to be perfectly straight.
You can help make sure that your selvage is straighter before cutting it by laying it out on a flat surface. Iron the fabric to remove any wrinkles that could be pulling on the selvage and changing its shape. Lay a ruler or other perfectly straight edge along the border of the selvage to make sure that it is straight before you cut.
Does the Width of Fabric Include Selvage?
Yes, the width of the fabric typically includes the selvage edge. Measurements of a fabric’s width usually look at the total width of the piece rather than just the usable portion. To determine the usable width of your fabric, subtract the width of the selvage from the total width of the material.
If you see a pattern that asks you to cut along the width of the fabric, it is asking you to cut from selvage to selvage across the material. You may see this represented on your pattern as “WOF.”
Do You Have to Cut the Selvage Off of Fabric?
Generally, yes. You’ll want to cut the selvage edges off of your fabric. The selvage will usually look and feel different from the rest of your fabric. This can lead it to pull, tighten, or raise as you sew – while also looking different from the rest of your piece.
Some quilters will choose to leave the selvage along some of their pattern pieces, especially if their seam allowances will cover up this edge. This can be a way of maximizing how much fabric they have to use and can minimize waste. But this only works because the selvage is ultimately hidden inside the quilt.
But that doesn’t mean the selvage pieces have to go to waste! Many sewers will save their selvage edges until they have a bunch of them to use. Then, they’ll piece them together to do unique projects.
It’s not uncommon to see quilts, purses, pillows, or even clothing made from selvage strips that are quilted together. These projects will often be heavier and less soft than if they were made with typical fabrics. However, sewing together pieces like these can be an excellent way to reduce waste and use every bit of the fabric you buy.
What Does it Mean to Cut Selvage to Selvage?
If you use a lot of sewing patterns, you’ll probably come across a step from time to time that asks you to cut from “selvage to selvage.” This means that they want you to cut in a straight line across the fabric’s width.
This instruction is just another way of saying that they want you to cut a line across the width of fabric (WOF), as discussed above. It is a way of making even lines along the weft grain of the fabric.
What Do the Colored Dots on the Selvage Mean?
Many selvage edges will have a series of colored dots along their border. These dots match the exact colors used in the pattern of the fabric. Manufacturers often number these dots to show the order in which the colors were printed on the fabric.
I like to use the colored dots on the selvage as a useful tool for choosing coordinating fabrics to match the patterns I already have. Instead of taking a large piece of fabric into the craft store, I can just cut off the selvage edge and take the strip into the store with me. Then, I hold the colored dots up directly to the fabrics to see which ones match the colors I already have in my fabric at home.
This can help to stop the guessing game of choosing colors. There’s nothing more frustrating than buying a bunch of fabric, only to get home and realize it’s an entirely different shade than what you wanted. Use this trick to save yourself a lot of time and effort on your next fabric buying trip!
What is a Selvage Quilt?
Fabric is difficult to recycle and because of this, textiles create a lot of unnecessary waste. Many sewers look for creative ways to use up every bit of the fabric they can, even going so far as to make projects entirely out of scraps. That’s where selvage quilts come in.
Selvage quilts are made by sewing together selvage strips to create a quilt top. They are a fun way to use up these bits of material that are typically discarded once they have been cut off of the fabric. Using the selvage to make a quilt is an excellent way to use up every bit of fabric you have in your stash!
How to Make a Selvage Quilt
Making a selvage quilt starts by first removing the selvage edges from the fabric. Try to cut them as straight as possible to give you a clean edge to work with. These strips can be small and difficult to maneuver, but you can always widen them by cutting ½” or so into the fabric to give you more area to sew.
Once you have your strips, you can begin to lay them out to form the pattern of your quilt. I often find it easier to lay them on top of a large piece of fabric that is the size of the quilt I want to make. This gives you something larger to sew the strips, though you don’t necessarily have to do this step to make your quilt.
Make sure that the raw edge of the selvage is facing inward. This allows you to layer the finished edge of your next strip over the raw edge to cover it as you work. Once you have your first two strips layered, stitch along the overlapped edges to hold the two strips in place.
Continue this process as you work your way across the piece. You can lay your strips straight across the fabric or angle them however you like. What is important is that they overlap enough for you to stitch them together.
Once you have your selvage pieces fully stitched together, you can proceed to quilt it like you would any other quilt top. Remember that this fabric will be thicker than standard fabric, and can require you to use a heavy-duty needle for your sewing machine. Selvage edges may be difficult to sew by hand.
Other Projects to Make with Selvage Strips
Quilts may be one of the most popular options for how to use up those extra selvage strips, but that’s not the only thing they can be used for! Consider trying one of the projects below to use up those extra scraps you have laying around.
Selvage Pillow
Instead of sewing strips together to make an entire quilt top, shape them into a square and make your own throw pillows! Create two equally-sized panels and place them together with the right-sides touching. Sew along the outer edge, leaving a 2-3” opening in the center of one of the sides.
Turn the pillow right-side out and stuff it with a filling of your choice. You can even use extra selvage pieces as stuffing if you have plenty on hand. Hand stitch the opening closed and you have a fun pillow to use around your house.
Wallet or Coin Purse
If you have smaller panels made of selvage strips, consider cutting them to make a wallet or coin purse! You can make a simple fold-over design that you secure with a button or a snap. Or, sew a zipper to close the edges to hold your coins in place.
On a larger scale, you could do the same thing to make a purse, tote bag, or another similar accessory to carry your belongings. These panels can be used in most places where you would normally use a thicker woven fabric.
Children’s Play Clothes
If you’re looking for a way to make affordable children’s clothing, try using your selvage scraps. Sew the scraps together into a single panel and then cut out your pattern pieces.
Sew them together how you normally would and you end up with a fun outfit that your kids can play all day in. You won’t have to feel bad if these clothes get dirty, since they didn’t cost you anything extra to make!
Conclusion
Many sewers cut off their selvage edges and discard them without ever realizing just how useful these pieces can be. The next time you use fabric with a selvage edge, try to see if you can spot the features we’ve described here. Finding the grain, choosing colors, and figuring out other important information about your fabric will be a breeze now that you’re a selvage expert!