Screen printing offers one of the most authentic and artistic ways to print designs onto fabric. Both beginners and advanced artisans can enjoy this gorgeous method of printing onto textiles. So, what exactly is screen printing?
Screen printing creates a design on fabric by forcing ink through a stenciled screen onto the cloth. Professional screen printers use a digital image and a light-exposed emulsion to craft intricate screens. Most screen prints use a thick plastisol ink that creates permanent designs on the fabric.
In this article, you will learn what screen printing is and how it works. You will find out what materials you need to get started with this process. Finally, you will discover the pros and cons of this popular printing method.
Quick Navigation
- What is Screen Printing on Shirts?
- How Does Screen Printing Work?
- What is Screen Printing Used for?
- Types of Screen Printing
- What Materials are Used in Screen Printing?
- Step by Step Screen Printing Process
- Screen Printing Advantages and Disadvantages
- How Long Does Screen Printing Take?
- Screen Printing Cost per Shirt
- How Long Does Screen Printing Last?
- What is a Screen Printer?
- How to Use a Screen Printing Machine for T-Shirts
- Best T-Shirt Fabric for Screen Printing
- How to Tell if a Shirt is Screen Printed?
- Silk Printing vs Screen Printing
- Screen Printing vs Heat Press
- Screen Printing for Beginners
- Conclusion
What is Screen Printing on Shirts?
Screen printing onto shirts is one of the most durable and artistic ways to create a textile design. To create a screen print on a shirt, an artist uses a squeegee to scrape thick dye across a stenciled screen. The dye goes through the negative space on the screen and soaks into the shirt’s fabric.
Modern screen printing typically uses a chemical process to create the stencils on each screen. Commercial printers also use large automatic screen printers that can hold lots of these stencils at once.
That said, the basic process of screen printing remains quite simple at its core. If you want, you can set up your own screen print using just a few simple tools at home. All you need is a mesh screen, plastisol ink, and a stencil made of vinyl or plastic.
Screen printing has an illustrious history as one of the world’s oldest forms of textile decoration. It originated in China during the Song dynasty. At this point, artists wove human hair into a fine mesh and push ink through this mesh onto silks to create a design.
Japan can take credit for introducing stencils, at first in simple geometric designs and later in more intricate images. This led to the wider popularization of printing onto textiles.
The modernization of the process took place in France around the 1700s. At this point, the method of stretching silk over a frame to create a taut screen took hold. This innovation is why you will also see screen printing referred to as “silk screening.”
You may also see the term “serigraph” thrown around. This mostly means hand-made, artistic forms of screen printing. Serigraph means “silk writing,” coming from the Latin word for silk (seri) and writing (graphos).
Today, commercial printers and anyone selling t-shirts typically use screen printing. An artist creating a one-of-a-kind print will more likely refer to this handiwork as a serigraph.
How Does Screen Printing Work?

Screen printing works by placing a stenciled design onto a shirt or piece of fabric. The process has a straightforward concept but can get more complex when used commercially to mass-produce prints.
The most fundamental process of screen printing goes like this: first, a printer creates a stencil. If you wanted to print an apple, for example, you would outline that blacks out the negative space around the shape of an apple.
Next, the printer places that stencil on top of a tightly stretched mesh screen. Traditionally, this screen would feature finely woven silk. Today, printers use cheaper polyester mesh.
The screen with its stencil rests on top of the fabric (or t-shirt).
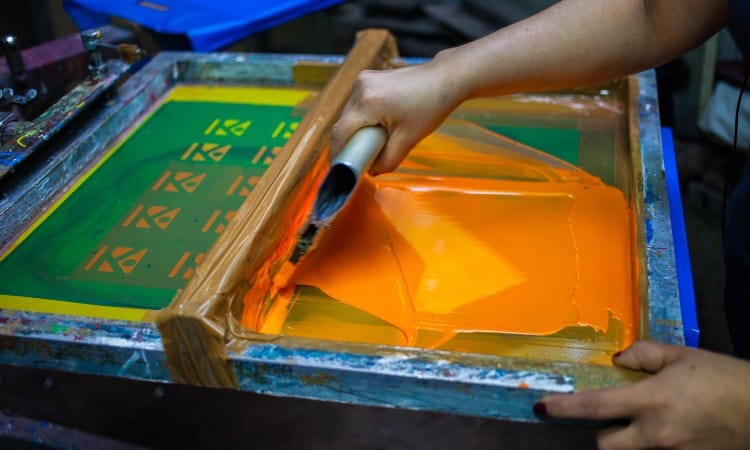
Finally, the printer uses a squeegee to push thick ink across the stencil and mesh. This pushes ink through the positive space in the design–the areas not blocked by the stencil.
When the printer removes the screen, the stenciled image remains on the fabric!
At its core, screen printing follows the basic pattern of stencil, screen, ink, squeegee, and finished design.
But of course, that is a massive oversimplification if you want to get into commercial printing. You can see how commercial printing works in the “how to screen print step by step” guide later in this article!
What is Screen Printing Used for?

Screen printing is used for high-quality graphic t-shirts and popular non-clothing items like stickers and banners.
The best-known use for screen printing technology is graphic t-shirts, hoodies, and tank tops. This printing method forms a raised design on fabric that lasts a long time. This type of design also looks more high-end than some other types of textile printing like DTG.
Simple designs like lettering, logos, and names all look great in this thick, clearly defined ink.
Screen printing can decorate stickers, posters, banners, balloons, and more!
Types of Screen Printing
You can use six different screen printing types: spot color, halftone, duotone, grayscale, simulated process printing, and CMYK. The most commonly used, by professionals and home artists, is spot color printing, though.
Spot-color screen printing uses the concept of pushing one solid color of ink through a stencil at a time.
If you want lettering in white and a rising sun behind the letters in yellow, you will use two different stencils. You would create two different screens and layer one on top of another to apply the yellow and then the white. This method works well on cotton textiles like t-shirts.
Half-tone printing mixes shades of one color of ink to create variations in hue. For example, you could start with magenta but then add a 50/50 blend of white to have a much paler shade of pink. This contrast can create images that look multi-colored.
Duotone printing works like sepia-tone photography. It is a form of multi-tone printing that uses black and colored dots of ink to form more intricate images.
Grayscale printing is exactly what it sounds like–it uses halftones of gray and black to create intricate black and white images. Professional screen printers like this method because it is one of the cheapest ways to screen print images onto shirts.
Simulated process printing has an advanced and digitized process that uses four-color spot-color printing techniques. Only professionals with advanced equipment will use this method. It can create photorealistic images, which other types of screen printing cannot accomplish.
The CMYK method of printing gets quite complex. It involves mixing the four basic print colors (cyan, magenta, yellow, and black) into unique shades for each image. Professionals use digitized mixing equipment to create these shades.
What Materials are Used in Screen Printing?
If you plan to try screen printing, you will need several key materials to get you started, such as screens, squeegees, and plastisol ink. Check out this guide to necessary materials and then find out how to use them in the next section on the step-by-step screen printing process!
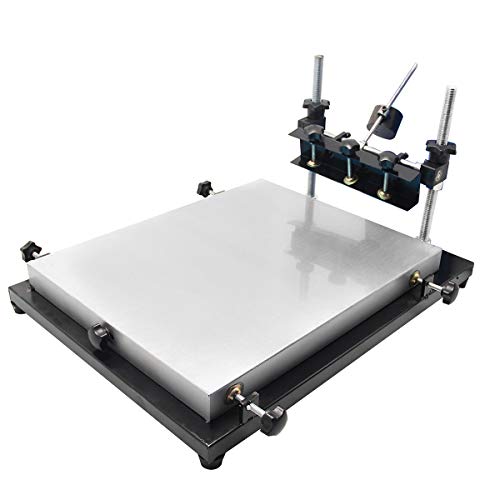
- Most screen printers use either a manual or automatic press that can hold the screen and the t-shirt or textile at the same time. Manual presses often have a clamshell shape and hold just one stencil at a time, while complex commercial presses will have arms to hold many screens at once. These presses can range in price from $80 to several thousand dollars.
- You will want to stock up on various mesh screens and frames. These come in coarser or finer weaves, known as the mesh count. The standard mesh count for printing onto cotton tees is 156, but you can also get screens with thicker or thinner thread and in white or yellow color for different projects.
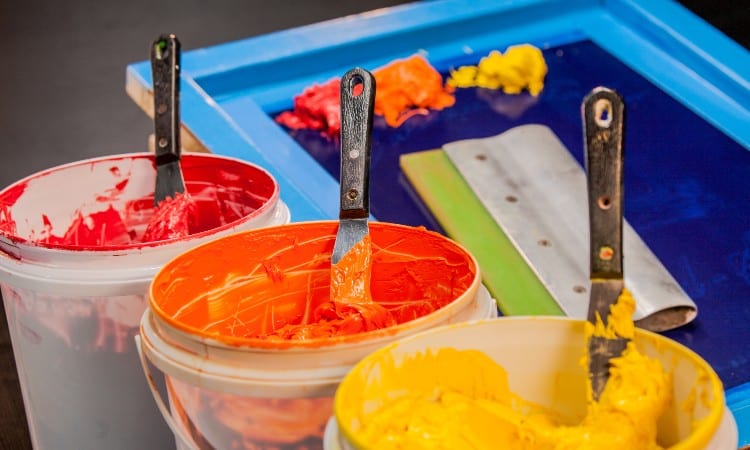
- You will also need a good quantity of plastisol inks for your print. If you have wondered what kind of paint is used in screen printing, it is a type of liquid plastic known as plastisol ink.
- To apply the plastisol ink in a smooth layer across the screen, you will need several different small squeegees. They look pretty much like the rubbery squeegees you might use to clean your windows at home!
- A heat press or heat gun will allow you to cure the design after printing it. Most home artists invest in a small heat press, but professionals may opt to get larger, more expensive models that can treat many items at once.
- You also need equipment for creating your stencils. This includes software to digitally design the image, the chemical emulsion to create a stencil out of this digital image, and exposure units to cure and prepare the emulsion.
Step by Step Screen Printing Process
This step-by-step screen printing process will show you the breakdown of the process most commonly used by commercial screen printers.
- First, the printer uses design software to make a digital form of the design. This design might feature nothing but simple lettering, or it could have a full-color image.
- Next, this design prints out onto clear sheets of acetate. For simple designs, one sheet may suffice. For designs involving more than one color, the printer has to separate the colors in the image and print out separate sheets for each one. These sheets will help make the stencils.
- The printer will select a polyester mesh screen based on the kind of design. For example, designs with many small details work best when printed through a fine mesh screen.
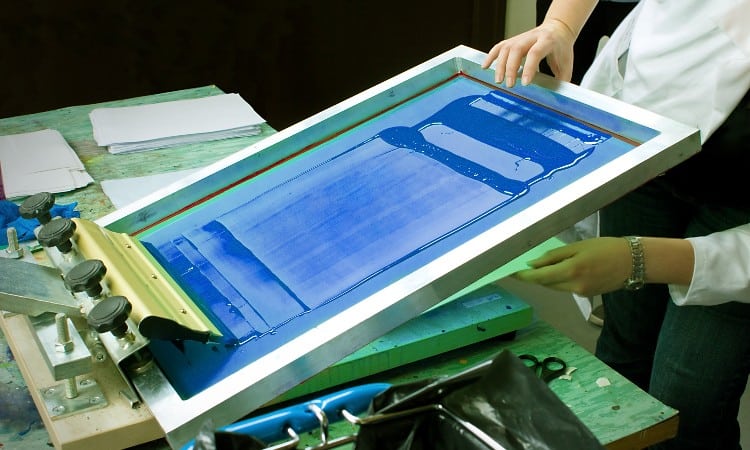
- Next, the printer will use a light emulsion process to transfer the design in stencil form onto the screen. The first step in this process is to paint a layer of a light-reactive emulsion onto the screen or screens.
- The printer will smooth each acetate sheet on top of the emulsion-coated screens. Keep in mind that each separate color in the design will require its own screen.
- Now the screens and acetate sheets go through intense exposure to light. Most commercial printers will use an exposure unit that puts out just the right amount of light for the process. The exposure process will harden the emulsion that does not have a printed design on the acetate sheet, creating a type of stencil.
- The last key step in preparing the stenciled screen is to rinse away the emulsion. During the rinsing process, the emulsion under the printed design will have a soft consistency and rinse away. This leaves the hardened, exposed emulsion to form a negative image of the design!
- Now the printer moves to the press or machine itself, arranging the shirts (or other materials) in a ready-to-print position.
- The screen slots into the arm of the press and the printer applies a thin line of plastisol ink across the top of the screen.
- The printer uses a squeegee to pull the ink down the length of the screen, crossing the stenciled portion. The squeegee forces ink through the stenciled screen and down onto the fabric!
- Finally, the design needs heat to help it remain permanent. Most commercial printers use large dryers for this purpose, but a heat press or heat gun can also work.
Screen Printing Advantages and Disadvantages
Like any popular technique, screen printing does have advantages and disadvantages. Check out this short list of the most important pros and cons of screen printing t-shirts.
The biggest advantages of screen printing include:
- Screen printing makes higher quality designs than other popular types of textile printing.
- It works well for printing in bulk as the stencils can get reused indefinitely to recreate the design on multiple shirts.
- It creates precise, raised lines perfect for shirts sporting lettering or a logo.
- It also works well for one-color designs because these require the least amount of time and money to produce using screen printing.
- The raised designs created by screen printing last a very long time because of the tough plastic nature of plastisol ink.
The disadvantages of screen printing include:
- The more colors you use in a design, the more involved and costly the process becomes. You have to create a separate screen for every color in every design. This means that a design involving three colors will take three times as much work and time to process as a one-color design.
- The process uses a ton of water when used on a commercial scale and is not eco-friendly as a result.
- Screen printing requires much more setup time than many other types of printing. Of course, once you have prepped the screens, you can keep using them, making this cost-effective and quicker for bulk orders than other types of printing! But it is cost prohibitive for small orders or customer prints.
How Long Does Screen Printing Take?
Screen printing a shirt can take as little as ten minutes to as long as a whole day, depending on the complexity of the job and the amount of set-up required.
The key difference in timing often comes down to the stenciled screens. It takes a while to harden the emulsion and then rinse it off each screen. If you have already prepped your stencils, you can print out new shirts in minutes. All you have to do is apply the ink to the back of the screen and use a squeegee to push it through!
But if you need to start from scratch and create a design and then use a light-reactive emulsion to create a stencil, you will have to plan for at least a full day, if not longer, before you can print your shirt.
You will also need to let the freshly-inked design rest for twenty minutes to an hour before drying it in some cases.
Screen Printing Cost per Shirt
It typically costs a t-shirt printer between $5-$9 to print a cotton shirt. This does depend greatly on the size of an order, though. You could quickly bulk print fifty shirts using the same design in less than an hour. But if you have to make new stencils and set them up for fifty different designs, you will need several weeks to get through them all!
For this reason, the cost per shirt goes down as the size of the order increases. It might cost you $7.50 per shirt to create 50 of the same shirt and only $4 per shirt to create an order of 300, all using the same design.
On the customer side, screen-print shirts often cost a bit more than DTG shirts because of the greater quality and durability. On average, custom screen print shirts can cost anywhere from $20-$30.
How Long Does Screen Printing Last?
Screen printed shirts should maintain the brightness and texture of the design through as many as 50 washes in a regular washing machine, which normally more than covers the lifespan of the shirt!
You can prolong the life of the design even more by turning your tees inside out before you wash them. Also, avoid leaving the shirts hanging in direct sunlight, as this could fade the colors in the design over time.
What is a Screen Printer?
 A screen printer provides a base to hold the blank and arms to hold the stenciled screens for each color in the design. Unlike a laser or inkjet printer, this type of “printer” does not actually apply the design itself. It simply offers an easy way to arrange all the components so you can use a squeegee to apply the ink yourself.
The two key things to consider about a screen printer are its size and whether it operates manually or automatically.
Basic screen printers often feature two or three arms for holding screens. This allows you to rotate through each separate color in a design, applying ink to the stencils one at a time. Most of these have small dimensions, measuring less than a 3-foot cube.
Small screen printers also require you to manually rotate the screens down onto the shirt before applying the ink. In many cases, you can find these at-home screen printers for around $100.
More advanced, extremely expensive screen printers can sometimes hold six or even more screens in a wheel-shaped configuration. Most of them come with automatic features for lifting and lowering the screens. This helps with multi-color designs because the machine can align all the screens so that the color layers line up with each other exactly.
These commercial-level models will take up a lot of space, often forming a six-foot diameter or even more! They always cost several thousand dollars as well. But for anyone planning to launch a t-shirt printing business, the commercial model will offer much quicker production times for bulk shirts orders.
How to Use a Screen Printing Machine for T-Shirts
Every screen printer will have slight variations, but you can follow these basic steps to use a screen print machine for t-shirts.
You will begin setting up your press after you have prepared the stenciled design on your screens.
- First, tape off the edges of each screen. This will help prevent seepage if you accidentally get too much ink on the stencil.
- Next, clamp the screens into the arms of the press. Your owner’s manual should provide a diagram showing how to do this.
- If you have an automatic machine, you can set it to register the colors and align the screens at this point.
- Apply pallet adhesive to help the shirt remain flat and unwrinkled as you print.
- Load your shirt and align the printhead holding the first screen over it.
- Flood the screen with ink.
- Use your squeegee to draw the ink across the design.
- For a multi-color design, flash-set each layer and repeat the steps here to apply the other colors one screen at a time.
Best T-Shirt Fabric for Screen Printing
The best t-shirt fabric for screen printing is 100% cotton or a blended fabric with a large percentage of cotton fibers.
Cotton has a high absorbency that reacts well with plastisol ink. That said, you can screen print onto many different surfaces, including plastic, wood, and some types of paper.
You can even screen print onto polyester, though the process gets more complicated and requires a different type of ink.
How to Tell if a Shirt is Screen Printed?
The easiest way to tell if a shirt is screen printed is to feel the texture of the printed design and check to see if it has a raised surface. Other types of fabric printing, like direct-to-garment, soak into the fabric and do not have a raised texture. Screen printing has an almost three-dimensional texture and a slightly plasticky feel.
Silk Printing vs Screen Printing
Silk printing and screen printing are the same processes, with different names. Back in the 1700s, manufacturers used real silk threads to make the screens they printed through. This inspired the popular term “silk screening” or “silk printing” to describe this style of decorated fabric.
Today, the term “screen printing” offers a little more accuracy since manufacturers no longer use screens made out of real silk. Instead, they use the more affordable option of polyester mesh screens.
Screen Printing vs Heat Press
The main difference between screen printing and heat transfer printing methods is that screen printing lasts longer and heat transfers cost less.
Digital heat transfers look like a piece of paper with a design printed onto it. This method uses solvent ink printed out of an inkjet printer onto special paper. Heat will then transfer that ink from the paper to the fabric of the shirt.
Digital heat transfers do have some advantages. They allow intricate images such as full-color photos. You can mass-produce hundreds of heat transfer sheets quickly, though you will still have to use a heat press to apply each sheet to a shirt.
That said, screen printing does create better quality and longer-lasting designs. The ink used in a heat transfer will soak down into the shirt and will eventually fade, crack, and disappear from the fabric.
Screen Printing for Beginners
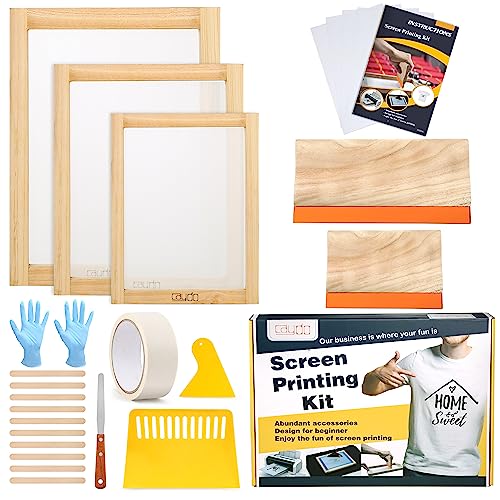 One of the best ways to get into screen printing as a beginner is to try a screen printing kit. This will help you figure out the basic steps of the process without investing in thousands of dollars of equipment!
The Caydo 23-piece screen print kit offers all the basic tools you need to create several designs. It has three frames in varying sizes, a squeegee, and other minor tools to help align each design. You will need to purchase your inks separately, though.
The Speedball Advanced all-in-one screen printing kit offers many more options, including the ability to create your own light-reactive emulsion stencils using a LED UV light that comes with the kit. This kit includes all the inks you need to create your first designs!
Conclusion
Screen printing uses ink pushed through stenciled screens to create crisp, raised designs on fabric. It is one of the most popular methods of printing graphic t-shirts. The screen printing process involves creating a digital design, transferring it to the screen through a light emulsion, and then spreading ink over the stencil using a squeegee.
The biggest advantage of screen printing is that it lasts a long time and is cost-effective for bulk orders. The biggest disadvantage of screen printing is that it takes more time and money to create multi-color designs using this method.