Stretchy fabric is famously difficult to work with because, well – it stretches! If you’ve ever tried to sew stretchy fabrics like you would regular woven fabrics, they’ve probably pulled, twisted, rolled, and snagged the entire time, making you want to scream. But stretchy fabrics don’t have to be frustrating to use, as long as you take the proper steps.
You can sew stretchy fabric on any regular sewing machine with a few adjustments. Use a zig-zag or stretch stitch that will move with the fabric, and switch to a ballpoint or stretch needle. You’ll want to sew slowly and steadily, to ensure your fabric doesn’t roll or twist.
Stretchy fabrics don’t have to stress you out. Follow along as we walk you through exactly what to do to ensure you know how to sew stretchy fabric the right way!

Quick Navigation
- Can You Sew Stretchy Fabric With a Regular Sewing Machine?
- What Needle Should You Use for Stretch Fabric?
- Best Thread for Stretchy Fabric
- What is the Best Stitch for Stretchy Fabric?
- What Presser Foot to Use for Stretch Fabric?
- How to Sew Stretchy Fabric
- Sewing Machine Settings for Stretchy Fabric
- How to Sew Stretchy Fabric by Hand
- How to Choose the Right Fabric
- Why Is My Sewing Machine Skipping Stitches?
- How Do I Keep Fabric From Bunching Up As I Sew?
- Can You Sew Stretchy Fabric with a Straight Stitch?
- Conclusion
Can You Sew Stretchy Fabric With a Regular Sewing Machine?
There’s no need to stress! Your regular home sewing machine will work perfectly for this task. Most modern machines come with settings that can be adjusted to handle stretchy fabrics. You can also switch out your usual needle and presser foot for alternatives designed to work better with these materials.
The real ticket here is to prepare in advance before sewing your fabrics. This means gathering the right supplies and preparing the fabric in specific ways. If you do, your regular sewing machine will tackle the job with ease.
What Needle Should You Use for Stretch Fabric?
 The first step to tackling stretchy fabrics is to use the right needle. Stretch needles, also known as ‘ball point needles,’ are more rounded than typical sewing needles. They are specially designed to move easily within the loops of stretchier fabrics.
Part of this design comes from their special coatings, which help them glide through the more rubbery fibers that make up stretch fabrics. This is especially helpful for elastic-based materials.
In the end, how sharp your needle’s tip is may seem like a small detail. But making the switch can improve your sewing by helping to prevent skipped or poorly formed stitches. The end results are projects that are better formed, that stand up to everyday wear and tear.
Best Thread for Stretchy Fabric
 If you’re a regular sewer, you probably have a tried-and-true type of thread you like to use for your projects. But stretchy fabric doesn’t always work well with threads that are rigid and reluctant to stretch. You’ll want to avoid cotton thread, as it has no give at all.
Instead, pull out a trusty polyester or nylon thread to use with these fabrics. Polyester will usually have a little bit of stretch itself, helping the stitches to move along with the fabric as it is pulled. Polyester all-purpose threads are widely available at most crafting stores.
You may see elastic thread options when you’re out buying your supplies, but you’ll want to use them with caution. Elastic thread can be a good choice when you’re trying to make clothing that is form-fitting to the body. It stretches far more than any other type of thread, often rivaling the stretch of the fabric you are sewing with.
However, you’ll need to be sure to only add it to the bobbin of your machine and to wind it by hand. This can still be challenging, so you can also use elastic thread to hand sew stretchy fabrics. Either way, remember that this thread can be very tricky to use and that polyester may be the best option, to begin with.
What is the Best Stitch for Stretchy Fabric?

Once you’ve changed your needle and chosen the best thread, you’ll need to use the right sewing stitch on your fabric. The typical stitch that most machines default to is a straight stitch, but this option won’t stretch much at all. Stitches made this way won’t bend and flex with the fabric as it is pulled, and can even break if pulled too far.
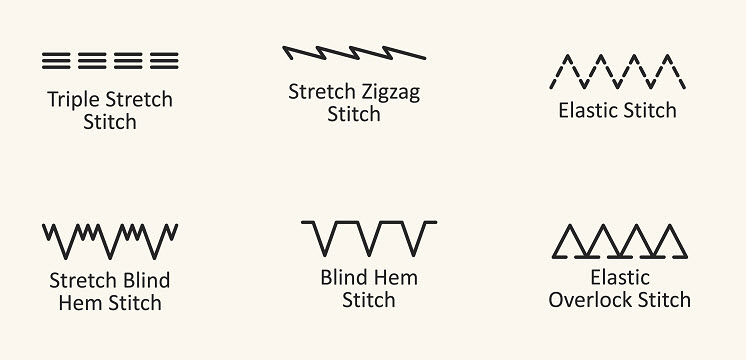
Most modern sewing machines will come with a stretch stitch setting, which is often called the ‘lightning bolt’ stitch. It’s a simple enough stitch to recognize on your machine because it looks like the lightning bolt it gets its name from. Stretch stitches flex well with the fabric as it moves, making your seams strong and stable.
If your machine doesn’t have a stretch stitch, go for a classic zigzag stitch instead. The zigzag pattern will stretch along with the fabric as it is pulled, while still being strong and sturdy. You can make the zigzag stitch as wide or narrow as you’d like, based on the final look you are going for.
What Presser Foot to Use for Stretch Fabric?
 If you make the changes we’ve already discussed, you should be able to sew stretchy fabrics with no fuss! However, some sewing machines still struggle with these fabrics because they get caught in the presser foot or feed dogs of the machine.
A lot of this trouble comes because standard presser feet only pull the fabric through using feed dogs underneath the fabric. The feed dogs pull the bottom layer of your project through at a faster rate than the top, stretching your fabric unevenly. The uneven pulling can lead to excess fabric on the bottom being caught in your machine as it passes through.
A walking foot or dual feed attachment is often the best way to keep fabrics from catching on your machine. These attachments add an extra set of feed dogs to your machine that grips the top of the fabric as it is pulled through. This helps to pull even the most difficult of fabrics through the machine at a steady speed and tension.
Be sure to only use foot attachments that are designed for your machine model. You can always check the manual of your machine to see which attachments the manufacturer recommends for your model.
How to Sew Stretchy Fabric

Once you have all of your supplies, it’s time to sew your stretchy fabric!
1. Prepare Fabric
It’s always a good idea to pre-wash fabrics before sewing, but stretchy fabrics really require this step to work properly. These fabrics can shrink considerably after washing, meaning that any garments you make can end up much smaller than you intended!
Wash and dry your fabric however you normally would launder your clothes. Be sure to dry them as you normally would, as well before laying out your pattern and cutting your fabric. Due to the amount of shrinkage, you’ll likely want to purchase more fabric than your pattern calls for to ensure you have enough to work with.
2. Mark Fabric
After you have pre-washed and dried your fabric, it’s time to lay out your pattern. You can use a temporary adhesive spray to stick your pattern to your fabric to make this part easier!
Begin by finding the grain of the fabric, and aligning your pieces with the grain. This will keep fabric orientations consistent and let the fabric stretch to make your new clothing more comfortable.
Once you have laid out your fabric in the right direction, use a sliver of soap to outline your pattern pieces. This might sound unusual, but the soap will mark your fabric without bunching it up. It washes out easily and is an excellent way to use up any leftover soap you may have lying around!
If soap isn’t the right option for you, there are a number of washable sewing pens available on the market you could use. However, because of the stretchiness of this fabric, you will want to be careful not to let the pens pull the fabric as you mark. If you do, you could accidentally mark your pieces in odd shapes.
3. Cut Fabric
With stretchy fabric, you’ll want to use an extra sharp blade to cut clean lines. This is true whether you use your trusty fabric scissors or a rotary blade. Dull blades will require you to make more cuts, increasing your chances of cutting crooked.
Once you have your tools in hand, you can begin cutting your pre-marked pieces. Cut slow and steady, and be sure not to stretch or pull the fabric as you do so. If you pull the fabric as you work, you may accidentally cut your pieces irregularly.
One of the best ways to ensure your tension is even is to lay the fabric flat on a table as you cut. Be careful not to let the fabric drape over the sides, as this could pull and stretch it as you work.
4. Preventing Curled Edges
If you’ve ever dealt with stretchy fabric before, you’ve probably been frustrated by edges that never seem to stop curling. You can use pattern weights to weigh the edges down, but these can be clunky and get in your way. Instead, try using fabric starch to help stabilize the edges of the fabric as you work.
If you don’t have fabric starch on hand, there are a few common household products that you can try. Hair spray used along the edges can help prevent curling and fraying. You can also dip the fabric into lukewarm water with a bit of added soap, before allowing it to air dry lying flat.
Be careful when trying options like ironing, as some stretchy fibers cannot handle the heat. Always check the materials that the fabric is made of to ensure you won’t damage it as you iron. When in doubt, iron the back side of the fabric to help prevent blemishes on the front.
5. Stabilize the Fabric
You can also make your sewing process easier by stabilizing your fabric before you sew. There are a number of stabilizing materials on the market that you can apply to the back of the fabric before you cut it. These stabilizers come in options that wash away the first time you wet the fabric, making it easy to remove them when your project is finished. These stabilizers will help keep your fabric in the same position as you work. They’ll prevent it from stretching oddly, or even from curling up as you cut or sew.
6. General Techniques for Sewing
Even with all of the preparation in the world, your success may still come down to how well you handle the fabric as you sew it. Generally, you want to keep the tension of the fabric consistent as you work with it. This will prevent it from stretching or pulling in odd places and ruining the overall shape.
You’ll also want to make sure to sew with a consistent speed. Sewing too fast can cause your fabric to bunch up and align in strange ways. Sewing too slowly can cause it to get pulled into the gaps in your sewing plate, potentially ruining the fabric as it gets trapped in your machine.
Steady work and consistent handling are key to sewing knit fabrics.
7. Finish the Seams
Stretch stitches can sometimes make it look like there are gaps in your seams, which don’t give the clean appearance you’ll want on your new clothing. To help with this, gently press open your seams to allow the fabric to align properly and fill in any gaps that form. This will also help your clothing to lay better as you wear it, giving it an overall better shape.
Stretch fabrics will not fray, so there is no need to finish the seams with a serger or a hem. This step is optional and entirely your own choice. If you do choose to finish the seams in one of these ways, be sure to choose a stitch that will still let it stretch.
8. Hemming Stretchy Fabric
Hemming is an important step to finishing your clothing, but it can be tricky to get right. If you use the wrong stitch, your openings could become too tight to wear comfortably. You won’t be happy if all your hard work ends with a shirt that won’t stretch over your head!
Fortunately, stretchy fabrics won’t fray. This means you can do a simple foldover around the outer edge of the fabric, before hemming with a zigzag or stretch stitch. You’ll want to avoid a straight stitch, which won’t allow your hem to stretch and may make your clothing difficult or uncomfortable to wear.
Hemming can be done with your sewing machine, or by hand, if you prefer. Hemming by hand will enable you to space out your stitches and even use an elastic thread to help keep the edges stretchy. Be sure to pin your hem and mark where to sew to keep your hand-sewn hems even.
Sewing Machine Settings for Stretchy Fabric
As you set up your sewing machine for stretchy fabric, you may need to adjust the default settings you normally use.
If you’re sewing with lightweight stretchy fabrics, try reducing the foot pressure to 1 in order to get a steady stitch. You won’t need very much pressure to pull these fabrics through the machine. You may also want to use stretch stitches that are shorter in length. Aim for stitches that are around 1 mm in length.
For medium-weight fabrics, your ideal foot pressure may be in the 1-2 range. This will pull the fabric into the machine a bit stronger than with lighter fabrics, to make up for the additional weight. You can also use slightly larger stitch lengths, around 1.5 – 2 mm in length for a zigzag stitch.
With heavy-weight fabrics, you’ll probably need a higher foot pressure between 3 and 4. This will help the heavy fabric to feed into the machine at a steady pace even with its added weight. You’ll also want to lengthen your stitches considerably, around 4 mm in length.
How to Sew Stretchy Fabric by Hand
Stretchy fabrics can be sewn by hand, as long as you take steps to keep your stitches consistent as you work. Measure and mark where you want your stitches to lay and use the markings as your guide.
The easiest stitch to use while hand sewing is the zigzag stitch. You’ll want to start by marking evenly spaced dots along the seam you’re creating. These will be the points where your needle will enter the fabric. Begin sewing by connecting two dots using a vertical line, then make a stitch diagonally to reach the next stitch.
You can continue sewing your zigzag stitch by alternating vertical and diagonal lines as you work your way across the fabric. You can adjust the size of your stitches by changing the placement of your markings along your piece.
How to Choose the Right Fabric

An important part of sewing with stretchy fabrics is understanding the various types available to use. Each individual fabric will stretch to different degrees, which can affect the overall comfort and fit of your garment. There’s nothing worse than using a fabric with the wrong stretch and ending up with clothes that fit all wrong!
Stretch Percentage
If you’re sewing with a pattern meant for stretchy fabrics, it may include a percentage (%) of stretch your fabric will need to have. When you purchase your fabrics, the percent of stretch may be listed on the label of the bolt. If it is not, you can calculate the stretch yourself.
Cut a 3-inch square from the fabric, and stretch it as far as it will go. Measure this width, and then divide it by one less than the original width – in this case, 2. As an example, if your 3-inch square stretches to 9-inches, you would divide 9 by 2 to get a final number of 0.45. This number is equivalent to 45%, meaning that the fabric has a 45% stretch overall.
Be sure to check your pattern closely to ensure you’ve chosen a fabric with the correct amount of stretch. Some patterns may even come with a stitch measurer, for you to place on your fabric and test to ensure it stretches to the extent the pattern calls for.
Stretch Direction
Another key part of stretchy fabric is the direction of its stretch. Most stretchy fabrics will be either a two-way or four-way stretch. Fabrics with four-way stretch can stretch in any direction you pull them. Meanwhile, a two-way fabric will only stretch horizontally or vertically.
Many fabric manufacturers will label the stretch direction of their fabric. If they don’t, you can figure this out by stretching a small piece of the fabric yourself. If you can pull it evenly in all four directions, it has a four-way stretch. If you can only stretch it horizontally or vertically, it has a two-way stretch.
Why Is My Sewing Machine Skipping Stitches?
With stretchy fabrics, the usual culprits for skipped stitches are the needle and thread you are using. If you are using a needle that is all-purpose, it will be too sharp and may cause your stitches to skip. Use a ballpoint needle or stretch needle instead.
As for the thread, avoid using cotton thread or other non-stretchy options. Stick to a polyester thread that has a bit of natural stretch to move with the fabric so it expands without breaking stitches.
How Do I Keep Fabric From Bunching Up As I Sew?
Your fabric is probably bunching because it is getting pulled through the machine at an inconsistent speed. This is usually because a typical sewing machine only has feed dogs underneath the fabric. The bottom fabric will be pulled through faster than the top, causing it to bunch up.
You can fix this by using a walking foot or other foot attachment that has feed dogs for the top of the fabric as well. This will pull the fabric through at a more consistent speed and help prevent bunching. Also be sure to keep a slow, steady speed as you sew.
Can You Sew Stretchy Fabric with a Straight Stitch?
It’s not usually a good idea to sew stretchy fabric with a straight stitch if you want it to keep its stretchiness. Straight stitches won’t move with the fabric as it expands, and will often break if pulled too far.
However, if you’re sewing a portion of your garment that you don’t want to stretch, you could use a straight stitch to keep the fabric in place. This could be useful for straps, ties, or other more fixed embellishments on your garment.
Conclusion
Stretchy fabric doesn’t have to be intimidating to work with, especially if you keep in mind the tips we’ve discussed here. Work slowly and steadily, and make sure you have the right equipment to tackle this tricky fabric. Be sure to keep this page handy as you work, to help answer any questions that may come up along the way!